Pokazywanie postów oznaczonych etykietą Kind Of Black. Pokaż wszystkie posty

wtorek, 13 września 2016

Spóźnione Tropiki

Late Tropics

Aloha?
To jedyne tropikalne powitanie jakie przyszło mi do głowy :D Zazwyczaj ludzie robią tropikalne, neonowe i wakacyjne mani gdzieś w okolicach lipca i sierpnia, ale ja jak zwykle jestem trochę spóźniona.. Przynajmniej wciąż jest lato, prawda? :D

Aloha?
This is the only tropical hallo that I could think of :D Normally people make tropical, neon and summery manicures somewhere during July and August, but as always I'm a little late.. At least it's still summer, right? :D


Kolor bazowy jakiego tutaj użyłam to jaskrawy, neonowy żółty - El Corazon Matte Effect Neon 141. Nałożyłam dwie warstwy i tyle wystarczyło do uzyskania pełnego krycia. Ten lakier miał raczej gęstą formułę, ale dla mnie do ogarnięcia. Jeśli chodzi o neony to wolę mieć gęstszą konsystencję i fajne krycia niż być zmuszoną do nakładania niezliczonej ilości warstw.

The base colour I used here is a bright, neon yellow - El Corazon Matte Effect Neon 141. I applied two coats and that was enough to achieve full opacity. This polish had a thicker formula, but for me manageable. When it comes to neons I rather have a thicker formula and nice opacity than to be forced to apply countless amounts of coats.


Wzór jaki możecie zobaczyć na moich paznokciach pochodzi z płytki MoYou London Tropical 14. Odbiłam go lakierem do stempli Colour Alike Kind Of Black i Stemplem B. Loves Plates Jumbo. Zdecydowałam się też dodać trochę koloru kwiatom plumerii przy pomocy mojego chińskiego tint'a 04. Tint ma neonowo rózowy kolor, ale na żółtej bazie wygląda bardziej na koralową czerwień. Więcej na temat różnych rodzajów tintów jakich używam możecie poczytać TUTAJ i TUTAJ.

The design You can see on my nails comes from MoYou London Tropical 14 plate. I stamped it with Colour Alike Kind Of Black stamping polish and B. Loves Plates Jumbo Stamper. I also decided to colour the plumeria flowers with my Chinese tint 04. The tint has a neon pink colour, but on the yellow base it looks more like a coral red. You can read more about all kinds of tints I use HERE and HERE.


Manicure jest jak zawsze zabezpieczony jedną warstwą Golden Rose Gel Look (żeby zapobiec rozmazaniu wzoru) i jedną warstwą INM Out The Door (żeby wszystko szybciej wyschło).

The manicure is just like always secured with one coat of Golden Rose Gel Look (to prevent smudging the design) and one coat of INM Out The Door (to make everything dry quicker).


Poniżej możecie zobaczyć śliczną płytkę Tropical 14 od MoYou London..

Below You can see the lovely Tropical 14 plate from MoYou London..

Źródło: http://moyou.co.uk/
..i większość produktów jakich użyłam do stworzenia tego mani.

..and most of the products I used to create this manicure.


niedziela, 17 lipca 2016

Double Stamping Vol.1

Cześć Wam!
Ostatnio widuję coraz więcej mani z podwójnymi stemplami. Nie mogłam sie oprzeć zrobieniu czegoś z użyciem tej techniki na swoich paznokciach. Mam nadzieję, że spodoba Wam się moja propozycja, juz teraz mogę Wam powiedzieć, że nie będzie ostatnią ;)

Hi there!
Lately I see more and more manicures with double stamping. I couldn't resist doing something using this technique on my nails. I hope You'll like my proposition, I can tell You right now that it won't be the last one ;)


Jako bazy w tym mani użyłam mojego absolutnie ulubionego bladego, różowawego nudziaka - Color Club New-Tral. Potrzebowałam dwóch warstw do pełnego krycia. Kocham ten lakier i używam go zaskakująco czesto zważywszy na wielkość mojej kolekcji.

As a base in this manicure I used my all time favourite pale, pinkish nude colour - Color Club New-Tral. I needed two coats to get full opacity. I love this nail polish and I use it surprisingly often considering the size of my collection.


Oba stemplowe wzorki jakich użyłam pochodzą z płytki Uber Chic 3-03. Pierwszy był odbity lakierem do stempli Kaleidoscope No.14 Fuchsia i Stemplem B. Loves Plates Jumbo. Drugi Colour Alike Kind Of Black i Stemplem B. Loves Plates Crystal Clear żeby wypozycjonować wzór tak samo na każdym paznokciu.

Both stamping designs I used come from Uber Chic 3-03 plate. The first one was stamped with Kaleidoscope No.14 Fuchsia stamping polish and B. Loves Plates Jumbo Stamper. The second one with Colour Alike Kind Of Black and B. Loves Plates Crystal Clear Stamper to position the design equally on each nail.


Tak jak zawsze zabezpieczyłam zdobienie jedną warstwą Golden Rose Gel Look i jedną warstwą INM Out The Door.

Like always I secured the nail art with one coat of Golden Rose Gel Look and one coat of INM Out The Door.


Poniżej możecie zobaczyć płytkę UC..

Below You can see the UC plate..

Źródło: http://uberchicbeauty.com/

...i większość produktów jakich użyłam do stworzenia tego zdobienia.

...and the most of the product I used to create me nail art.


niedziela, 10 lipca 2016

Inspirowane Kwiaty

Inspired Flowers

Cześć,
dzisiaj mam mani bardzo mocno inspirowane TYM zdobieniem zrobionym przez Yasinisi. Uwielbiam jej pomysły i pamiętam, że jak zobaczyłam te kwiaty to oniemiałam. Po prostu wiedziałam, że któregoś dnia powtórzę je u siebie i dziś jest ten dzień ;)

Hi,
today I have a manicure strongly inspired by THIS nail art made by Yasinisi. I love her ideas and I remember that I was stunned when I first saw these flowers. I just knew I would make them on my nails someday and today is the day ;)


Kolor bazowy jaki nałożyłam to Kiko 510 Mauve Grey. Użyłam dwóch średnich warstw żeby osiągnąć pełne krycia. Jest on trochę ciemniejszy niż baza wybrana przez Yasinisi, ale lakier Kiko wpadł mi w oko. Pokryłam go również jedną warstwą brokatowej mgiełki Orly Love Each Other.

The base colour I applied is Kiko 510 Mauve Grey. I used two medium coats to achieve full coverage. It's slightly darker than the base chosen by Yasinisi, but the Kiko polish caught my eye. I also covered it with one coat of Orly Love Each Other glitter mist.


Cudny kwiatowy wzór jaki możecie tutaj zobaczyć pochodzi z płytki Uber Chic 1-03. Odbiłam go lakierem do stempli Colour Alike Kind Of Black i Stemplem Uber Chic XL Clear żeby kontrolować rozkład wzoru. Nie tak dawno kupiłam przezroczysty stempel XL z Aliexpress i zamieniłam gumkę na tą z UC.

The amazing flower design You can see here comes from Uber Chic 1-03 plate. I stamped it with Colour Alike Kind Of Black stamping polish and the Uber Chic XL Clear Stamper to control the placement of the design. I recently bought a XL Clear stamper from Aliexpress and switched the head for the UC one.


Moim następnym krokiem było zabezpieczenie wzoru warstwą Golden Rose Gel Look i pokolorowanie brzegów płatków kwiatów tintem DIY. Wybrałam fioletowy tint z numerkiem 11. O tym jak zrobiłam moje tinty możecie poczytać TUTAJ. Na koniec dodałam trochę mikro ćwieków od Born Pretty Store żeby wykończyć zdobienie. Są one ekstremalnie małe - 0,8mm, możecie je znaleźć TUTAJ. Wybrałam ćwieki zamiast bulionu ponieważ bardziej przylegają do powierzchni paznokcia, łatwiej nałożyć na nie top coat i jest mniejsze ryzyko, że odpadną.

My next step was securing the design with a layer of Golden Rose Gel Look and colouring the edges of the flower petals with a DIY tint. I chose a purple tint with the number 11. You can read how I made my tints HERE. In the end I added some micro studs from Born Pretty Store to complete the look. They're extremely small - 0,8mm, You can find them HERE. I chose studs over caviar because they're more fay to the surface of the nail, it's easier to put top coat over them and there's less risk of them coming off.


Poniżej jest płytka UC jakiej użyłam..

Below is the UC plate I used..

Źródło: http://uberchicbeauty.com/

..i wszystkie produkty.

..and all of the products.


poniedziałek, 27 czerwca 2016

Mint And Lace

Hej!
Dalej mam Wam do pokazania sporo mani, więc to które zobaczycie dzisiaj jest dość stare.. Mam jednak nadzieje, że Wam przypadnie do gustu. Mi osobiście strasznie się podobało jak koronkowy wzór wyglądał na paznokciach.

Hey!
I still have a lot of manicures to show You, so the one You'll see today is quite old.. I hope You'll like it though. I personally loved the way the lace design looked on the nails.


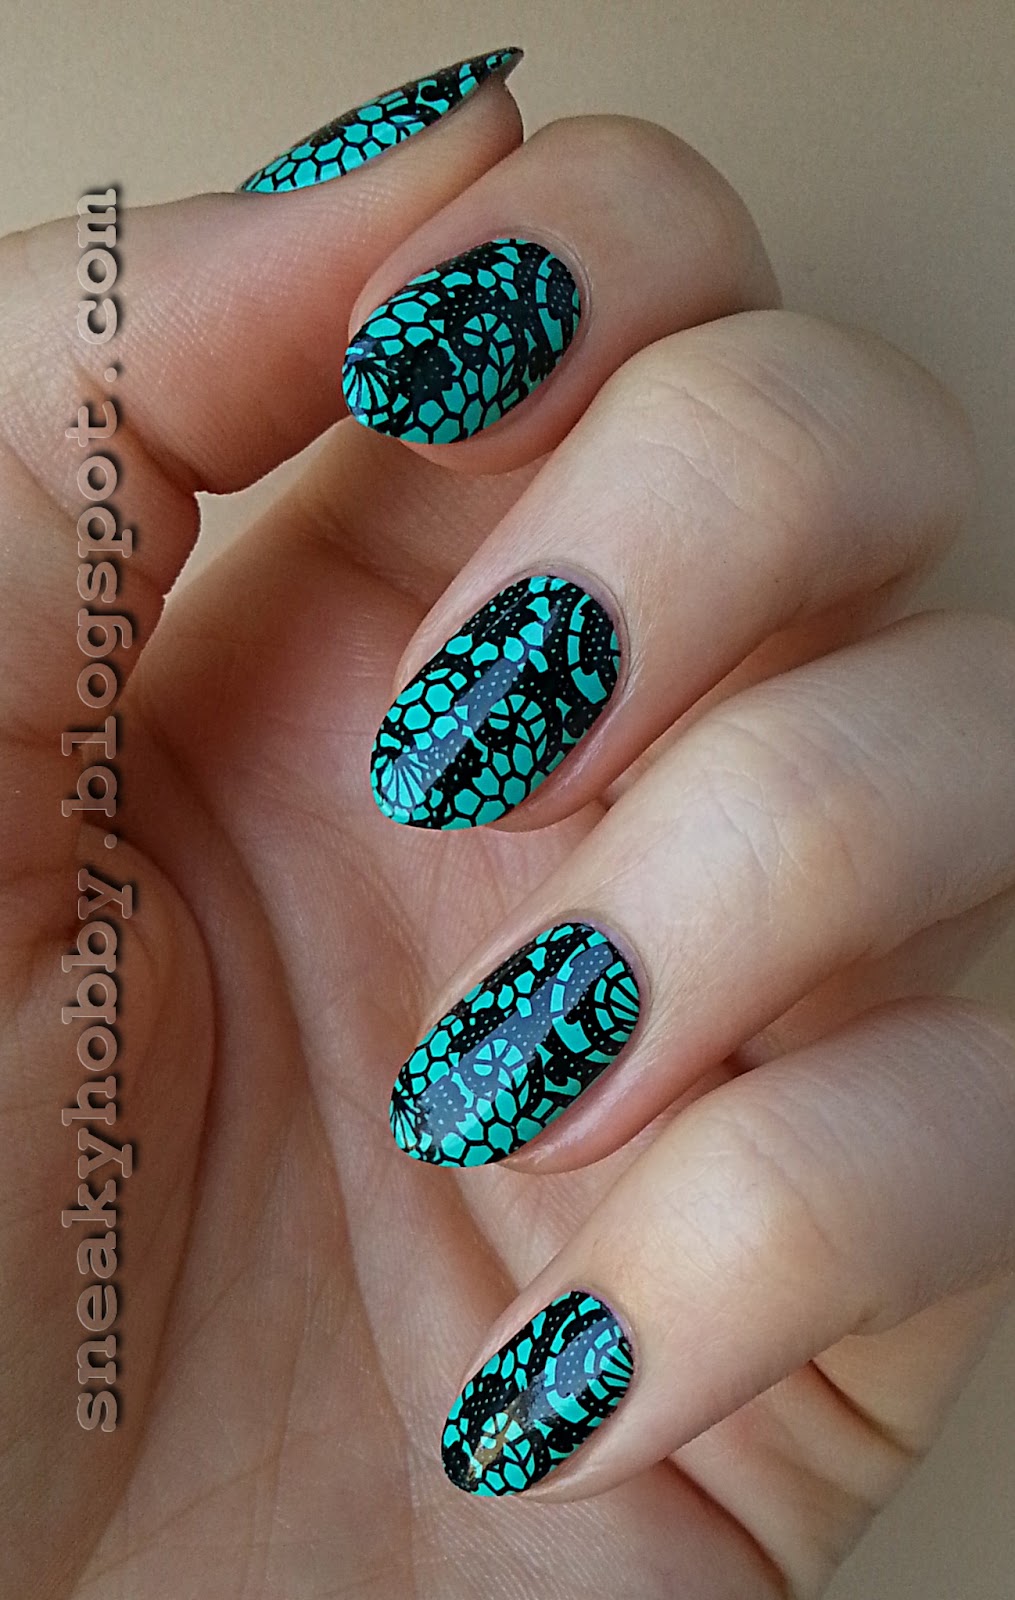
Tak jak sugeruje tytuł posta, bazą w tym mani jest bardzo żywy odcień mięty. Użyłam dwóch warstw Kiko 526 Mint. Już prawdopodobnie wiecie jak bardzo lubię lakiery Kiko, ale uwierzcie jak napiszę to po raz kolejny - te produkty są tak proste w obsłudze, kryjące i mają precyzyjny kształt pędzelka.

Just like the title of the post indicates, the base in this manicure is a very vibrant shade of mint. I used two coats of Kiko 526 Mint. You probably know by now how much I like Kiko polishes, but believe me when I write it again - these products are so easy to work with, opaque and have a precise brush shape.


Uroczy koronkowy wzór jakiego tutaj użyłam pochodzi z płytki Uber Chic Paris In Love. Odbiłam go lakierem do stempli Colour Alike Kind Of Black i Stempla B. Loves Plates Jumbo. Jak widzicie ta kombinacja zadziałała świetnie, wzór przeniósł się perfekcyjnie.

The lovely lace design I used here comes from Uber Chic Paris In Love plate. I stamped it with Colour Alike Kind Of Black stamping polish and B. Loves Plates Jumbo Stamper. As You can see this combination worked amazing, the design transferred perfectly.


Jak zwykle zabezpieczyłam mani jedna warstwą Golden Rose Gel Look, który jest (jak narazie) jedynym top coat'em nierozmazującym ekstremalnie zdobień. Ostatnio jednak mam wrażenie, że firma coś zmieniła, bo coraz częściej zdarza mi się zniszczyć manicure nakładając ten top coat. Zawsze czekam dość długo po odbiciu wzoru, więc jestem pewna, że wysechł całkowicie, ale nawet wtedy top coat go rozmazuje. Dzieje się to również z każdym lakierem do stempli. Fakt, mam ciężką rękę i tendencję do dociskania pędzelka do paznokcia podczas nakładania lakieru i top coat'u. To głównie dlatego rozmazywanie ma miejsce, ale kilka buteleczek temu nie musiałam być aż tak ekstremalnie ostrożna z tym konkretnym top'em. Ostatnimi czasy czuję, że muszę prawie trzymać pędzelek w powietrzu żeby uniknąć rozmazania nail art'u. Jeśli macie jakieś podpowiedzi top coat'owe albo sprawdzone produkty, dajcie mi proszę znać w komentarzach.

As usual I secured my nail art with one coat of Golden Rose Gel Look, which is the only top coat (so far) that doesn't extremely smudge nail art. Recently though I have a feeling that the brand changed something, because more and more often I ruin my manicure applying this top coat. I always wait quite a while after stamping the design, so I'm sure it dries fully, but even then the top coat smears it. This also happens with every brand of stamping polishes. I do have a heavy hand and tend to press the brush onto the nail when I apply nail polish or top coat. that's mainly why smudging happens, but a few bottles ago I didn't have to be so extremely cautious with this particular top coat. Nowadays I feel like I almost have to hold the brush in the air to avoid smearing my nail art. If You have any top coat tips, or verified products please let me know in the comments.


Poniżej możecie zobaczyć płytkę jakiej użyłam...

Below You can see the plate I used...


...i główne produkty.

...and the main products.


sobota, 25 czerwca 2016

Tropikalne Kwiaty Wiśni?

Tropical Cherry Blossoms?

Cześć!
Dawno, dawno temu zrobiłam delikatny manicure z kwiatami wiśni używając płytki Uber Chic. Był on bardzo konwencjonalny - jasny i w standardowych kolorach. Tym razem mam ten sam motyw na paznokciach, ale w całkiem innym wydaniu.

Hello!
Once upon a time I did a delicate manicure with cherry blossoms using a Uber Chic plate. It was very conventional - light and in standard colours. This time I have the same theme on my nails, but in a totally different take.


Mój poprzedni manicure z kwiatami wiśni jest TUTAJ. Jak widzicie wzór jakiego użyłam nie jest tym samym, tym razem jest to obrazek negative space. To pierwsza duża różnica. Druga to kolory. Muszę przyznać, że nie przemyślałam tego mani. Pomalowałam paznokcie dwoma warstwami Kiko 485 Pearly Coral Rose. To koral, który zależnie od oświetlenia jest albo bardziej różowy albo pomarańczowy, ma również dużo złotego shimmer'u w środku. Kiedy moja baza była gotowa zaczęłam po prostu szukać fajnego i łatwego stemplowego wzorka..

My previous cherry blossom manicure is HERE. As You can see the design I used isn't the same one, this time it's a negative space image. That's the first big difference. The second one is the colours. I have to admit that I didn't think this manicure through. I painted my nails with two coats of Kiko 485 Pearly Coral Rose. This is a coral that depending on lighting is either more pink or orange, it also has lots of gold shimmer inside. When my base was ready I just started searching for a nice and easy stamping design..


Jakimś sposobem skończyło się na zrobieniu kwiatów wiśni na kolorze, który dużo bardziej pasowałby do tropikalnych kwiatów. Cóż, to cała ja :D Nie mogłam wyrzucić z głowy tego wzorka jak już go zobaczyłam i nie mogłam zadowolić się niczym innym. Tym sposobem powstały tropikalne kwiaty wiśni :D:D:D

Somehow I ended up doing cherry blossoms on a colour that would suit tropical flowers much better. Well, that's just all me :D I couldn't get this design out of my head once I saw it and just couldn't settle for anything else. That's how tropical cherry blossoms were born :D:D:D


Płytka jakiej użyłam żeby stworzyć to zdobienie to Uber Chic 7-01. Użyłam też Colour Alike Kind Of Black i Stempla B. Loves Plates Jumbo. Manicure jest pokryty jedną warstwą Golden Rose Gel Look i jedną warstwą INM Out The Door.

The plate I used to create this nail art is Uber Chic 7-01. I also used Colour Alike Kind Of Black and the B. Loves Plates Jumbo Stamper. The manicure is covered with one coat of Golden Rose Gel Look and one coat of INM Out The Door.


Tutaj jest płytka Uber Chic 7-01...

Here's the Uber Chic 7-01 plate...


...a tutaj produkty jakich użyłam.

...and here are the products I used.


piątek, 17 czerwca 2016

Paisley Manicure

Cześć Wam!
Minęło taaaaaak długo od mojego ostatniego postu.. Tęskniłyście??? Miałam trochę problemów z komputerem, trochę wypadków paznokciowych i sporo innych rzeczy, którymi musiałam się zająć. Nie mogłam znaleźć ani czasu ani energii żeby pisać, ale teraz - wróciłam! Na mój powrót mam Wam do pokazania śliczny paisley manicure.

Hi there!
It's been soooooo long since my last post.. Did You miss me??? I had some problems with my computer, some nail accidents and a lot of other things to take care of. I just couldn't find the time and the energy to write, but now - I'm back! For my comeback I have a lovely, paisley manicure to show You.


Kolorem bazowym jest tutaj mięta od Essie o nazwie Blossom Dandy. Ten lakier jest dość podobny do Mint Candy Apple (tylko trochę zieleńszy) i dla mnie ma zdecydowanie lepszą formułę. Nałożyłam dwie proste warstwy.

The base colour here is a mint from Essie called Blossom Dandy. This polish is quite close to Mint Candy Apple (just a bit greener) and for me it definitely has a better formula. I applied two easy coats.


Już od jakiegoś czasu chciałam wypróbować moją nową płytkę z wzorami paisley od MoYou London. Podoba mi się, że firma zaczęła dodawać dużo wzorów negative space na swoich płytkach i dzisiaj właśnie jednego z nich użyłam. Płytka nazywa się MoYou London Flower Power 16. Wzór odbiłam Colour Alike Kind Of Black i Stemplem B. Loves Plates Jumbo.

I wanted to try out my new paisley MoYou London plate for some time now. I love that the brand started to add a lot of negative space designs on their plates and today I used one of them. The plate is called MoYou London Flower Power 16. I stamped the design with Colour Alike Kind Of Black and B. Loves Plates Jumbo Stamper.


Jak zwykle stemple pokryłam jedną warstwą Golden Rose Gel Look i jedną warstwą INM Out The Door.

As usual I covered the stamping with one coat of Golden Rose Gel Look and one coat of INM Out The Door.


Poniżej możecie zobaczyć płytkę jakiej użyłam..

Below You can see the plate I used..

Źródło: http://www.moyou.co.uk

..i większość produktów.

..and most of the products.


sobota, 5 marca 2016

Czasochłonna Brokatowa Układanka

Time-consuming Glitter Placement

Hej!
Ostatnio odkryłam, że bardzo lubię glitter placement'y. Zrobiłam dwa proste mani używając tej techniki TUTAJ i TUTAJ, więc tym razem zdecydowałam się zrobić coś odrobinę bardziej skomplikowanego i czasochłonnego. Mam nadzieję, że Wam się spodoba ;)

Hey!
Lately I discovered I really like glitter placements. I did two simple manicures using this technique HERE and HERE, so this time I decided to try something a bit more complicated and time-consuming. I hope You'll like it ;)


Moim pierwszym krokiem w tym mani było pomalowanie paznokci dwoma warstwami Joko J162 Exclusive Blue. To śliczny teal i pomyślałam, że ładnie będzie pasował do niebieskawego, opalizującego brokatu jaki wybrałam do tego mani. Potym kroku odbiłam czarny zygzakowy wzór. Użyłam płytki B. Loves Plates B.01 Geometry Is Perfect, ich Stempla Jumbo oraz lakieru do stempli Colour Alike Kind Of Black.

My first step in this manicure was painting my nails with two coats of Joko J162 Exclusive Blue. It's a lovely teal colour and I thought it would fit nicely to the blueish, opalescent glitter I picked for this nail art. After this I stamped a black zigzag design. I used B. Loves Plates B.01 Geometry Is Perfect plate, their Jumbo Stamper and Colour Alike Kind Of Black stamping polish.


Brokat jakiego użyłam pochodzi ze sklepu Lady Queen i jest częścią TEGO setu. Jak widzicie na zdjęciach brokat wygląda na paznokciach bardziej zielono niż niebiesko, więc przykleiłam go do tealowych pasków, a czarne zostawiłam widoczne. Tak samo jak w przypadku moich dwóch poprzednich glitter placement'ach nałożyłam Golden Rose Gel Look (po jednym paznokciu, żeby top coat za bardzo nie wysechł) i przykleiłam brokat. Całość pokryłam jedną warstwą INM Out The Door.

The glitter I used comes from Lady Queen store and it's a part of THIS set. As You can see on the photos the glitter appears on the nails more green than blue, so I stuck it on the teal stripes and left the black ones visible. Just like in my two previous glitter placements I applied Golden Rose Gel Look (one nail at a time, so the top coat doesn't dry to much) and than stuck the glitter. The whole thing is covered with one coat of INM Out The Door.


Poniżej możecie zobaczyć płytkę jakiej użyłam..

Below You can see the plate I used..

Żródła: http://allegro.pl/show_user.php?uid=37818237

..i resztę produktów.

..and the rest of the products.


sobota, 30 stycznia 2016

Projekt Tęcza II: Tydzień 3 - Czarny

 Project Rainbow II: Week 3 - Black

Cześć Wszystkim!
Mamy trzeci, czarny tydzień Projektu Tęcza II i jest to mój kolor. Zdecydowanie przeważa w mojej garderobie, wkrada się w wiele moich makijaży i lubię go na paznokciach. Tym razem jednak chciałabym pokazać Wam manicure nie aż tak czarny, jak można byłoby się po mnie spodziewać ;)

Hallo Everyone!
It's the third, black week of Project Rainbow II and that's my colour. It definitely outweighs in my wardrobe, it sneaks into a lot of my make-up's and I like it on my nails. This time though I'd like to show You a manicure not as black, as would be expected of me ;)


W tym mani użyłam mojego absolutnie ulubionego nudziakowego, różowego lakieru - Color Club New-Tral. Nalożyłam dwie przyjemne warstwy i moje paznokcie wyglądały idealnie.

In this manicure I used my absolute favourite nude, pink nail polish - Color Club New-Tral. I applied two easy coats and my nails looked perfect.


Zdobienie jakie mam na paznokciach jest jednym z najtrudniejszych do zrobienia dla mnie. Mam duży problem z precyzyjnym umieszczeniem wzoru i prawie nigdy mi to nie wychodzi. Używałam wielu stempli i wielu różnych technik stemplowania, ale takie zdobienia były po prostu poza zasięgiem. Również w tym mani niektóre paznokcie były poprawiane, ale stemplowanie było to dużo, dużo łatwiejsze przy pomocy mojego nowego Stempla Crystal Clear od B. Loves Plates.

Jestem pewna, że już słyszeliście o tym typie stempli. Są otwarte z jednej strony i mają transparentną gumkę, więc widzimy gdzie umieszczamy wzór. B. Loves Plates oferuje te stemple w dwóch kolorach, fioletowym i przezroczystym. Mam oba i mogę potwierdzić, że przezroczysty ma odrobinę miększą gumę. Jestem wielką fanką miękkich stempli, więc oba wymienione są wciąż dość twarde dla mnie. Ułatwiają rozmieszczanie wzoru, ale ciężko jest w nie wtopić paznokcie zwłaszcza jeżeli są dłuższe i mają silną krzywą C (z tego powodu musiałam poprawić niektóre paznokcie). Czekam na miększe wersje i mam nadzieję, że kiedyś się pojawią. Na razie te na pewno ułatwią mi życia. Będą świetne do mniejszych wzorów i napisów, nie sądzę jednak żebym ich używała do całopaznokciowych wzorów.

The nail art I have on my nails is one of the hardest for me to do. I have a lot of trouble with placing the design accurately and almost never get it right. I used a lot of stampers and a lot of different techniques of stamping, but nail arts like this were just out of reach. Also in this manicure some of my nails were redone, but stamping was much, much easier with my new Crystal Clear Stamper from B. Loves Plates.

I'm sure You already heard of this type of stampers. They're open on one side and have a transparent head, so we can see where we're placing the design. B. Loves Plates offers two colours of these stampers, a purple one and a clear one. I have both and I can confirm that the clear one has a bit softer head. I'm a big fan of squishy stampers, so both of these are still quite firm for me. They do simplify design placement, but it's difficult to sink my nails into them especially when they're longer and have a strong C-curve (that's why I had to redo some nails). I'm waiting for softer versions and hope for them to appear someday. For now these will surely make my life a lot easier. They'll be great for smaller designs and inscriptions, I don't think I'll be using them for full nails designs though.


Ów "czarny" w tym mani to w zasadzie tylko wzorek. Żeby go zrobić użyłam płytki MoYou London Doodles 01 i lakieru do stempli Colour Alike Kind Of Black.

The "black" in this manicure is actually just the design. To make it I used MoYou London Doodles 01 plate and Colour Alike Kind Of Black stamping polish.


Poniżej możecie zobaczyć użyte produkty.

Below You can see the products I used.


Moja propozycja na czarny tydzień jest prawdopodobnie niespodziewana i inna, ale żeby być pewnym musicie zobaczyć pozostałe na stronce Kociołek Rozmaitości.

My proposition for the black week is probably unexpected and different, but to be sure You'll have to check out the rest on Kociołek Rozmaitości.

Projekt Tęcza II