Pokazywanie postów oznaczonych etykietą Aliexpress. Pokaż wszystkie posty

niedziela, 17 września 2017

Dots And Swirls

Kropki I Zawijasy

Hej!
Na dzisiajszy post mam elegancki mani. Połączyłam kropki z odrobiną zawijasów, całość utrzymałam w trzech kolorach: czarnym, białym i granatowym. Manicure taki jak ten jest idealny na wesela olbo inne imprezy. Nosiłam je do granatowej sukienki i czarnych dodatków. Wyglądało bardzo ładnie, nawet dostałam kilka komplementów :)

Hey!
I have a elegant manicure for todays post. I combined dots with some swirls and kept the whole thing in three colours: black, white and dark blue. A manicure like this is perfect for weddings or other partys. I wore it to a dark blue dress and black accessories. It looked very nice, I even got a few compliments :)


Czarne paznokcie pokryte są lakierem My Secret Dessed In Black. Nałozyłam dwie warstwy i było to wystarczające żeby osiągnąć pełne krycie. Na pozostałych paznokciach mam Safari 56, w tym przypadku dwie warstwy również dały dobry poziom krycia.

The black nails are covered with My Secret Dressed In Black. I applied two coats and it was enough to achieve full opacity. On the rest of my nails I have Safari 56, in this case two coats gave a nice level of coverage as well.


Oba wzorki jakich użyłam w tym mani pochodzą z płytki Uber Chic 3-03. Najpierw odbiłam małe kropeczki lakierem do stempli Kads, wydaje mi się, że nazwa koloru to #2 Blue. Wszystkie moje lakiery do stempli Kads mam z TEGO sklepu na aliexpress.

Both design I used in this manicure come from Uber Chic 3-03 plate. Firstly I stamped the small dots with Kads stamping polish, I believe the colours name is #2 Blue. I got all of my Kads stamping polishes from THIS store on Aliexpress.


Moim kolejnym krokiem było dodanie zawijasowych wzorów na granatowych kropkach. Lakier jakiego użyłam to Kaleidoscope by El Corazon 01 Black. Udało mi się wypozycjonować stempel tak idealnie dzięki przezroczystemu stemplowi (Aliexpress Blue Metal Handle XL). Wszystkie ostemplowane paznokcie były zabezpieczone top coat'em Kads żeby uniknąć rozmazania. Następnie dodałam INM Out The Door na wszystkie paznokcie, ponieważ jest to mój najulubieńszy top coat. Sprawia, że mój manicure bardzo szybko schnie i dłużej utrzymuje się bez odprysków. Niestety rozmazuje też wszystkie zdobienia.. dlatego potrzebuję warstwy Kads pod żeby zakonserwować stemple ;)

My next step was adding a swirly design on top of the dark blue dots. The polish I used was Kaleidoscope by El Corazon 01 Black. I managed to position the stamp so perfectly thanks to a clear stamper (Aliexpress Blue Metal Handle XL.). All of my stamped nails were secured with Kads top coat to avoid smudging. Next I added INM Out The Door to all of my nails, becuase it's my favourite top coat ever. It makes my manicure dry extra fast and last much longer without chipping. Unfortunately it also smears every nail art.. that's why I need a layer of Kads to preserve the stamping ;)


Poniżej możecie zobaczyć świetną płytkę Uber Chic jakiej użyłam..

Below You can see the amazing Uber Chic plate I used..

Źródło: http://uberchicbeauty.com/
..i większość produktów.

..and most of the products.


niedziela, 7 maja 2017

REVIEW: Born Pretty Store Holo Polish H003 Temptation Wait

Cześć :)
Czas na recenzję nad którą pracowałam już od jakiegoś czasu. Holograficzne lakier firmy Born Pretty Store musiały się w końcu pojawić na moim blogu. Po obejrzeniu mnóstwa swatchy w internecie pokazujących jak silny i liniowy efekt holo mają - dwa z nich wybrałam do recenzji. Dzisiaj będziemy dyskutować o fioletowej piekności - H003 Temptation Wait. Drugi kolor jaki mam to zielony H008 All-embracing, ale ten zostawię na następny raz.

Hello :)
It's time for a review I've been working on for quite some time now. Holographic polishes from the Born Pretty Store brand were destined to appear on my blog at some point. After seeing numerous swatches on the internet, showing what a strong and linear holo effect they have - I chose two of them for review . Today we'll be discussing the purple beauty - H003 Temptation Wait. The second colour I have is green H008 All-embracing, but I'll be leaving that one for next time.


Zacznijmy od kilku szczegółow dotyczących samego lakieru. Holo przychodzi w srebrnym, kartonowym pudełeczku z numerem i nazwą lakieru na wierzchu. Ta cześć jest trichę niefortunna, ponieważ ja musiałam nakleić swoje własne etykiety na butelki żaby rozróżnić odcienie. Tak jest po prostu łatwiej, niż szukać w internecie nazwy kalieru za każdym razem jak chciałoby się o nim napisać.

Let's start from some details about the polish itself. The holo comes in a silver cupboard box with the name and number of the polish on top. This part is quite unfortunate, because I had to put my own labels on the bottles in order to distinguish the shades. It's just easier that way, than to search for the name of the polish each time I want to write about it.


Buteleczki i zakrętki są prosokątne, ale możemy z łatwością zdjać kanciastą cześć zakrętki. W ten sposób mamy lepszą możliwość chwycenia nasady pędzelka. Przynajmniej dla mnie lepiej jest trzymać standardowy uchwyt pędzelka niż taki duży, prostokątny. Sam pędzelek jest trochę za szeroki.. Można jednym pociągnięciem pomalować całe paznkieć i to jest plus dla niektórych osób. Ja osobiście wolę mieć trochę węższy pędzelek i więcej kontroli nad tym jak dokładnie nakładam lakier w pobliżu skórek. Każda buteleczka ma 1ml produktu. Firma oferuje holograficzne lakiery w również sześcio mililitrowych buteleczkach, ale nie wiem czy kolory są odpowiednikami. Dokładnie ten lakier jaki recenzuję jest TUTAJ.

The bottles and the caps are rectangular, but we can easily take the cap's angular part off. That way we get a better grip on the brush handle. At least for me it's better to hold a standard brush handle than such a big rectangular one. The brush itself is a bit too wide.. You can cover a whole nail with one stroke and that's a plus for some people. I personally prefer to have a slightly narrower brush and more control over how precisely I apply the polish in the cuticle area. Each bottle contains 10ml of the product. The brand offers holographic polishes in 6ml bottles as well, but I don't know if the colours correspond. The exact polish I'm reviewing is HERE.

Natural light

Mój pierwszy manicure z użyciem tego lakieru był prostym zdobieniem stemplowym. Odbiłam wzór tylko na dwóch paznokciach, żebyście mogli zobaczyć ten holograficzny lakier również solo.

My first manicure using this polish was a simple stamping nail art. I only stamped two nails, so You'd be able to see this holographic polish on it's own as well.

Natural light
Natural light


W tym mani użyłam kremowej bazy (jednej warstwy Color Club Mrs. Robinson) pod holo, żeby ułatwić procedurę czyszczenia skórek. Nie było to jednak konieczne. H003 Temptation Wait świetnie kryje przy jednej warstwie i dobrze się zmywa przy skórkach. Byłam na prawdę pod wrażeniem.

In this manicure I used a cream base (one coat of Color Club Mrs. Robinson) underneath the holo to ease the cuticle area clean-up routine. It wasn't necessary though. The H003 Temptation Wait covers amazingly in one coat and cleans up well from the cuticles. I was really impressed.

Artificial light

Wzorek jaki możecie zobaczyć na moich paznokciach pochodzi z płytki Lina Feeling Shapely 08. Odbiłam go Stemplem B. Loves Plates Jumbo i lakierem do stempli Kaleidoscope 87 Lavender.

The design You can see on two of my nails comes from Lina Feeling Shapely 08 plate. I stamped it with B. Loves Plates Jumbo Stamper and Kaleidoscope 87 Lavender stamping polish.

Artificial light

Muszę Was ostrzec, że zrobiłam dużo zdjęć. Próbowałam uchwycić efekt holo w różnym oświetleniu żeby jak najdokładniej zrecenzować te lakiery. Jak widzicie lakier w świetle dziennym nie sprawia, że serce bije szybciej. Efekt jest dużo lepszy w sztucznym świetle (w moim przypadku pod lampą pierścieniową), ale zaczekajcie aż zobaczycie ten lakier w bezpośrednim słońcu!

I have to warn You that I made a lot of photos. I tried to catch the holo effect in various lighting to review these polishes as thoroughly as possible. As You can see the polish in natural light doesn't make your hear beat faster. The effect is much better in artificial light (in my case under s ring light), but wait to see this polish in direct sunlight!

Artificial light

Kolejną ważną kwestią jest użycie top coat'u. W tym mani pokryłam stemplowane paznokcie top coat'em Kads, a potem wszystkie paznokcie INM Out The Door. Przy tym konkretnym holograficznym kolorze widziałam znaczącą różnicę między paznokciami porytymi top coatem a paznokciami a samym lakierem. H003 stał się bardziej błyszczący, to normalne, ale w tym samym momencie kolor stal się bardziej intensywny, ciemniejszy. Efekt holo nie ucierpiał, wyglądał nawet lepiej na wzornikach pokrytych top coat'em, które pokażę Wam na koniec posta.

Another important thing is the usage of top coat. In this manicure I covered the stamped nails with Kads top coat and after that all of my nails with INM Out The Door. With this particular holografic colour I saw a significant difference between nails covered with a top coat and the nails with only the polish on them. H003 got more glossy, that's normal, but at the same time the colour intensified, darkened. The holo effect didn't suffer, it even looks better on the nail displays covered with top coat, which I'll show You in the end of the post.

Źródło: http://linanailartsupplies.com/


Następnym mani jaki zrobiłam również była kompozycja holo i stempli. Pomyślałam, że proste swatche byłyby trochę nudne, więc dodoałam wzorek. Tym sposobem dostajecie dwa w jednym - swatch i zdobienie ;)

The next manicure I did was a composition of holo and stamping as well. I thought simple swatches would be a bit boring, so I added the design. This way You get both - a swatch and some nail art ;)

Natural light

Tym razem widzicie lakier holograficzny solo. Nie użyłam ani bazy ani top coat'u. Nałożyłam dwie warstwy, ale pierwsza wyglądała w zasadzie na tak samo kryjącą.

This time You see the holographic polish on it's own. I didn't use a base or a top coat. I applied two coats, but the first one was actually just as opaque.

Artificial light
Artificial light


Jeśli chodzi o zdobienie, użyłam jako bazy Kiko 330 Lilac i nałożyłam dwie warstwy. Odbiłam wzór z płytki Uber Chic 12-03 używając Stempla Aliexpress Blue Metal Handle XL oraz lakieru do stempli Born Pretty Store #2603. Na koniec dodałam też do wzoru trochę kropek lakierem Temptation Wait żeby połaczyć go bardziej z pozostałymi paznokciami. Stemple byly zabezpieczone jedna warstwą top coat'u Kads.

When it comes to the nail art, I used Kiko 330 Lilac as a base and applied two coats. I stamped a design from Uber Chic 12-03 stamping plate using Aliexpress Blue Metal Handle XL Stamper and Born Pretty Store #2603 stamping polish. In the end I also added to the design some dots of Temptation Wait to link it more with the other nails. The stamping was secured with one coat of Kads top coat.

Direct sunlight
To jest prawdopodobnie to na co czekaliście - zdjęcia w słońcu! To nie sekret, że holograficzne lakiery najlepiej wyglądają w tego typu oświetleniu. BPS H003 nie był inny.

This is probably what You've been waiting for - photos in sunlight! It's not a secret that holographic nail polishes look best in this type of lighting. BPS H003 was no different.

Direct sunlight
Direct sunlight


Direct sunlight
Tutaj możecie zobaczyć produkty jakich użyłam.

Below You can see the products I used.

Żródło: http://uberchicbeauty.com/


Tutaj jest kilka swatch'y na wzornikach. Zrobiłam porównanie mięszy BPS H003 Temptation Wait z top coat'em oraz bez niego. Chciałam też zobaczyć jak podobny jest ten lakier do moich innych fioletowych holo - Color Club Eternal Beauty i popolarnego ostatnimi czasy Golden Rose Holographic 05. Jak widzicie nie ma tu dupe'ów. BPS jest dużo ciemniejszy, a jednocześniema trochę mniej intensywny efekt holo.

Here are some swatches on nail displays. I did a comparison between BPS H003 Temptation Wait with top coat and without it. I also wanted to see how similar this polish is to my other purple holos - Color Club Eternal Beauty and the popular nowadays Golden Rose Holographic 05. As You can see no dupes here. BPS is much darker, but at the same time has a bit less intensive holo effect.


Podsumowując muszę powiedzieć, że ten lakier był na prawdę fajny. Kryjący po jednej warstwie, łatwy w użytku i spektakularny w bezpośrednim słońcu. Nie była zbytnio pod wrażeniem efektu w cieniu, ale to nic nowego. Muszę też zaznaczyć, że holograficzne własciwości tego koloru nie były tak silne jak w niektórych moich innych fioletach, ale są one dużo jaśniejsze. Może to jest powód. Niemniej jednak cieszę się, że mam ten lakier w kolekcji.

In conclusion I have to say that this polish was really nice. Opaque in one coat, easy to work with and spectacular in direct sunlight. I wasn't too impressed with the effect in the shade, but that's not something new. I also have to point out that the holographic properties of this shade weren't as strong as in some of my other purples, but they are much lighter. Maybe that's the cause. Nevertheless I'm happy to have this polish in my collection.


Jak Wam się podoba ten holoś? Pamiętajcie, że jeśli zamawiacie coś z Bron Pretty Store możecie użyć mojego kodu zniżkowego HMG10 żeby otrzymać 10% upustu na wszystkie nieprzecenione produkty.
How do You like this holo polish? Remember that if You're ordering something from Born Pretty Store You can use my discount code HMG10 to get 10% off any items that aren't already on sale.

piątek, 14 kwietnia 2017

Checked Nails & Yellow Flowers

Cześć!
Wiosna zaczęła sie już jakiś czas temu i od tego czasu mieliśmy trochę na prawdę ąłdnej podoby, ale ostatnio wzrócił deszcz i zimno.. Żeby uniknąć depresyjnego nastroju musiałam zrobić jakieś ciepłe i radosne paznokcie.

Hello!
Spring started a while ago and since then we had some really nice weather, but lately rain and cold came back.. In order to avoid the depressing mood I had to do some warm and cheerful nails.


Dla mnie żółty to jeden z najbardziej radosnych kolorów, więc właśnie jego wybrałam do dzisjeszego mani. Nałożyłam dwe grubsze warstwy Color Club Macaroon Swoon jako bazę.

For me yellow is one of the most cheerful colours, so that's what I picked for today's manicure. I applied two thicker coats of Color Club Macaroon Swoon as my base.


Chciałam wypróbować jakies nowe płytki MoYou London, więc poszłam w kraciasty wzór na większości paznokci i kombinację tej samej kratki z kwiatami na kciuku i serdecznym. Te dwa wzory pochodzą z całkiem innych płytek, ale wzór kratki był tak podobny, że musiałam je ze sobą sparować.

I wanted to try out some new MoYou London plates, so I went with a black, checked design on most of my nails and a combination of the same check and flowers on my thumb and ring finger. These two design come from totally different plates, but the check design is was similar, that I just had to pare them up.


Płytki jakich użyłam to MoYou London Hipster 05 i Trend Hunter 02. Użyłam też lakieru Kaleidoscope Black i Stempla Aliexpress Blue Metal Handle XL.

The plates I used are MoYou London Hipster 05 and Trend Hunter 02. I also used Kaleidoscope 01 Black and Aliexpress Blue Metal Handle XL Stamper.


Zabezpieczyłam stemple top coat'em Kads (moim top coat'em numer jeden do zdobień) i zaczęłam kolorować kwiaty żółtym tint'em. Wybrałam P2 Gloss Goes Neon Spaceshot, ponieważ daje żywy kolor już przy jednej warstwie. Po wyschnięciu tint'a nałozyłam jedną warstwę INM Out The Door.

Poniżej możecie zobaczyć płytki jakich użyłam..

I secured my stamping with Kads top coat (my number one top coat for nail art designs) and started to colour the flowers with a yellow, sheer tint. I chose P2 Gloss Goes Neon Spaceshot, because it gives a vibrant colour in just one layer. After the tint dried I applied one coat of INM Out The Door.

Below You can see the plates I used..

Źródło: http://moyou.co.uk/


Źródło: http://moyou.co.uk/

..i większośc pozostałych produktów.

..and most of the products.


niedziela, 26 lutego 2017

Niesamowity Duet: Magnetyczny Lakier I Stemple

Amazing Duet: Magnetic Polish And Stamping

Cześć Wam!

Ostatnio zrobiłam zamówienie na Hypnotic Polish i oprócz innych rzeczy wzięłam też sporo magnetycznych lakierów Masura. Już widziałyście jeden z nich w moim mani pt. Różowy Cmentarz, a dzisiaj chciałabym pokazać Wam kolejny.

Hey there!

Lately I made an order on Hypnotic Polish and among other things I got quite a few magnetic polishes from Masura. You've already seen one of them in my Pink Cemetery manicure and today I'd like to show You another one.


Sklep oferujący te magnetyczne lakiery sugeruje nakładanie ich na czarną bazę i ponieważ większość z nich ma w sobie brokat, tak czy owak nakładałabym je na kremowy lakier. W tym przypadku nie wybrałam jednak czerni, a bardzo ciemny szary (Kiko 382 Pearly Gunmetal) i nałożyłam jedną grubszą warstwę. Lakier Kiko jest tak napigmentowany, że ta jedna warstwa dała mi pełne krycie. Na tym etapie zrobiłam wszystkie konieczne poprawki przy skórkach i sięgnęłam po Masura Glaxy Collisions.

The shop offering these magnetic polishes suggest to put them over a black base and because most of them have glitter, I would paint a cream polish under them either way. In this case I didn't pick black though, but a very dark grey (Kiko 382 Pearly Gunmetal) and applied it in one thick coat. The Kiko polish is so pigmented, that this one coat gave me full opacity. At this point I made all the necessary clean-ups in the cuticle area and reached for Masura Galaxy Collisions.


Magnetyczny lakier nakładałam po jednym paznokciu, ponieważ musimy jak najszybciej namagnetyzować powierzchnię żeby otrzymać najlepszy efekt. Tym razem chciałam uzyskać okrągły wzór na paznokciach, więc użyłam magnesu Dance Legend Magnetic Pen żeby stworzyć ciemniejszy obszar na środku każdego paznokcia. Muszę przyznać, że trochę się zdziwiłam widząc ciemniejszy okrąg w pobliżu miejsca gdzie trzymałam magnes. Myślałam, że końcówka długopisu będzie przyciągać metaliczne drobinki, a nie odpychać je.. Tak czy inaczej efekt jest na prawdę magiczny. Nałożyłam dwie warstwy lakieru magnetycznego i magnetyzowałam obie, ale myślę, że kiedy mamy ciemną bazę można obuć się z tylko jedną warstwą Masury. Te magnetyczne lakiery są bardzo napigmentowane.

I applied the magnetic polish one nail at a time, because we have to magnetize the surface as soon as possible to achieve the best effect. This time I wanted to make a circular design on my nails, so I used Dance Legend Magnetic Pen to create a darker area in the center of each nail. I must say that I was a bit surprised to see a darker circle near the spot where I held the magnet. I thought that the tip of the pen would pull the metallic particles, not push them away.. Nevertheless the effect is really magical. I applied the magnetic polish in two coats and magnetized each of them, but I think that when we have a dark base we can get away with just one coat of Masura. These magnetic polishes are really pigmented.


Zaczekałam aż baza całkowicie wyschnie i zaczęłam odbijać piękny wzór z płytki Uber Chic 4-03. Przy pomocy Stempla Aliexpress Blue Metal Handle XL umieściłam środek wzoru idealnie w centrum każdej ciemniejszej, stworzonej wcześniej plamy koloru. Użyłam lakieru do stempli Kaleidoscope 01 Black i pokryłam paznokcie top coat'em Kads żeby uniknąć rozmazania. Żeby jeszcze lepiej zabezpieczyć zdobienie położyłam też jedną warstwę INM Out THe Door.

I waited for the base to fully dry and started stamping a beautiful design from Uber Chic 4-03 plate. With the help of Aliexpress Blue Metal Handle XL Stamper I placed the center of the design exactly in the middle of each darker spot of colour created before. I used Kaleidoscope 01 Black stamping polish and covered my nails with Kads top coat to avoid any smudging. To secure the nail art even better I added a layer of INM Out The Door top coat as well.


Poniżej możecie zobaczyć płytkę UC jakiej użyłam..

Below You can see the UC plate I used..

Źródło: http://uberchicbeauty.com/

..i większośc pozostałych produktów.

..and most of the other products.


poniedziałek, 6 lutego 2017

#CREATIVENAILPARTY - Tydzień 4 - Skandynawskie Wzory

#CREATIVENAILPARTY - Week 4 - Scandinavian Pattern

Cześć,
projekt #CREATIVENAILPARTY już prawie się kończy. W tym tygodniu robimy zdobienia na ostatni temat - skandynawskie wzory. Ja uwielbiam wszystkie sweterkowe wzory, mam nadzieję, że Wy także ;)

Hello,
#CREATIVENAILPARTY project is almost over. This week we're making nail arts for the last theme - Scandinavian pattern. I totally love all sweater designs, I hope You do too ;)


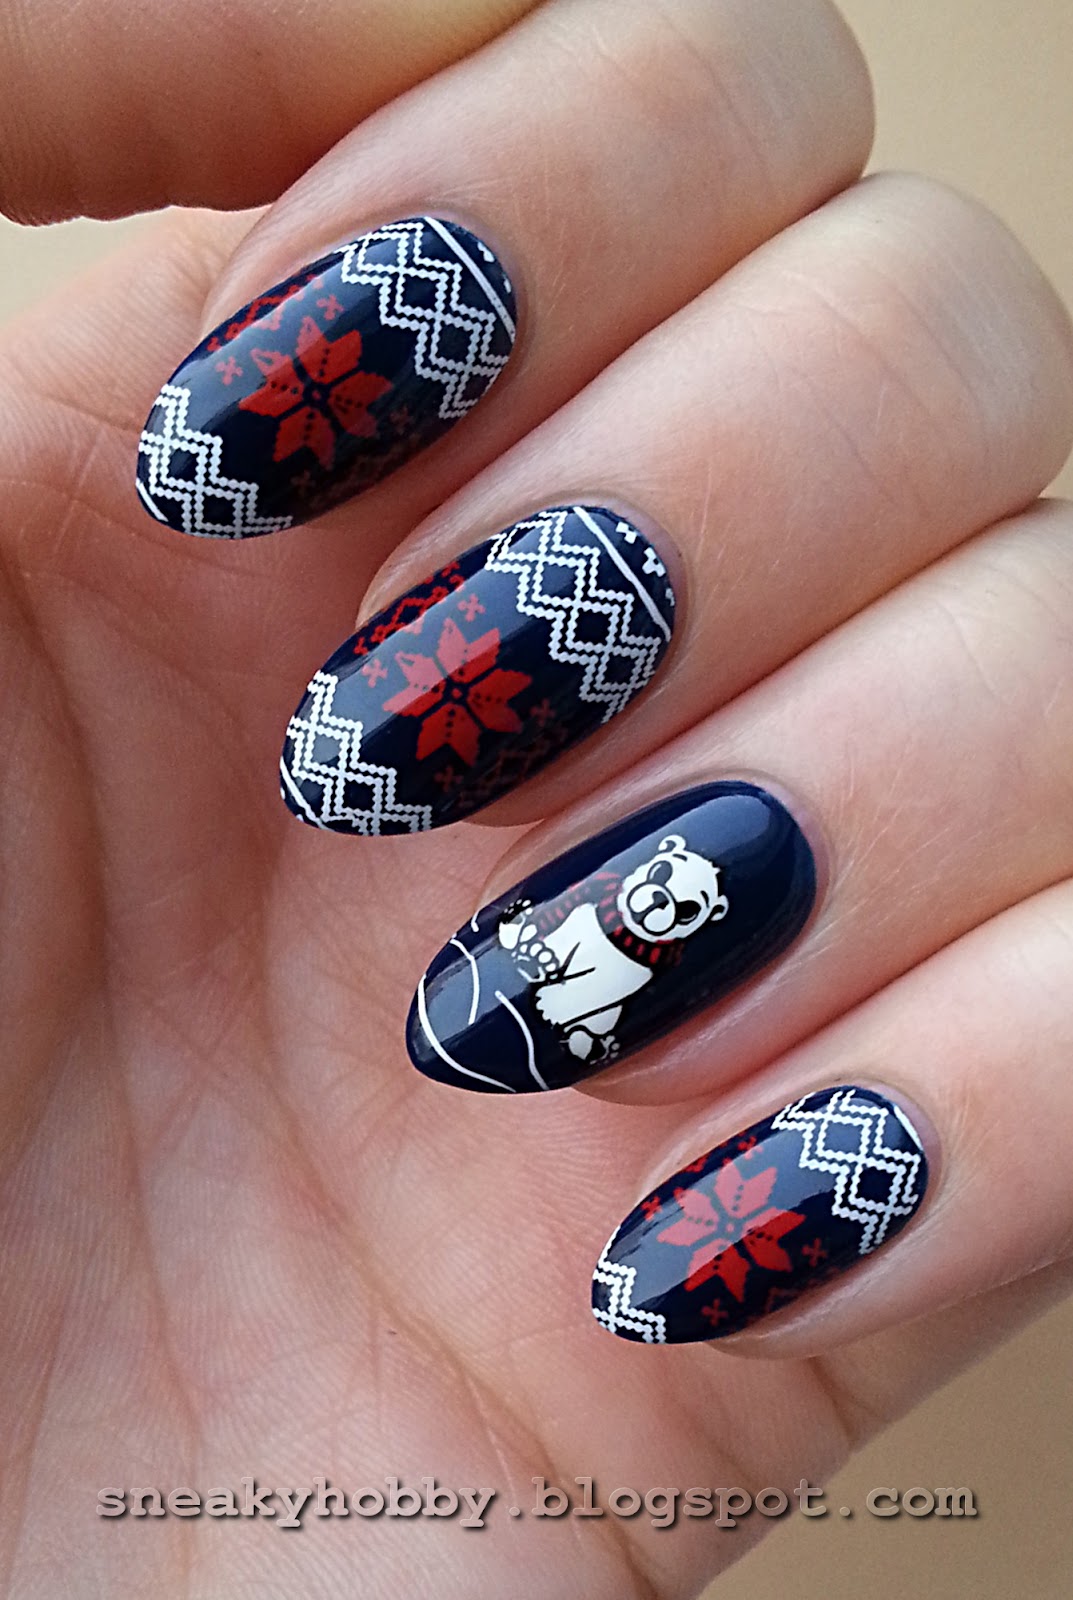
Zedydowałam sie pójść w dwukolorowy sweterkowy wzór na granatowej bazie i słodkie polarne misie na dwóch akcentowych paznokciach. Utrzymałam manicure w tylko tych trzech kolorach, żeby wyglądał na pełną kompozycję.

I decided to go with a two colour sweater design on a dark blue base and a cute polar bear on two accent nails. I kept the manicure in just three colours, so it would appear as a whole composition.


Kolor bazowy jaki mam na paznokciach to Essie Style Cartel i nałożyłam dwiewarstwy żeby uzyskać pełne krycie. Pokryłam go także top coat'em Sally Hansen Insta-Dri żeby móc praktycznie od razu stemplować.

The base colour I have on my nails is Essie Style Cartel and I applied two coats to achieve full opacity. I also covered it with Sally Hansen Insta-Dri top coat to be able to stamp over it almost right away.


Większość moich paznokci ma na sobie skandynawski wzór. Obrazek jakiego użyłam pochodzi z płytki MoYou London Festive 30 i odbiłam go dwoma kolorami - czerwonym (Kaleidoscope 13 True Red) i białym (Kaleidoscope 02 White). Najpierw zakryłam środek paznokci odrobina taśmy i odstemplowałam cały wzór bielą. Kiedy odkleiłam taśmę, białe kawałki wzoru były gotowe. Następnie pokryłam już tylko brakujące części wzoru czerwonym lakierem i odbiłąm go na środku paznokci. Użyłam Stempla Aliexpress Blue Metal Handle XL żeby idealnie rozmieścić wzór.

Most of my nails have a Scandinavian pattern on them. The image I used comes from MoYou London Festive 30 plate and I stamped it with two colours - red (Kaleidoscope 13 True Red) and white (Kaleidoscope 02 White). First I covered the middle of my nail with some tape and stamped the whole design with white. When I peeled the tape, the white parts of the design were ready. Next I covered just the missing part of the design with red polish and stamped it in the middle of my nails. I used the Aliexpress Blue Metal Handle XL Stamper to place the design perfectly.


Moje paznokcie akcentowe mają na sobie misia polarnego z płytki Bundle Monster BM-S156. Wzór był odbity czernią (Kaleidoscope 01 Black) i pokolorowany na stemplu tymi samymi lakierami, jakich użyłam do seterkowego wzoru. Kiedy lakiery trochę przeschły odbiłam misia na paznokciach. Śnieg na którym on siedzi nie jest częścią wzoru, ale pochodzi z tej samej płytki (pożyczyłam go od pingwinka obok).

My accent nails have a polar bear from Bundle Monster BM-S156 plate on them. The design was stamped with black (Kaleidoscope 01 Black) and coloured straight on the stamper with the same polishes I used for the sweater design. When the polishes dried a little I stamped the bear onto my nails. The snow he's sitting on isn't part of the design, but it comes from the same plate (I borrowed it from the alongside penguin).


Zdobienie jest zabezpieczone jedną warstwą top coat'u Kads i jedną warstwą Sally Hansen Insa-Dri. W ten sposób unikam rozmazania wzoru, mam błyszczące wykończenie, szybkie schnięcie i brak kurczenia lakieru. Do tej pory żaden top coat jakiego używałam nie dał mi tego wszystkiego na raz, więc po prostu użuwam dwóch różnych.

Poniżej możecie zobaczyć płytki jakich użyłam..

The nail art is secured with one coat of Kads top coat and one coat of Sally hansen Insta-Dri. This way I avoid smearing the design, have a glossy finish, quick drying and no polish shrinkage. So far no top coat I used gave all of these at once, so I just use two different ones.
Below You can see the plates I used..

Źródło: http://moyou.co.uk/
Źródło: http://bundlemonster.com/
..i większość pozostałych produktów.

..and most of the products.


Tutaj są poprzednie mani jakie zrobiłam na #CREATIVENAILPARTY:


Here are the previous manicures I did for #CREATIVENAILPARTY: