Pokazywanie postów oznaczonych etykietą 01. Pokaż wszystkie posty

wtorek, 10 grudnia 2019

Reindeer - #glamnailschallengedec

Hej,
czas na mani z Reniferem w GlamNailsChallenge. Już od jakiegoś czasu chciałam zrobić kombinację z kratką na paznokciach i reniferowymi motywami a ten prompt był idealną okazją.

Hey,
it's time for Reindeer manicures in GlamNailChallenge. For some time I wanted to do the combination of checkered nails with reindeer motives and this prompt was the perfect opportunity.


Zdecydowałam się na zieleń i złoto. Lakierem bazowym jakiego użyłam jest Kiko 534 Green Forest. Nałożyłam dwie cienkie warstwy.

I decided to go with green and gold. The base polish I used is Kiko 534 Green Forest. I applied two thin coats.


Na tej bazie odbiłam wzorek kratki z płytki Lina Nail Art Supplies 4 Seasons Winter 03 używając lakieru Kaleidoscope by El Corazon 01 Black.

Over this base I stamped a checkered design from Lina Nail Art Supplies 4 Seasons Winter 03 plate using Kaleidoscope by El Corazon 01 Black.


Tak zostawiłam część paznokci, a na serdecznym i środkowym dodałam trochę złota. Odbiłam renifera i zwrot "happy winter to all" używając lakieru B. Loves Plates BLP05 B. a Royal Gold. Oba wzorki również pochodzą z płytki Lina Nail Art Supplies 4 Seasons Winter 03.

I left part of my nails like that and on my ring and middle finder I added a bit of gold. I stamped a reindeer and the phrase "happy winter to all" using  B. Loves Plates BLP05 B. a Royal Gold. Both stamping designs also come from Lina Nail Art Supplies 4 Seasons Winter 03 plate.


Na koniec dodałam też matowy top coat.

At the end I also added a matte top coat.


Jak Wam się podoba to zdobienie? Czekacie na więcej mani do GlamNailsChallenge???

How did You like this nails art? Are You waiting to see more GlamNail Challenge manicures???

Źródło: IG @nbnailart


środa, 17 października 2018

Pumpkins - #glamnailschallengeoct

Cześć,
czas na Halloween'owe dynie! To czwarty temat w Glam Nails Challenge i moja propozycja jest tym razem dość elegancka.

Hi,
it's time for Halloween Pumpkins! That's the fourth theme in Glam Nails Challenge and my proposition this time is quite elegant.


Bazowy lakier jaki wybrałam to Illyrian Gold Lion. To ciemny szary z malutkim, złotym shimmer'em. Wygląda niesamowicie, shimmer jest mocno widoczny a formuła jest świetna. Użyłam dwóch cienkich warstw do pełnego krycia.

The base polish I chose is Illyrian Gold Lion. That's a dark grey with fine, gold shimmer. It looks amazing, the shimmer is strongly visible and the formula is great. I used two thin coats for full opacity.


Na tej bazie odbiłam wzorek z płytki Clear Jelly Stamper Haunted Mansion. Pierwsza część odbita była lakierem Kaleidoscope by El Corazon 01 Black, a druga (dynie) Kaleidoscope by El Corazon 72 Pumpkin.

Over this base I stamped a layered design from Clear Jelly Stamper Haunted Mansion plate. The first part was stamped with Kaleidoscope by El Corazon 01 Black and the second one (pumpkins) with Kaleidoscope by El Corazon 72 Pumpkin.


Tak jak zawsze zapezpieczyłam stemple specjalnym top coat'em do zdobień. Tym razem był to Born Pretty Store No Smudge.

Just like always I secured my stamping with a special top coat for nail art. This time it was Born Pretty Store No Smudge.


Tym razem zdecydowałam się zaperezentować moje mani w wersji matowej. Myślę, że w ten sposób wygląda bardzo elegancko i nawet shimmer w Illyrian Gold Lion dalej dobrze widać. Matowy top coat jaki zastosowałam jako ostatnią warstwę w tym mani to Golden Rose Matte top coat.

This time I decided to present my manicure in a matte version. I think it looks very elegant this way and event the shimmer in Illyrian Gold Lion is still nicely visible. The matte top coat I put as a last layer in this manicure is Golden Rose Matte top coat.


Co myślicie o moim zdobieniu? Wedługm mnie jest to bardzo subtelna propozycja jeśli chodzi o Halloween'owe mani. Dynie są suma sumarum tylko dodatkiem i mogą być łątwo zastąpione przez kropki czy inne małę wzory.

What do You think about my nail art? In my opinion this is a very subtle proposition when it comes to Halloween manicure. The pumpkins are essentially just an addition and can be easily replaced by dots or other small designs.


Koniecznie zajrzyjcie na Instagram pod #glamnailchallengeoct żeby zobaczyć wszystkie inne zgłoszenia do Glam Nail Challenge.

Be sure to check out all of the other entries in Glam Nails Challenge on Instagram under the #glamnailschallengeoct.

Źródło: https://www.instagram.com/glamnailschallenge/


środa, 15 sierpnia 2018

Ruby Wing Crowd Surf With A Lace Design

Hej!
Chcielibyście zobaczyć kolejny reagujący na promienie UV lakier od Ruby Wing? Zakochałam się w tej marce jakiś czas temu i od tego czasu zebrałam całkiem niezłą kolekcję ich lakierów. Widzieliście już niektóre z posiadanych przeze mnie kolorów (TUTAJ jest link do tych postów). Dzisiaj chciałąbym pokazać Wam Ruby Wing Crowd Surf ze ślicznym, koronkowym wzorem.

Hey!
How would You like to see another UV responsive nail polish from Ruby Wing? I fell in love with this brand a while ago and gathered quite a collection of they're polishes since then. You've already seen some of the colours I own (HERE is the link to those posts). Today I'd like to show You Ruby Wing Crowd Surf with a lovely lace design.


Zaczęłam to mani przez nałożenie dwóch średnich warstw lakieru bazowego (Ruby Wing Crowd Surf) i to wystarczyło do pełnego krycia.

I started this manicure by applying the base polish (Ruby Wing Crowd Surf) in two medium coats and that was enough for full opacity.


Kiedy lakier trochę wysechł dodałam wasrtwę ILNP Scarlet z kolekcji Real Magic Toppers żeby całość miała trochę błysku. Lakiery z tej kolekcji są spektakularne i używam ich teraz niemal w każdym mani.

When the polish dried a bit I added a layer of ILNP Scarlet from the Real Magic Toppers collection to give the whole thing a little sparkle. The polishes from this collection are spectacular and I use them in almost every manicure now.


Kiedy moja baza byłą gotowa zaczęłam odbijać przepiękny wzór z płytki MoYou London Lace 03. Użyłąm lakieru Kaleidoscope by El Corazon 01 Black i Stempla B. Loves Plates Jumbo.

When my base was ready I started stamping a gorgeous design from MoYou London Lace 03 plate. I used Kaleidoscope by El Corazon 01 Black and B. Loves Plate Jumbo Stamper.


Zabezpieczyłam mój manicure używając dwóch top coat'ów. Najpierw nałożyłam Kads Smudge Resistant a potem INM Out The Door.

I secured my manicure using two top coats. First I applied Kads Smudge Resistant and next INM Out The Door.


Na większości moich zdjęć możecie zobaczyć Ruby Wing Crowd Surf w świetle normalnym. W bezpośrednim słońcu jest dużo, dużo ciemniejszy. Poniżej wrzucam zdjęcie prezentujące lakier w obu wersjach. Na żywo kiedy lakier stał się ciemny można było zobaczyć stemple dość wyraźnie. Niestety na moich zdjęciach wszystko się zlało.

On most of my photos You can see Ruby Wing Crowd Surf in normal light. In direct sunlight it turns much, much darker. Below I'm posting a photo presenting the polish in both versions. In real life when the polish turned darker You could still see the stamping design quite clearly. Unfortunately on my photo it all merged together.


Jak Wam się podoba mój manicure? Macie jakieś lakiery reagujące na promienie UV w swojej kolekcji?

How do You like my manicure? Do You have any UV responsive polishes in Your collection?


niedziela, 27 maja 2018

#CREATIVENAILPARTY - Tydzień 4 - Do Sukienki

#CREATIVENAILPARTY - WEEK 4 - Matching The Dress

Hej!
Przychodzę do Was z ostatnim zgłoszeniem do #CREATIVENAILPARTY. W tym tygodniu tematem jest Do Sukienki i wybrałam jako moją inspirację bardzo wyjątkową sukienkę.
Hey!
I come to You with my last entry for #CREATIVENAILPARTY. This week the theme is Matching The Dress and I picked a very special dress for my inspiration.


W życiu dziewczyny jest kilka sukienek, które są bardziej pamiętne od innych. Suknia ślubna zdecydowanie jest jedną z nich i to właśnie jest sukienka jaką chcę Wam pokazać, sparowana z pasującym mani. Nie byłabym sobą gdybym nie dodała czegoś ekstra do tej całej idei, więc moja propozycja jest trochę.. niekonwencjonalna. Jest jednak w 100% pasująca do mnie, mam nadzieję, że Wam się spodoba.

In a girls life there are some dresses that are more memorable then others. The wedding dress is definitely one of them and that's the dress I want to show You, pared with a matching manicure. I wouldn't be myself if I didn't add an extra twist to this whole idea, so my proposition is a bit.. unconventional. It's 100% me though, I hope You'll enjoy it.


Zacznijmy od rzeczonej sukienki. Jest to sukienka w całości z koronki, która ma gęstą siateczkę z symetrycznie rozłożonymi ciemniejszymi kropkami jak również haftowanymi kwiatami i zawijasami. Wzór koronki był tym co chciałam skopiować na paznokcie.

Let's start from the dress in question. It is an all lace dress that has a very dense meshwork with symmetrically spread bolder spots as well as some embroidered flowers and swirls. The design of the lace was what I tried to copy onto my nails.


Manicure zaczęłam od nałożenia warstwy mlecznej odżywki, ponieważ nie zamierzałam używać lakieru bazowego. Jak wyschła, przeszłam od razu do stemplowania.

I started my manicure by applying a layer of milky nail strengthener, because I wasn't going to put any base polish on. When it dried, I went straight to stamping.


Znalazłam na płytce MoYou London Bridal 10 wzorek, który jest idealną kopią mojej siateczki na sukience i odbiłam go lakierem Kaleidoscope by El Corazon 01 Black. Mówiłam Wam, że chcę zrobić coś niekonwencjonalnego, więc ten ślubny manicure nie jest taki niewinny i biały ;)

I found a design on MoYou London Bridal 10 plate that is an exact copy of the meshwork on my dress and stamped it with Kaleidoscope by El Corazon 01 Black. I told you I wanted to do something unconventional, so this "wedding" manicure isn't all innocent and white ;)


Pewnie już wiecie, że nie maluję wzorków na paznokciach ręcznie, więc musiałam znaleźć kwiatki i zawijasy z mojej sukienki ja jakiejś płytce. Nie było to łątwe zadanie, ale chyba nieźle mi poszło.

You probably know by now that I don't do hand painted designs on my nails, so I had to find the flowers and swirls from my dress on a stamping plate. It wasn't an easy task, but I think I did quite well.


Kwiatki są z płytki Lina Nail Art Supplies 4 Seasons - Spring 01 a zawijasy są częściami dwóch wzorków z płytki Lina Nail Art Supplies Twirls & Swirls 01. Te wzory były odbite lakierem Kaleidoscope by El Corazon 02 White.

The flowers are from Lina Nail Art Supplies 4 Seasons - Spring 01 plate and the swirls are parts of two designs from Lina Nail Art Supplies Twirls & Swirls 01 plate. These designs were stamped with Kaleidoscope by El Corazon 02 White.


Jak zwykle zabezpieczyłam stemple top coat'em Kads Smudge Resistant. Chciałam żeby całość miała matowe wykończenie, więc dodałam też warstwę Golden Rose Matte top coat.

Just like always I secured the stamping with Kads Smudge Resistant top coat. I wanted the whole thing to have a matte finish, so I also added a layer of Golden Rose Matte top coat.


Jak widzicie zdobienie jakie przygotowałam wygląda na rockową wersję standardowego ślubnego mani i to jest dokłądnie co chciałam osiągnąć. Poniżej możecie zobaczyć stylizację jaką wykombinowałam i możecie powiedzieć mi czy udało mi się dopasować do niej paznokcie.

As You can see the nail art I prepared looks like a rock version of a standard wedding manicure and that's exactly what I wanted to achieve. Below You can see the stylization I came up with and You can tell my if I matched it with my nails.


Więc? Podoba Wam się moje niecodzienne ślubne zdobienie i stylizacja? Patrząc z perspektywy czasu na dzień mojego ślubu, trochę żałuję, że nie założyłąm czegoś takiego, ale cóż.. był to w końcu środek lata. Trochę za ciepło na skórę ;)

Well? Do You like my unconventional wedding nail art and stylization? Looking back at my wedding day I'm a bit sad I didn't actually end up wearing something like this, but well.. it was the middle of Summer after all. A bit too warm for a leather jacket ;)


Płytki jakich użyłam możecie zobaczyć tutaj..

You can see the plates I used here..

Źródło: http://moyou.co.uk/

Źródło: http://linanailartsupplies.com/

Źródło: http://linanailartsupplies.com/
..a jeśli interesuje was co stworzyłam w poprzednich tygodniach #CREATIVENAILPARTY, możecie zobaczyć wszystkie moje zgłoszenia TUTAJ.

..and if You're interested what I created for the previous weeks of #CREATIVENAILPARTY, You can find all my entries HERE.


Specjalne podziękowania dla mojej siostry za pomoc w operowaniu aparatem! Ten post pewnie nie powstałby gdyby nie ona.

Special thanks for my great sister for helping with operating the camera! This post wouldn't come to existence if it wasn't for her.

czwartek, 3 maja 2018

#CREATIVENAILPARTY - Tydzień 1 - Źółty

#CREATIVENAILPARTY - Week 1 - Yellow

Hej!
Słyszałyście, że wyzwanie #CREATIVENAILPARTY prowadzone przez The Cieniu właśnie znów się zaczęło?! Pamiętacie zimową edycję? Jeśli nie to TUTAJ jest link do moich mani. Tym razem tak jak poprzednio mamy cztery tematy, a każdy trwa tydzień. Tematy są jednak mniej sezonowe, więc jest większa dowolność. Myślę nawet, że będzie tu dla mnie okazja na przemycenie Halloween'owego zdobienia :D Na początek "Żółty", poniżej zaś możecie zobaczyć pozostałe tematy, jak również dokładne daty.

Hey!
Did You hear that #CREATIVENAILPARTY challenge hosted by The Cieniu just started again?! Do You remember the Winter edition? If not, HERE is the link to my manicures. This time just like before there's four themes and each one lasts a week. The themes are less seasonal though, so there's much more flexibility. I think there will even be a chance for me to sneak in a Halloween nail art :D We're starting with "Yellow" and below You can see what are the other themes, as well as the exact dates.


Na początek mam trochę blogowych spraw którymi chciałąbym się z Wami podzielić. Już od jakiegoś czasu przeszkadza mi fakt, że moje zdjęcia nie są zbyt estetyczne. Boli mnie wiedza, że nawet jeśli moje zdobienia są satysfakcjonujące to nie mam warunków ani sprzętu żeby Wam je pokazać w bardziej atrakcyjny sposób. Do tej pory fotografowałąm tylko w dzień, w bliskiej odległości od okna i to bardzo ograniczało moje możliwości stworzenia jakiejkolwiek scenki. Próbowałam naprawić ten problem przez kupno pary softbox'ów i profesjonalnego tła, jednak dalej nie zrobiło to aż takiej wielkiej różnicy. Wciąż robię zdjęcia smartfonem i to nie najnowszym. To główny powód dla którego nie jestem w stanie (i prawdopodobnie szybko nie będę) osiągnąć lepszego poziomu ostrości, upragnionego ostatnio tła typu bokeh oraz zamierających dech w piersi ujęć makro moich zdobień. Nie mniej jednak udało mi się przynajmniej odrobinę podnieść poziom ogólnej koncepcji fotografowania manicuru. Światło i ostrość (poprawiona tylko w programie) dalej są do kitu w większości przypadków, a tło to tylko sztuczny bokeh. Wyglądam też przy niektórych ujeciach jakbym uprawiałą jogę, ponieważ większość cześci mojego ciałą jest przed obiektywem telefonu a ja nachylam się do przodu próbując jednak zobaczyć co tak w zasadzie fotografuję, balansując między statywami softbox'ów (wyobraźcie to sobie przez chwilę, to musi być komiczny widok :D). Pomimo tego mam nadzieję, że zmiany są na lepsze i obiecuję postarać się z czasem poprawiać coraz więcej. Kupno porządnego aparatu jest moim priorytetem, tak żebym w przyszłości była bardziej dumna z moich zdjęć. Dajcie znać w komentarzach co myślicie, chętnie przyjmnę wszytskie rady w tym temacie.

First off all I have some blog related things I want to share with You. For some time now I've been bothered with the fact that my photos aren't very esthetic. It pains me to know that even if my nail art is satisfying, I don't have the conditions and equipment to show You it in a more appealing way. Till now I only photographed in daylight, in the vicinity of a window and that really narrowed down my possibilities of building any scene at all. I tried to fix this issue by buying a pair of softbox lights and a professional background, but it still doesn't make that big of a difference. I still take my photos with a smartphone and not a very hi-tech one. That's the main reason I'm not able (and probably won't be in the nearest future) to achieve a better level of focus, the desired lately bokeh background or stunning macro shots of my designs. However I did manage to upgrade the general concept of photographing a manicure at least a little bit. The lighting and focus (sharpened only with a computer program) still sucks most of the time and the background is just artificial bokeh. Also with some poses it almost looks like I'm doing joga, because most of my body parts are in front of the phone camera and I'm leaning forward trying to see what I'm actually photographing, balancing somewhere between the softbox tripods (just imagine that for a moment, it has to be a hilarious view :D). Nevertheless I hope the changes are for the better, I promise to do my best and improve more in time. Buying a decent camera is my priority, so I can be more proud of my pictures in the future. Let me know Your thoughts in the comments, I'll gladly take any advise in the matter.

Wróćmy teraz do manicuru, który tutaj mamy. Najważniejsz jest tutaj oczywiście neonowy żółty, ale sparowałąm go tutaj z kilkoma innymi żarówiastymi kolorami z kolekcji Colour Alike Neon Goes Pastel. Użyłam Yellow Flash (trzy warstwy) jako bazy pod moje stemple, a Hot Red (dwie warstwy) na resztę paznokci. Dołożyłam też warstwę toppera ILNP Alchemist na wszystkie paznokcie żeby dodać im trochę błysku (wyglądało to świetnie na żywo).

Now lets get back to the manicure at hand. The most important factor here is the neon yellow of course, but I pared it with some other bright colours from the Colour Alike Neon Goes Plastic collection. I used Yellow Flash (three coats) as the background for my stamping and Hot Red (two coats) for the rest of the nails. I also added one coat of ILNP Alchemist topper on all of my nails to give the an extra spark (it looks stunning in real life).


Zdobienie jakie możecie tutaj zobaczyć było zrobione przy użyciu techniki reverse stamping. Wzorek pochodzi z płytki B. Loves Plates B.08 Feather Fever, odbiłąm go lakierem Kaleidoscope by El Corazon 01 Black, a piórka pokolorowałam CA Hot Red, Electric Green i Neon Pink używając bardzo małego pędzelka. Na koniec zebzpieczyłam stemple top coat'e, Kads Smudge Resistant oraz pokryłam wszystkie paznokcie INM Out The Door.

The nail art You can see here was made using the reverse stamping technique. The design comes from B. Loves Plates B.08 Feather Fever plate, I stamped it with Kaleidoscope by El Corazon 01 Black and coloured the feathers with CA Hot Red, Electric Green and Neon Pink using a really small nail art brush. In the end I secured the stamping with Kads Smudge Resistant top coat and covered all of my nails with INM Out The Door.


Większość produktów jakich użyłąm przewija się gdzieś na zdjęciach, a poniżej możecie zobaczyć cudowną płytkę Feather Fever.

Most of the products I used are somewhere on the photos and below You can see the wonderful Feather Fever plate.

Źródło: http://blovesplates.com/

Jak Wam się podoba moje pierwsze zgłoszenie do #CREATIVENAILPARTY? Jesteście ciekawe co zrobię następnym razem?

How do You like my first entry for #CREATIVENAILPARTY? Are You curious what I'm going to come up with next?


Możecie śledzić wyzwanie na Instagramie oczywiście pod hashtagiem #CREATIVENAILPARTY oraz na koncie The Cieniu.

You can fallow the challenge on Instagram, of course under the hashtag #CREATIVENAILPARTY and on The Cienu account.


sobota, 21 kwietnia 2018

Perfect Lace

Cześć Wam,
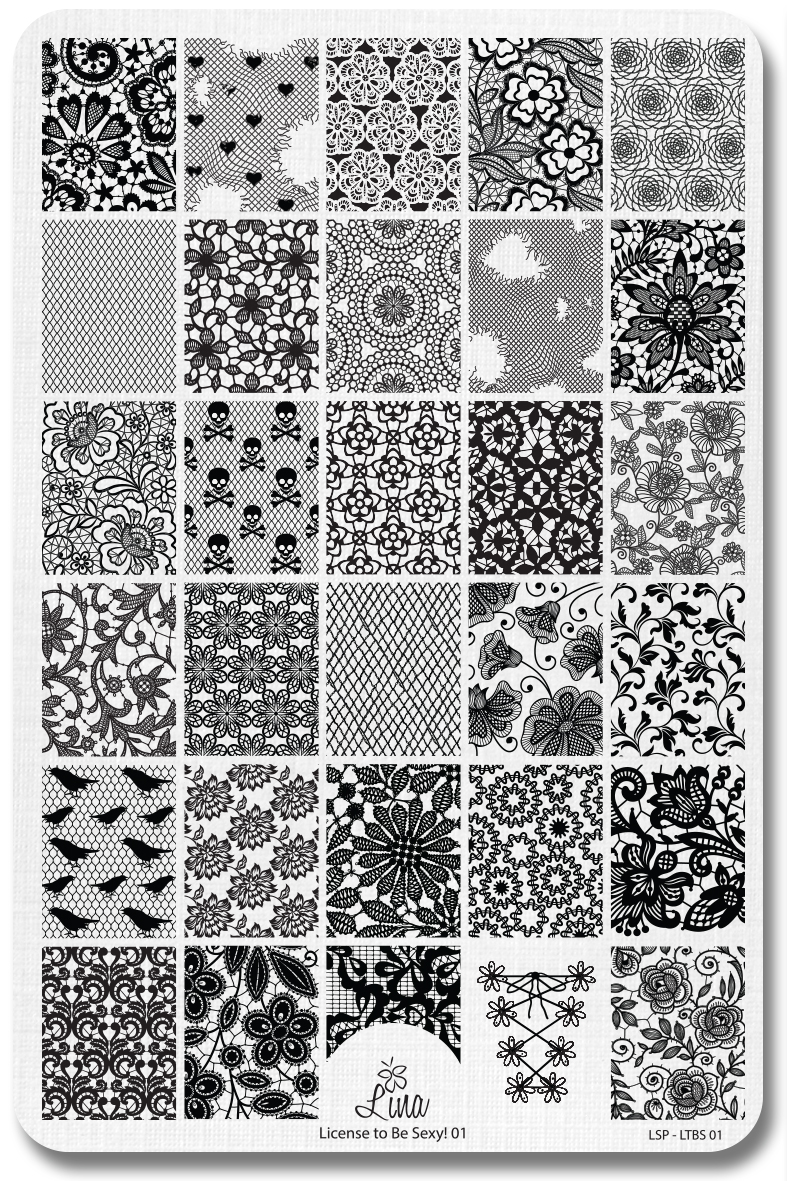
minęło już tyyyyle czasu od kiedy pisałam tu posta. Przepraszam, że tak zaginęłam w akcji ostatnio. Myślę, że ponieważ moje ogólne samopoczucie nie było najlepsze, nie mogłąm znaleźć motywacji do pisania. Wiosna z jej słoneczną pogodą powinna mi pomóc i postawić mnie na nogi. Dzisiaj chcę Wam pokazać manicure jaki zrobiłam z użyciem jednej z najpękniejszych koronkowych płytke jakie kiedykolwiek widziałam - Lina Nail Art Supplies License To Be Sexy 01.

Hi there,
it's been soooo long since I wrote a post here. I'm sorry for being so MIA lately. I think that because my overall frame of mind wasn't the best, so I just couldn't find the motivation to write. Spring with it's sunny weather should help me and get me back in shape. Today I want to show You a manicure I did using one of the most beautiful lace plates I've ever seen - Lina Nail Art Supplies License To Be Sexy 01.


Lakier bazowy jaki mam na paznokciach to Kiko 510 Mauve Grey i nałożyłam dwie średniej grubości warstwy żeby osiągnąć pełne krycie. Jako błyszczący dodatek nałożyłąm także jedną warstwę ILNP Moonstone. Tak jak zapowiadałam w poprzednim poście, jest to kolejny niesamowity lakier z kolekcji ILNP Real Magic Topper. Drobinki w Moonstone są głównie niebieskie, fioletowe i różowe więc świetnie harmonizowały z odcieniem mojej bazy.

The base polish I have on my nails is Kiko 510 Mauve Grey and I applied two medium thick coats to achieve full opacity. As a sparkly addition I also applied one coat of ILNP Moonstone. Just like I announced in my previous post, this is another amazing polish from the ILNP Real Magic Toppers collection. The particles in Moonstone are mostly blue, purple and pink so they consorted with my base shade very well.


Tak jak wspomniałam na początku tego postu, wspaniały, koronkowy wzór jakiego użyłąm pochodzi z płytki Lina Nail Art Supplies License To Be Sexy 01. Do stemplowania użyłąm lakieru Kaleidoscope by El Corazon 01 Black i Stempla Born Pretty Store Clear Jelly Silicone Marshmallow Stamper. Zabezpieczyłam też całe zdobienie top coat'em Kads Smudge Resistant i INM Out The Door.

Like I mentioned in the beginning of this post, the wonderful lace patter I used here comes from Lina Nail Art Supplies License To Be Sexy 01 plate. For the stamping I used Kaleidoscope by El Corazon 01 Black polish and Born Pretty Store Clear Jelly Silicone Marshmallow Stamper. I also secured my whole nail art with Kads Smudge Resistant top coat and INM Out The Door.


Poniżej możecie zobaczyć płytkę o której tak czule pisałam..

Below You can see the plate I've been writing so fondly about..
Źródło: http://linanailartsupplies.com/

..oraz większość pozostałych produktów jakich użyłam.

..and most of the other products I used.


Jak Wam się podoba moje zdobienie? Widzieliście mój poprzedni manicure z użyciem tej wspaniałej koronkowej płytki? Jeśli nie, to jest TUTAJ.

How do You like my nail art? Did You see my previous manicure using this amazing lace plate? If not, HERE it is.