Pokazywanie postów oznaczonych etykietą Neon Goes Plastic. Pokaż wszystkie posty

czwartek, 3 maja 2018

#CREATIVENAILPARTY - Tydzień 1 - Źółty

#CREATIVENAILPARTY - Week 1 - Yellow

Hej!
Słyszałyście, że wyzwanie #CREATIVENAILPARTY prowadzone przez The Cieniu właśnie znów się zaczęło?! Pamiętacie zimową edycję? Jeśli nie to TUTAJ jest link do moich mani. Tym razem tak jak poprzednio mamy cztery tematy, a każdy trwa tydzień. Tematy są jednak mniej sezonowe, więc jest większa dowolność. Myślę nawet, że będzie tu dla mnie okazja na przemycenie Halloween'owego zdobienia :D Na początek "Żółty", poniżej zaś możecie zobaczyć pozostałe tematy, jak również dokładne daty.

Hey!
Did You hear that #CREATIVENAILPARTY challenge hosted by The Cieniu just started again?! Do You remember the Winter edition? If not, HERE is the link to my manicures. This time just like before there's four themes and each one lasts a week. The themes are less seasonal though, so there's much more flexibility. I think there will even be a chance for me to sneak in a Halloween nail art :D We're starting with "Yellow" and below You can see what are the other themes, as well as the exact dates.


Na początek mam trochę blogowych spraw którymi chciałąbym się z Wami podzielić. Już od jakiegoś czasu przeszkadza mi fakt, że moje zdjęcia nie są zbyt estetyczne. Boli mnie wiedza, że nawet jeśli moje zdobienia są satysfakcjonujące to nie mam warunków ani sprzętu żeby Wam je pokazać w bardziej atrakcyjny sposób. Do tej pory fotografowałąm tylko w dzień, w bliskiej odległości od okna i to bardzo ograniczało moje możliwości stworzenia jakiejkolwiek scenki. Próbowałam naprawić ten problem przez kupno pary softbox'ów i profesjonalnego tła, jednak dalej nie zrobiło to aż takiej wielkiej różnicy. Wciąż robię zdjęcia smartfonem i to nie najnowszym. To główny powód dla którego nie jestem w stanie (i prawdopodobnie szybko nie będę) osiągnąć lepszego poziomu ostrości, upragnionego ostatnio tła typu bokeh oraz zamierających dech w piersi ujęć makro moich zdobień. Nie mniej jednak udało mi się przynajmniej odrobinę podnieść poziom ogólnej koncepcji fotografowania manicuru. Światło i ostrość (poprawiona tylko w programie) dalej są do kitu w większości przypadków, a tło to tylko sztuczny bokeh. Wyglądam też przy niektórych ujeciach jakbym uprawiałą jogę, ponieważ większość cześci mojego ciałą jest przed obiektywem telefonu a ja nachylam się do przodu próbując jednak zobaczyć co tak w zasadzie fotografuję, balansując między statywami softbox'ów (wyobraźcie to sobie przez chwilę, to musi być komiczny widok :D). Pomimo tego mam nadzieję, że zmiany są na lepsze i obiecuję postarać się z czasem poprawiać coraz więcej. Kupno porządnego aparatu jest moim priorytetem, tak żebym w przyszłości była bardziej dumna z moich zdjęć. Dajcie znać w komentarzach co myślicie, chętnie przyjmnę wszytskie rady w tym temacie.

First off all I have some blog related things I want to share with You. For some time now I've been bothered with the fact that my photos aren't very esthetic. It pains me to know that even if my nail art is satisfying, I don't have the conditions and equipment to show You it in a more appealing way. Till now I only photographed in daylight, in the vicinity of a window and that really narrowed down my possibilities of building any scene at all. I tried to fix this issue by buying a pair of softbox lights and a professional background, but it still doesn't make that big of a difference. I still take my photos with a smartphone and not a very hi-tech one. That's the main reason I'm not able (and probably won't be in the nearest future) to achieve a better level of focus, the desired lately bokeh background or stunning macro shots of my designs. However I did manage to upgrade the general concept of photographing a manicure at least a little bit. The lighting and focus (sharpened only with a computer program) still sucks most of the time and the background is just artificial bokeh. Also with some poses it almost looks like I'm doing joga, because most of my body parts are in front of the phone camera and I'm leaning forward trying to see what I'm actually photographing, balancing somewhere between the softbox tripods (just imagine that for a moment, it has to be a hilarious view :D). Nevertheless I hope the changes are for the better, I promise to do my best and improve more in time. Buying a decent camera is my priority, so I can be more proud of my pictures in the future. Let me know Your thoughts in the comments, I'll gladly take any advise in the matter.

Wróćmy teraz do manicuru, który tutaj mamy. Najważniejsz jest tutaj oczywiście neonowy żółty, ale sparowałąm go tutaj z kilkoma innymi żarówiastymi kolorami z kolekcji Colour Alike Neon Goes Pastel. Użyłam Yellow Flash (trzy warstwy) jako bazy pod moje stemple, a Hot Red (dwie warstwy) na resztę paznokci. Dołożyłam też warstwę toppera ILNP Alchemist na wszystkie paznokcie żeby dodać im trochę błysku (wyglądało to świetnie na żywo).

Now lets get back to the manicure at hand. The most important factor here is the neon yellow of course, but I pared it with some other bright colours from the Colour Alike Neon Goes Plastic collection. I used Yellow Flash (three coats) as the background for my stamping and Hot Red (two coats) for the rest of the nails. I also added one coat of ILNP Alchemist topper on all of my nails to give the an extra spark (it looks stunning in real life).


Zdobienie jakie możecie tutaj zobaczyć było zrobione przy użyciu techniki reverse stamping. Wzorek pochodzi z płytki B. Loves Plates B.08 Feather Fever, odbiłąm go lakierem Kaleidoscope by El Corazon 01 Black, a piórka pokolorowałam CA Hot Red, Electric Green i Neon Pink używając bardzo małego pędzelka. Na koniec zebzpieczyłam stemple top coat'e, Kads Smudge Resistant oraz pokryłam wszystkie paznokcie INM Out The Door.

The nail art You can see here was made using the reverse stamping technique. The design comes from B. Loves Plates B.08 Feather Fever plate, I stamped it with Kaleidoscope by El Corazon 01 Black and coloured the feathers with CA Hot Red, Electric Green and Neon Pink using a really small nail art brush. In the end I secured the stamping with Kads Smudge Resistant top coat and covered all of my nails with INM Out The Door.


Większość produktów jakich użyłąm przewija się gdzieś na zdjęciach, a poniżej możecie zobaczyć cudowną płytkę Feather Fever.

Most of the products I used are somewhere on the photos and below You can see the wonderful Feather Fever plate.

Źródło: http://blovesplates.com/

Jak Wam się podoba moje pierwsze zgłoszenie do #CREATIVENAILPARTY? Jesteście ciekawe co zrobię następnym razem?

How do You like my first entry for #CREATIVENAILPARTY? Are You curious what I'm going to come up with next?


Możecie śledzić wyzwanie na Instagramie oczywiście pod hashtagiem #CREATIVENAILPARTY oraz na koncie The Cieniu.

You can fallow the challenge on Instagram, of course under the hashtag #CREATIVENAILPARTY and on The Cienu account.


sobota, 20 sierpnia 2016

Colour Alike & B. Loves Plates Neons! Vol. 6

Cześć!
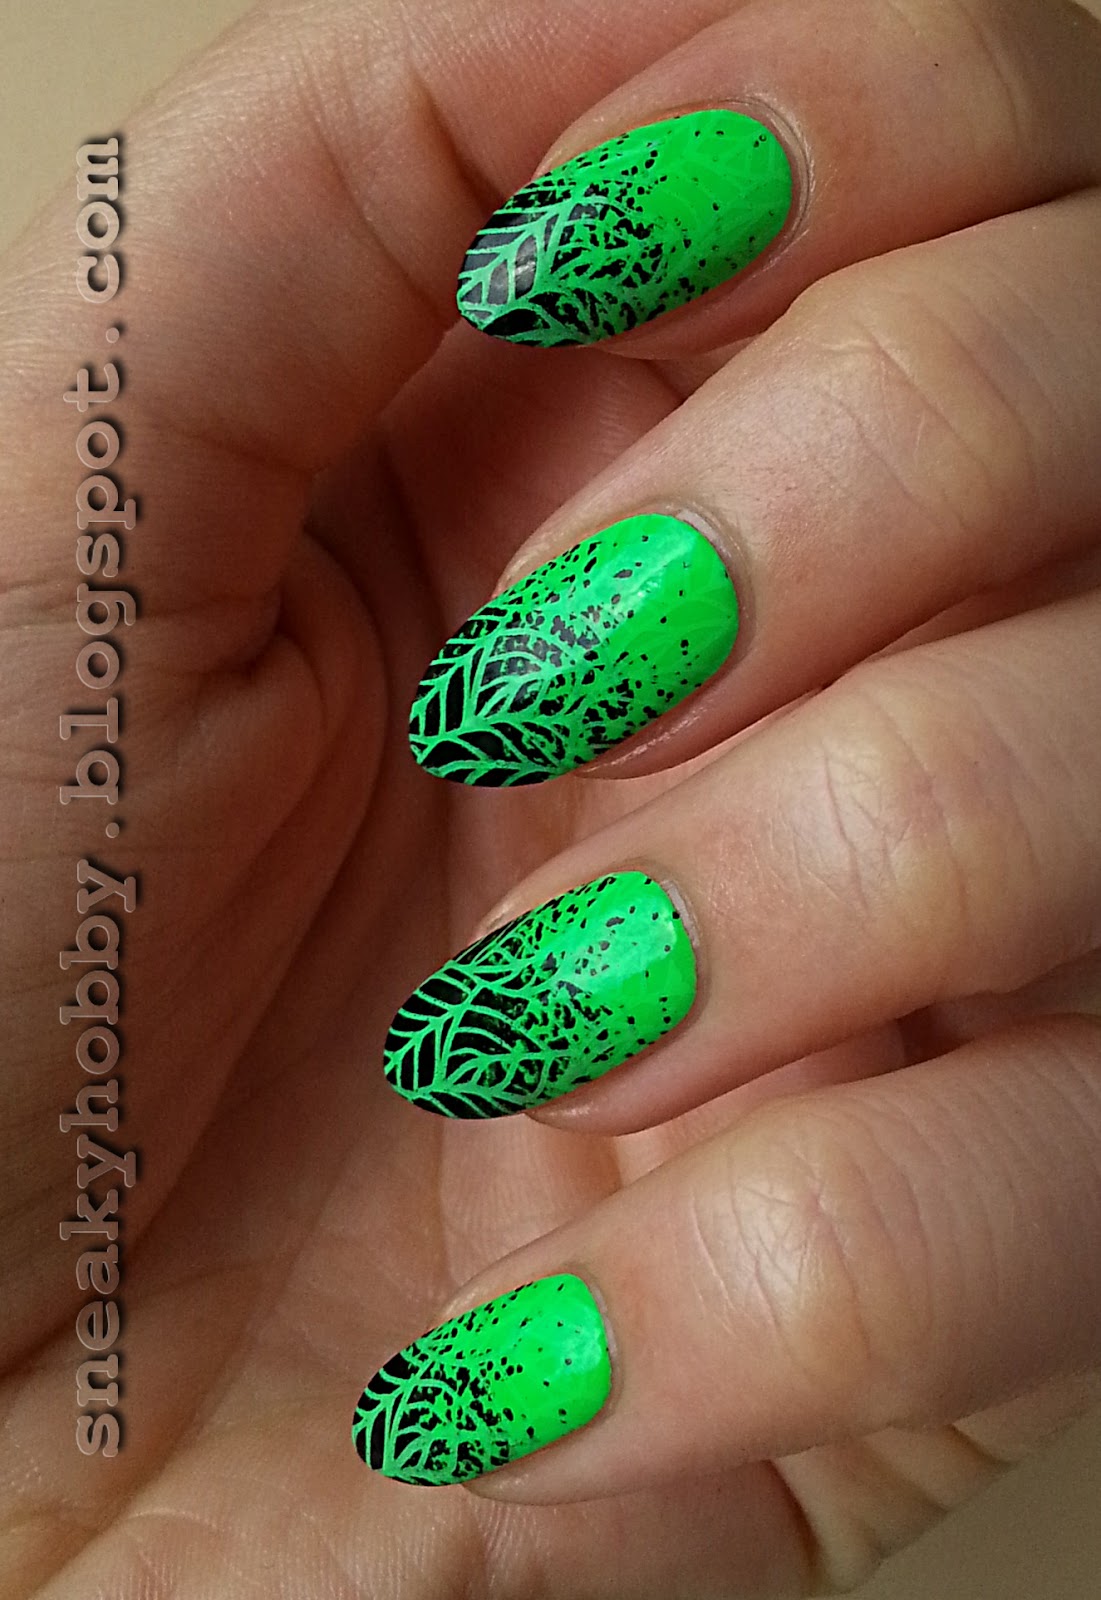
Przyszedł czas na mój ostatni manicure zrobiony przy użyciu lakierów z kolekcji Neon Goes Plastic i Neon Power. Dzisiaj są to dwie zieleni zmiksowane razem w jednym zdobieniu. Ciekawi mnie jak Wam się spodoba taka propozycja :>

Hi!
It's time for my last neon manicure made using polishes from Noen Goes Plastic and Neon Power collections. Today it's two greens mixed together in one nail art. I wonder how will You feel about this proposition :>


Zielony, neonowy, bazowy kolor to Colour Alike Electric Green. Użyłam dwóch warstw i osiągnęłam pełne krycie. Lakier tak jak poprzednie jest ciut gęstszy niż zazwyczaj, ale dla mnie wciąż komfortowy w użyciu. Schnie dość szybko do satynowego wykończenia.

The green, neon base polish is Colour Alike Electric Green. I used two coats and achieved a perfect coverage. The polish just like the previous ones is a bit thicker that usual, but for me still comfortable to use. It dries quite quick and to a satin finish.


To mani jest zasadniczo podwójnym stemplowaniem. Kiedy moja baza była całkowicie sucha zrobiłam wzór, który wygląda jak gradient. Pochodzi on z płytki Bundle Monster BM-XL 19 i odbiłam go Kaleidoscope 01 Black oraz Stemplem B. Loves Plates Jumbo. Absolutnie kocham ten pomysł, ponieważ normalnie jestem beznadziejna w gradientach. Zawsze narobię strasznego bałaganu, mam tendencję do wyczyszczania za dużo w okolicy skórek, jestem zbyt niecierpliwa żeby czekać aż każda warstwa wyschnie i kończę z kawałkami gąbki, włosami czy innymi rzeczami w lakierze. Nigdy nie wygląda do dobrze.. Ten stemplowy wzór uratował mi życie i żałuję, że inne firmy nie maja podobnych. Ten konkretny nie tworzy prostej linii gradientu, jest jakby wypukły (mam nadzieję, że wiecie o co mi chodzi). Chciałabym prosty wzór, można by go użyć pionowo albo skośnie.

This manicure is actually a double stamping. When my base colour was completely dry I did a design that looks like a gradient. It comes from Bundle Monster BM-XL 19 plate and I stamped it with Kaleidoscope 01 Black and B. loves Plates Jumbo Stamper. I absolutely love this idea, because normally I really suck at gradients. I always make a huge mess, I tend to clean too much in my cuticle area, I'm too impatient to wait for each layer to dry and end up with bits of the sponge, hair or other things in my polish. It's never pretty.. This stamping design saved my life and I regret that other brands don't have similar patterns. This particular one doesn't create a straight line of the gradient, it's kind of curved (I hope You know what I mean). I'd love a design that's straight, it could be use vertically or diagonally.


Kiedy mój zielono czarny gradient był gotowy odstemplowałam kolejny wzorek na nim. Użyłam płytki B. Loves Plates B.04 Leaves Of Happiness oraz lakieru do stempli Colour Alike & B. Loves Plates B. a Green Light. Tak jak poprzednio odbijałam Stemplem B. Loves Plates Jumbo. Jak widzicie lakier wygląda świetnie na czerni, jest dobrze napigmentowany i żywy. Ma też ciut inny odcień zieleni niż moja baza, więc kiedy patrzy się z bliska wzór jest widoczny na całym moim paznokciu. Z pewnej odległości listki zdają się zanikać w pobliżu skórek i to jest efekt. który chciałam osiągnąć.

When my green and black gradient was ready I stamped another design on top of it. I used B. Loves Plates B.04 Leaves Of Happiness plate and Colour Alike & B. Loves Plates B. a Green Light stamping polish. Just like before I stamped with B. Loves Plates Jumbo Stamper. As You can see the polish looks amazing over black, it's nicely pigmented and vibrant. It also has a bit different shade of green than my base colour, so when You look very close You can see the design on my whole nail. From a distance the leaves seems to fade near the cuticles, and that's exactly the effect I wanted to accomplish.


Poniżej możecie zobaczyć obie płytki użyte w dzisiejszym mani..

Below You can see both plates I used for today's manicure..

Źródło: https://bundlemonster.com/


Źródło: http://allegro.pl/listing/user/listing.php?us_id=37818237

..i większość produktów.

..and most of the products.


Jeżeli jesteście zainteresowane możecie zobaczyć moje pozostałe, neonowe mani z lakierami z tych dwóch kolekcji tutaj:

If You're interested You can see my other neon manicures with polishes from these two collections here:


wtorek, 16 sierpnia 2016

Colour Alike & B. Loves Plates Neons! Vol. 5

Cześć!
Lato powoli przemija, a ja dalej mam Wam do pokazania kilka neonów z kolekcji Neon Goes Plastic i Neon Power. Po moim ostatnim chłodniejszym mani wracam z kolejną słoneczną kompozycją.

Hi!
Summer is slowly passing by and I still have some neons from Neon Goes Plastic and Neon Power collections to show You. After my last cool toned manicure I'm back with another sunny composition.


Jako bazy użyłam Colour Alike Hot Red. Jest to chyba mój ulubiony lakier z zestawu, nie mam w swojej kolekcji nic podobnego. Jest to również kolejny niesamowity dwuwarstwowiec. Myślę, że przyzwyczaiłam się do konsystencji tych lakierów, jest trochę gęstsza, ale dla mnie - fajna i łatwa w obsłudze.

As a base I used Colour Alike Hot Red. This is probably my favourite polish from the bunch, I don't have nothing like it in my stash. This is also another amazing two coater. I think I got used to the formula of these polishes, it's a bit thicker, but for me - nice and easy to work with.


Sparowałam ten bazowy kolor z żółtymi stemplami. Zdecydowałam się na wzorek tylko w okolicy skórek żeby uniknąć zmiany koloru bazy. Użyłam lakieru do stempli Colour Alike & B. Loves Plates B. a Yellow Glow oraz Stempla B. Loves Plates Jumbo. Śliczny wzór pochodzi z płytki MoYou London Pro XL 06.

I pared this base colour with yellow stamping. I decided to place the design only in the cuticle area to avoid changing the base colour. I used Colour Alike & B. Loves Plates B. a Yellow Glow stamping polish and B. Loves Plates Jumbo Stamper. The lovely design comes from MoYou London Pro XL 06 plate.


Tak jak w przypadku innych lakierów do stempli z kolekcji Neon Power ważna jest szybka praca z nimi. Lakier ma wspaniałą pigmentację, ale zmienił swój kolor na tej konkretnej bazie. Wygląda bardziej jak standardowy, słoneczny żółty niż zielonkawy neonowy żółty, ale tak jak napisałam jest to spowodowane bazą jakiej użyłam. Normalnie wygląda on tak jak w butelce.

Just like with the other stamping polishes from the Neon Power collection working quick is important. The polish has wonderful pigmentation, but it did change it's colour on this particular base. It looks more like a standard sunny yellow that a greenish neon yellow, but as I wrote before this is caused by the base I used. Normally it looks just like in the bottle.


Poniżej możecie zobaczyć moją płytkę MoYou London 06..

Below You can see my MoYou London Pro XL 06 plate..

Źródło: http://moyou.co.uk/

..oraz większość produktów jakich użyłam.

..and most of the products I used.

sobota, 13 sierpnia 2016

Colour Alike & B. Loves Plates Neons! Vol. 4

Cześć Wam!
Dawno się nie.. pisało? Dalej jestem zakopana w pracy i nie mam za dużo czasu na blogowanie, ale postaram się pokazać Wam kolekcje Neon Goes Plastic i Neon Power przed końcem lata ;) Dzisiaj mam bardzo kontrastowe kombo, jestem ciekawa ilu z Was spodoba się taki typ zdobienia.

Hey there!
Long time no.. write? I'm still buried in work and I don't have too much time for blogging, but I'll try to show You the Neon Goes Plastic and Neon Power collections before the summer ends ;) Today I have a very contrast combo, I'm wonder how many of You like this type of nail arts.


Baza jaką wybrałam do tego mani to Colour Alike Neon Pink. Wierzcie mi jak powiem, że jest mega neonowy. Prawie świeci na moich dłoniach. Aplikacja jest na prawdę fajna, lakier pokrył moje paznokcie całkowicie w dwóch warstwach.

The base I chose for this manicure is Colour Alike Neon Pink. Believe me when I say it: it's neon as hell. It almost glows on my hands. The application is really good, the polish covered me nails fully in two coats.


Tym razem zdecydowałam się zrobić wzorek tylko na dwóch paznokciach. Bałam się, że niebieskie stemple mogą zmienić wygląd bazy, a chciałam Wam pokazać faktyczny kolor CA Neon Pink. Wzór pochodzi z płytki Uber Chic 1-01, odbiłam go Colour Alike & B. Loves Plates B. a Cobalt Kick oraz Stemplem B. Loves Plates Jumbo. Jak widzicie cała trójka spisała się świetnie, bo zdobienie wygląda perfekcyjnie.

This time I decided to do a design only on two nails. I was worried that the blue stamping might change how the base looks and I wanted to show the actual colour of CA Neon Pink. The design comes from Uber Chic 1-01 plate, I stamped it with Colour Alike & B. Loves Plates B. a Cobalt Kick and B. Loves Plates Jumbo Stamper. As You can see all three worked amazing, because the nail art looks perfect.


Stemple zabezpieczyłam Sally Hansen Maximum Growth, a potem całe mani pokryłam INM Out The Door.

I secured the stamping with Sally Hansen Maximum Growth and after that I covered my whole manicure with INM Out The Door.


Poniżej możecie zobaczyć płytkę Uber Chic..

Below You can see the Uber Chic plate..

Źródło: http://uberchicbeauty.com/

.. i resztę produktów jakich użyłam.

..and the rest of the products I used.


środa, 3 sierpnia 2016

Colour Alike & B. Loves Plates Neons! Vol. 3

Hej!
Mam nadzieję, że nie znudziły Wam się jeszcze neony ;) Dzisiaj mam do pokazania kolejny intensywny manicure. Zdecydowałam, że zostaniemy w pomarańczowej tonacji, tym razem jednak z odrobiną różu :)

Hey!
I hope You're not bored with neons yet ;) I  have another vibrant manicure to show You today. I decided we're staying in the orange colour range, but this time with a hint of pink :)


Gydybyście chcialy zobaczyć moje poprzednie neonowe kompozycje, są TUTAJ i TUTAJ. Mogę powiedzieć na 100%, że zrobię jeszcze co najmniej 3 żeby pokazać Wam wszystkie lakier z kolekcji Colour Alike Neon Goes Plastic i Colour Alike & B. Loves Plates Neon Power.

If You'd like to see my previous neon compositions, they're HERE and HERE. I can tell You for sure I'll be making at least 3 more to sow You all the polishes in Colour Alike Neon Goes Plastic and Colour Alike & B. Loves Plates Neon Power collections.


Bazowy kolor jakiego tutaj użyłam to Colour Alike Orange Fizz. Lakier ma na prawdę dobre krycie, nałożyłam dwie warstwy i byłamz adowolona z efektu. Tak jak inne neony w tej kolekcji jest on trochę gęstszy niż standardowe lakiery. Zauważyłam też, że lepiej jest ograniczyć ilość pociągnięć pędzelka do minimum.

The base colour I used here is Colour Alike Orange Fizz. This polish had really good coverage, I applied two coats and I was happy with the effect. Just like the other neons in this collection it's a bit thicker than standard polishes. I also observed that it's better to reduce the amount of brush strikes to minimum.


Wzór jaki możecie zobaczyć na moich paznokciach pochodzi z płytki Uber Chic 1-03. Ostatnio brakuje mi energii i czasu na wypróbowywanie czegoś bardziej skomplikowanego. Dużym plusem wzorków takich jak ten jest fakt, że nie trzeba być super dokładnym przy odbijaniu, a końcowy rezultat i tak wygląda świetnie. Użyłam tutaj lakieru do stempli Colour Alike & B. Loves Plates B. a Fucha Flash oraz Stempla B. Loves Plates Jumbo. Lakier do stempli szybko wysycha, więc pracujcie z nim sprawnie. Dla mnie nie jest to duży problem, ale myślę, że osoby początkujące mogą mieć kłopoty. Fajną sprawą jest to, że te lakiery łatwo zmywają sie ze skórek. Uwielbiam to w formułach od CA & B.

The design You can see on my nails comes from Uber Chic 1-03 plate. Lately I lack the energy and time to try anything more complicated. A big plus of designs like this one is that You don't have to be super precise with the stamping and the end result still looks great. I used here Colour Alike & B. Loves Plates B. a Fuchsia Flash stamping polish and B. Loves Plates Jumbo Stamper. The stamping polish dries quickly, so be sure to work fast with it. For me it's not a big problem, but I do think that beginners might have troubles. It's a nice thing that these polishes clean easily from the cuticles. I love this in CA & B.'s formulas.


Poniżej możecie zobaczyć płytkę UC..

Below You can see the UC plate..

Źródło: http://uberchicbeauty.com/

..oraz inne produkty jakich użyłam.

..and other products I used.


piątek, 29 lipca 2016

Colour Alike & B. Loves Plates Neons! Vol. 2

Co powiecie na neonowe paisley? Zrobiłam drugą kompozycję z lakierami z kolekcji Neon Goes Plastic i Neon Power. Moje pierwsze mani w tej małej serii możecie zobaczyć TUTAJ. Dzięki Colour Alike i B. Loves Plates myślę, że zrobię ich jeszcze  dużo takich energetycznych kombinacji!

How about a neon paisley? I made a second composition with polishes from Neon Goes Plastic and Neon Power collection. You can see my first manicure in this little series HERE. Thanks to Colour Alike and B. Loves Plates I think I'll be making much more of these energetic combinations!


Kolorem bazowym tutaj jest Colour Alike Purple Twist. Czytałam gdzieś, że ten odcień został dodany do kolekcji w ostatniej chwili i myślę, że była to świetna decyzja. To bardzo fajny, kryjący po dwóch warstwach fiolet.

The base colour here is Colour Alike Purple Twist. I read somewhere that this shade was added to the collection at the last moment and I think it was a great decision. It's a very nice, opaque in two coats purple.


Lakier do stempli jaki wybrałam do tego mani to Colour Alike & B. Loves Plates B. an Electric Orange. Tak jak przy poprzednim neonowym lakierze do stempli musimy działać szybko. Nie zepsułam żadnego paznokcia, ale wzór nie był trudny do przeniesienia. Nie musiałam zwracać dużej uwagi na odpowiednie rozmieszczenie itp. Użyłam Stempla B. Loves Plates Jumbo.

The stamping polish I chose for this manicure is Colour Alike & B. Loves Plates B. an Electric Orange. This is such an vibrant and positive colour! On the purple base it looked a little like ChG Flip Flop Fantasy and I loved it. Just like with the previous neon stamping polish we have to work fast. I didn't mess up any nails, but the design wasn't complicated to transfer. I didn't have to pay to much attention to appropriate placement etc. I used B. Loves Plates Jumbo Stamper.


Uroczy wzór paisly pochodzi z płytki MoYou London Flower Power 16. Mogliście ją już widzieć w akcji na moim blogu TUTAJ.

The lovely paisley design comes from MoYou London Flower Power 16 plate. You could already see it in action on my blog HERE.


Możecie zerknąć na wszystkie wzory z tej rewelacyjnej płytki poniżej.

You can take a look at all the designs on this amazing plate below.

Źródło: https://www.moyou.co.uk/

Z kolei tutaj są główne produkty jakich użyłam żeby stworzyć moje neonowe mani.

On the other hand here are the main products I used to create me neon manicure.


Nie byłam pewna jak dobrać lakiery z tych dwóch kolekcji żeby pokazać Wam je wszystkie w sześciu mani. Myślę, że ten mój pomysł zmusił mnie do stworzenia co najmniej kilku bardzo nieoczywistych kombinacji. Mam nadzieję, że spodobaja Wam się tak jak mi.

I wasn't sure how to match the polishes from these two collections together to show You all of them in six manicures. I think this idea of mine forced create at least a few very unobvious colour combinations. I hope You'll enjoy them as much as I do.


niedziela, 24 lipca 2016

Colour Alike & B. Loves Plates Neons! Vol.1

Cześć!
Neony! Neony wszędzie! Ostatnio nasza polska firma Colour Alike wypuściła kolekcję niesamowitych neonów o nazwie Neon Goes Plastic. Zrobili oni również we współpracy z B. Loves Plates neonowe lakiery do stempli (Neon Power). Jak tylko produkty pojawiły się na ich stronce od razy zamówiłam obie kolekcje i oto mój pierwszy manicure z ich użyciem.

Hi!
Neons! Neons everywhere! Lately our polish brand Colour Alike lunched a collection of amazing neons called Neon Goes Plastic. They also made neon stamping polishes in collaboration with B. Loves Plates (Neon Power). As soon as the products appeared on their site I ordered both collections and this is my first manicure with them.


Muszę przyznać, że nie miałam za wiele czasu żeby stworzyć coś ambitnego, ale jak odpakowałam te lakiery po prostu musiałam użyć ich od razu! Zdecydowałam się zrobić żółtą bazę i użyć Colour Alike Yellow Flash. Nałożyłam trzy warstwy żeby całkowicie pokryć paznokcie, ale ten lakier nie był problematyczny. Ma on trochę gęstszą formułę, ale dzięki temu krycie jest na prawdę fajne jak na neon. Lakier ma satynowe wykończenie, ale ja zawsze daję warstwę top coat'u, więc raczej nie zobaczycie go w tej wersji nigdzie na moim blogu.

I must admit I didn't have a lot of time to create something ambitious, but when I unwrapped these polishes I just had to use them right away! I decided to make a yellow base and used Colour Alike Yellow Flash. I applied three coats to fully cover my nails, but this polish wasn't problematic. It does have a bit thicker formula, but thanks to that the coverage is actually really nice for a neon. The polish has a satin finish, but I always add a top coat, so You probably won't see it in that version anywhere on my blog.


Przez poważny brak czasu na tej bazie zrobiłam prosty, kropkowy wzór. Użyłam Colour Alike B. a Pink Punch i Stempla B. Loves Plates Jumbo. Wzór pochodzi z płytki Uber Chic 1-03. Jak widzicie lakier do stempli działa na prawdę dobrze. Pigmentacje jest niesamowita, kolor jest żywy. Dużym plusem jest fakt, że lakier łatwo zmywa się ze skóry. Przy tym mani nie użyłam nawet lateksu do ochrony, a czyszczenie skórek poszło gładko. Lakier schnie szybko, więc musimy działać sprawnie. Raz skończyłam tylko z połową kropek na paznokciu, bo za długo czekałam z odbijaniem, więc miejcie to na uwadze. Może się to przydarzyć zwłaszcza jak używamy małych, płytkich albo bardzo szczegółowych wzorów. Lakier B. a Pink Punch nie jest dostepny obecnie w setach Neon Power. Wygląda na to, że partia nie przeszła testów jakościowych. Ja miałam szczęście dostać go jeszcze spośród kilku próbnych buteleczek, dzięki uprzejmości Colour Alike.

Due to a serious lack of time I did a simple dot design on this base. I used Colour Alike B. a Pink Punch and B. Loves Plates Jumbo Stamper. The design comes from Uber Chic 1-03 plate. As You can see the stamping polish worked really well. The pigmentation is amazing, the colour is vibrant. A big plus is that the polish cleans easily from the skin. In this manicure I didn't even use a latex barrier and my clean up went smoothly. The polish dries quickly, so we have to work fast. One time I ended up stamping only half of my dots because I waited too long with transferring, so keep that in mind. This can happen especially when we use small, shallow or very detailed designs. The B. a Pink Punch polish isn't currently available in the Neon Power sets. It looks like the batch didn't pass the quality tests. I was lucky to get it from the first couple of test bottles, thanks to the courtesy of Colour Alike.


Tym razem (nie jak zwykle ;)) użyłam do zabezpieczenia mani odżywki Sally Hansen Maximum Growth. Dalej próbuję znaleźć idealny top coat do zdobień, ale nie udaje mi się. Ta odżywka jest niezła, nie rozmazuje wszystkiego od razu. Nie jest jednak idealna, dalej muszę strasznie uważać i pomimo tego zdarza mi się czasem zepsuć stemple. Na wierzchu dodałam też warstwę INM Out The Door żeby przyśpieszyć schnięcie.

This time (not as usual ;)) I used Sally Hansen Maximum Growth hardner to secure my manicure. I'm still trying to find a perfect top coat for nail art, but failing at it. This hardner is quite good, it doesn't smudge everything right away. It's not perfect though, I still have to be very careful and despite this I sometimes mess up my stamping. On top of it all I also added a layer of INM Out The Door for fas drying.


Poniżej możecie zobaczyć płytkę do stempli jakiej użyłam..

Below You can see the stamping plate I used..

Źródło: http://uberchicbeauty.com/


..i produkty.

..and the products.