Pokazywanie postów oznaczonych etykietą BM-XL 19. Pokaż wszystkie posty

niedziela, 14 października 2018

Spooky Night Sky - #glamnailschallengeoct

Hej!
Trochę się spóźniłam z tym postem, bo mani w temacie Spooky Night Sky w Glam Nails Challenge były zaplanowane na 10tego października. Udało mi się wrzucić moją pracę na IG na czas, jednak to pierwsza okazja żeby usiąść w spokoju i o nim napisać. Ostatnio życie jest gorączkowe ponieważ zaczęliśmy remont w domu i ilość spraw do załatwienia jest po prostu szalona.

Hi there!
I'm a bit late with this post, because Spooky Night Sky manicures in Glam Nails Challenge were scheduled for 10th October. I managed to post my work on IG in time, but this is the first chance I got to sit down in peace and write about it. Life has been hectic lately, because we started renovating our house and the amount of errands to run is just crazy.


Moje Straszne Nocne Niebo jest fioletowo-niebieskie. Jako bazy użyłam Color Club Disco Dress. To ciemny, ale dość jaskrawy fiolet o świetnej formule. Potrzebowałam dwóch średnich warstw do pełnego krycia.

My Spooky Night Sky is purple and blue. As a base I used Color Club Disco Dress. It's a dark, but quite bright purple with a great formula. I needed two medium coats for full opacity.


Przy tym mani chciałam mieć co najmniej dwa kolory jako bazę, a to zazwyczaj prosi się o gradient. Jeśli obserwujecie mojego bloga pewnie wiecie, że rzadko je robię. Za dużo bałaganu jak dla mnie. Najlepszym sposobem na ułatwienie sobie zadania to zrobienie stempli. Dalej jestem beznadziejna w używaniu tego pustego prostokąta do gradientów, który pojawił się jakiś czas temu na rzeszy płytek. Zamiast niego używam wzorka z płytki Bundle Monster BM-XL19, który według mnie wygląda najbardziej podobnie do gradientu.

In this manicure I really wanted to have at least two colours as my base and that usually calls for a gradient. If You fallow my blog, You probably know I rarely do them. To messy for me. The best way to make the process easier is to do stamping. I still suck at using the blank rectangular design for gradients that appeared on a bunch of stamping plates a while back. Instead I use a design from Bundle Monster BM-XL19 plate that in my opinion looks the closest to a gradient.


Lakier jaki dobrałam do fioletu to Mundo de Unas Blue. Jak widzicie jest super napigmentowany i nawet na tak ciemnym fiolecie wygląda jaskrawo.

The polish I pared the purple with is Mundo de Unas Blue. As You can see it's super pigmented and even on such a dark purple looks vibrant.


Kolejnym krokiem było dodanie księżyca w pełni na palcu serdecznym i kciuku. W ten sposób nie ma wątpliwości, że na moich paznokciach jest noc ;) Wzorek jest warstwowy i pochodzi z płytki Clear Jelly Stamper Haunted Mansion. Odbiłam go lakierem Kaleidoscope by El Corazon 02 White i China Glaze Pelican Grey.

My next step was adding a full moon on my ring finger and thumb. This way there's no doubt that it's night time on my nails ;) This design is a layered one and comes from Clear Jelly Stamper Haunted Mansion plate. I stamped it with Kaleidoscope by El Corazon 02 White and China Glaze Pelican Grey.


Na moich paznokciach możecie zobaczyć upiorne drzewa i cmentarz. Wzorki te odbijane były osobno, ale oba pochodzą z płytki Clear Jelly Stamper Haunted Mansion. Odbiłąm je używając lakieru Kaleidoscope by El Corazon 01 Black.

On my nails You can see some spooky trees and a graveyard. These designs were stamped separately but both come from Clear Jelly Stamper Haunted Mansion plate. I stamped them using Kaleidoscope by El Corazon 01 Black.


Jak Wam się podoba moje zdobienie? Jesteście ciakwi co będzie następne. Tutaj są pozostałe tematy w Glam Nails Challenge.

How do You like my work? Are You curious what's coming next? Here are the next themes in Glam Nails Challenge.

Źródło: https://www.instagram.com/glamnailschallenge/

sobota, 30 czerwca 2018

REVIEW: Born Pretty Store BP-FS01 Recall

Cześć Wam!
Pewnie już słyszeliście, że Born Pretty Store zaprojektowało nowe buteleczki dla swoich lakierów. Szeroko reklamowali ten fakt w social mediach i nawet rozdali trochę produktów w tej nowej wersji. Mnie został wysłąny jeden lakier do recenzji w ramach współpracy i możecie go zobaczyć poniżej.

Hi there!
You probably heard by now that Born Pretty Store designed new bottles for their polishes. They widely advertised this fact on social media and even gave away some products in this new version. I was send one polish for review as a part of my collaboration and You can see it below.


Muszę powiedzieć, że nie jestem zachwycona tą zmianą i mam ku temu kilka powodów. Po pierwsze nie jestem fanką tego projektu butelki jako takiej. Dla niektórych z Was może wyglądać elegancko czy zgrabnie, alemi bardziej podobały się te prostokątne (regularne i do stempli). Może mam słąbość do geometrii i prostoty, nie wiem. Pewne jest zaś, że na prawdę dobrze się przechowywały w pudełkach. Drugą kwestią jest pojemność buteleczki, to tylko 6ml! Nic dziwnego, że wygląda smukło.. Jest po prostu małą, oto sekret. Holosie w prostokątnych butelkach jakie mam od BPS mają 10ml, a stemplowe lakiery 15ml. Prawdę mówiąc nie wydają mi się toporne czy cokolwiek takiego. Nie mniej jednak żeby zachować obiektywizm muszę powiedzieć, że mniejsza pojemność może mieć też zalety. Lakier może zachować taką samą konsystencję, ponieważ będziemy go mieć przez mniej czasu aż go wykończymy (chociaż w moim przypadku wydaje się, żę bardziej chodzi o ilość otwarć niż czas jaki lakier pozostaje w moich rękach i to decyduje o jego "świeźości"). Kupujemy mniejszą ilość produktu więc jeśli nam się nie spodoba, to nie aż taka strata. W teorii możemy też kupić więcej różnych lakierów za cenę jednej większej buteleczki. Przynajmniej w teorii.. a to ostatnia rzecz, która mnie niepokoi - cena. Mam nadzieję, że BPS nie spróbuje sprzedać nam mniejszej ilości produktu za podobną cenę.. W tej chwili możemy porównać cenę produktów w starych i nowych buteleczkach i przekonać się co jest bardziej opłacalne, ale co będzie jak starsze produkty znikną?

I have to say that I'm not thrilled by this change and I have a few reasons for that. First of all I'm not a big fan of this bottle design itself. For some of You it might look elegant or graceful, but I liked the rectangular ones better (regular and stamping). Maybe I'm a sucker for geometry or simplicity, I don't know. What's certain is that they stored in boxes really well. The second thing is the capacity of the bottle, it's only 6ml! No wonder it looks so slim.. It's just small, that's the secret. The holos in rectangular bottles I have from BPS have 10ml and the stamping polishes are 15ml. Quite frankly they don't appear clunky or any thing like that to me. Nevertheless to obtain objectivity I have to say that the smaller capacity can have some advantages as well. The polish might keep the same consistency, because we'll have it for a lesser amount of time before we use it all up (although in my case it seems to be more about the amount of openings than the time the polish stays in my hands and that decides about it's "freshness"). We buy a smaller amount of product and if we don't like it it's not such a waste. In theory we can also buy more different polishes at the cost of one bigger bottle. At least in theory.. and that's the last thing that worries me - the price. I hope BPS won't try to sell us less product for a similar price.. At this moment we can compare the price of products in old and new bottles and see what's more affordable, but what happens when the older products disappear?


To wszystko co mam do powiedzenia na temat samej buteleczki. Lakier jaki w niej przyszedł to całkiem inna historia. Dostałam Born Pretty Store BP-FS01 Recall i starsznie mi się nie spodobał jak go zobaczyłam po raz pierwszy.. To miętowa, jakby perłowa baza z holograficznym mikro glitter'em, która opalizuje na różowo i złoto. Tak ja opisałabym ten lakier. Jest też bardzo brzezroczysty.. i od razu pomyślałam o starych emaliach z lat 90tych, które dodawano do gazet dla nastolatków jak byłam w podstawówce. Wszystko to, to jednak moje pierwsze wrażenia i przyznaję, że ten lakier dużo zyskał w stylizacji na jaką wpadłam.

That's all I have to say about the bottle itself. The polish that came in it is a whole other story. I got Born Pretty Store BP-FS01 Recall and I hated it when I first saw it.. It's a mint, kind of pearly base with holographic micro glitter, that opalizes with pink and gold. That's how I'd describe this polish. It's also very sheer.. and immediately thought of the old 90's enamels that were added to teen magazines when I was in grade school. All of these though were my first impressions and I admit that the polish gained a lot in the stylization I came up with.


Zdecydowałam, że nie ma sensu budować krycia tym lakierem. Myślę, że moje białe końcówki byłyby widoczne bez względu na wszystko. Koniec końców nałożyłam dwie cienkie wartwy i zrobiłam stemple na końcówkach żeby je ukryć.

I decided there's no use to build the opacity with this polish. I think my white tips would stuck out no matter what. I ended up applying two thin coats and doing a stamping design on the tips to hide them.


Wzorek jakiego tutaj użyłam pochodzi z płytki Bundle Monster BM-XL19 i jest najlepszą imitacją gradientu w mojej kolekcji. Odbiłąm go lakierem Kaleidoscope by El Corazon 02 White.

The design I used here comes from Bundle Monster BM-XL19 plate and is the best imitation of a gradient in my collection. I stamped it with Kaleidoscope by El Corazon 02 White.


Nie było to moim zamiarem, ale ten manicure wygląda bardzo zimowo. przywiódł mi na myśl Elsę z Krainy Lodu :) Nie jest to typowy manicure w środku lata, ale na prawdę spodobało mi się jak wyszedł. Byłam dość zaskoczona tym jak ładnie wyglądał lakier z BPS w tej kombinacji. Po tym jak w ogóle mi się nie spodobał na początku możliwe, że nawet użyję go ponownie w przyszłości ;) Jeśli Wam się podoba, możecie go znaleźć TUTAJ razem z innymi kolorami z tej serii.

This wasn't my intention, but this manicure looks really wintry. It made me think of Elsa from Frozen :) Not your typical manicure in the middle of summer, but I really liked how it turned out. I was quite astonished by how nice the BPS polish looked in this combination. After not liking it at all at first I think I might even use it again in the future ;) If You like it You can find it HERE along with the other colours from this series.


Co myślicie o nowych butelkach BPS? Podoba Wam się lakier jaki Wam pokazałam? Przypadł Wam do gustu mój manicure? Dajcie znać w komentarzach!

What do You think about the new BPS bottles? Do You like the polish I showed You? How do You feel about my manicure? Let me know in the comments!


Jak zwykle chciałabym przypomnieć o kodzie HMG10 z mojego bloga. Daje on Wam 10% upustu na wszystkie produkty zakupione w sklepie internetowym Born Pretty Store, które nie były już uprzednio przecenione.
 
As usual I'd like to remind You about the HMG10 code from my blog. It gives You a 10% discount on all products bought in the Born Pretty Store on-line shop, that aren't already on sale.
 
 
Użyto próbek PR od Born Pretty Store / Born Pretty Store PR Samples used

czwartek, 20 października 2016

REVIEW: Born Pretty Store Nightscape Water Decals

Cześć,
tym razem przychodzę do Was z kolejna recenzją Born Pretty Store. Już od jakiegoś czasu miałam ochotę wypróbować krajobrazowe naklejki wodne i właśnie one przyszły w ostatniej paczce. Widziałam wiele zdobień z konturem miasta i byłam zakochana w każdym jednym. Niektóre były ręcznie malowane, niektóre stemplowe i pomyślałam, że naklejki wodne będą najprostszym sposobem na osiągnięcie takiego samego efektu. Poniżej możecie zobaczyć jak moje nowe naklejki wodne wyglądają, a znajdziecie je TUTAJ.

Hi,
this time I'm coming to You with another Born Pretty Store review. For some time now I was eager to try out landscape water decals and that's exactly what came in my last package. I saw numerous nail arts with a city contour and I loved every one of them. Some were freehand painted, some were stamping nail arts and I though that water decals would be the easiest way to achieve the same effect. Below You can see how do my new water decals look like and You can find them HERE.


Kartonik naklejek, który do nas przychodzi ma 12 rzędów krajobrazów miast i mają one odzwierciedlać niektóre z najbardziej znanych miast na świecie. Dostajemy też trzy różne typy krajobrazów: tylko kontur, czarny wzór i kolorową wersję. Dużym plusem jest to, że naklejki są cienkie. Ich krawędzie są niezauważalne na paznokciu kiedy zabezpieczymy zdobienie top coat'em. Jedyny problem jaki z nimi miałam to fakt, że ponieważ wzór jest dość długi, (nawet jak potniemy go na pasujące do paznokci kawałki) naklejka potrafi się czasem skleić do kupy jeśli nie jesteśmy dość ostrożne. Jest to oczywiście do ogarnięcie, ale przytrafiło mi się raz czy dwa. Jeśli chcecie więcej informacji o tym jak nakładać naklejki wodne, napisałam osobny post na ten temat TUTAJ.

The sheet of decals that comes to us has 12 rows of city landscapes and they're supposed to reflect some of the best known cities in the world. We also get three different types of landscapes: just a contour, a black design and a multicolour version. A big plus is that the decals are thin. Their edges are unnoticeable on the nail when we secure the nail art with a top coat. The only problem I had with them is that because the design is long, (even when we cut it into nail fitting pieces) the decals can sometimes stick together if we're not careful enough. It's manageable of course, but it did happen to me once or twice. If You want some more information on how to apply water decals, I wrote a separate post about this HERE.

Zrobiłam dwa mani używając tych naklejek i muszę powiedzieć, że bardziej podobają mi się na kwadratowych paznokciach niż na moich migdałach. To pewnie kwestia preferencji, ale jest to coś z czego zdałam sobie sprawę. Zwłaszcza przy drugim mani, nie wiedziałam czy pozostałą część paznokcia pod naklejką pokryć na czarno czy nie. Nawet spróbowałam, ale nie wyglądało to dobrze. Co Wy myślicie? Czy pewne wzory sa po prostu bardziej odpowiednie dla konkretnego kształtu paznokci?

I did two manicures using these decals and I have to say I like them more on square shaped nails than on my almonds. It's probably a matter of preference, but that's something that occurred to me. Especially with the second manicure, I didn't know if I should cover the rest of my nail under the decal with black or not. I even tried to, but it didn't look good. What do You think? Are some designs just better for a certain nail shape?


Pierwszy manicure jaki zrobiłam ma zwykłą, niebieska bazę. Nałożyłam dwie warstwy Dewi L34. Możecie o tym lakierze poczytać TUTAJ. Kiedy baza była całkiem sucha dodałam naklejki i zabezpieczyłam je jedną warstwą INM Out The Door.

The first manicure I did has a plain blue base. I applied  coats of Dewi L34. You can read more about this polish in my review HERE. After the base was completely dry I added the decals and secured them with one coat of INM Out The Door.


Poniżej są produkty jakich użyłam.

Below are the products I used.


Moje drugie zdobienie też jest niebieskie, ale tym razem byłam bardziej ambitna ;)

My second nail art is also blue, but this time I was more ambitious ;)


Najpierw pokryłam paznokcie jedną warstwą Essie Avenue Maintain żeby stworzyć bazę pod mój glitter. Lubię tak robić ponieważ czyszczenie skórek przy kremowym lakierze jest dużo wygodniejsze niż przy brokacie. Kiedy mam taką bazę po prostu się jej trzymam podczas aplikacji brokatu i wszystko gotowe. Poprawia to też krycie brokatu i nie musimy nakładać tak wielu warstw. Glitter jakiego użyłam w tym mani to Dewi L56. Kiedy całość była sucha odbiłam wzór imitujący gradient z płytki Bundle Monster BM-XL19. Użyłam lakieru Colour Alike & B. Loves Plates B. a Blue Ocean oraz Stempla B. Loves Plates Jumbo. Moimi następne kroki to: nałożenie jednej warstwy Sally Hansen Maximum Growth żeby zabezpieczyć stemple przed rozmazaniem w późniejszym czasie, dodanie naklejek wodnych i nałożenie jednej warstwy INM Out The Door żeby wykończyć manicure.

First I covered my nails with on coat of Essie Avenue Maintain as a base for my glitter. I like to do that because cleaning up my cuticles is much more comfortable with a cream polish than a glitter. When I have such a base I just stick to it applying the glitter and I'm good to go. It also improves the coverage of the glitter and we don't need to apply so many coats. The glitter I used in this manicure is Dewi L56. When the whole thing was dry I stamped on a gradient imitating design from Bundle Monster BM-XL19 plate. I used Colour Alike & B. Loves Plates B. a Blue Ocean and B. Loves Plates Jumbo Stamper. My next steps were: applying one coat of Sally Hansen Maximum Growth to secure the stamping from smudging afterwords, adding the water decals and putting one coat of INM Out The Door to finish the manicure.


Poniżej są produkty jakich użyłam przy tworzeniu tej propozycji.

Below are the products I used while I was creating this proposition.

Źródło: https://bundlemonster.com/


Born Pretty Store oferuje mnóstwo świetnych rzeczy i jest jednym z  moich ulubionych sklepów z produktami do zdobienia paznokci. Jeśli jesteście zainteresowane zrobieniem u nich zamówienia, skorzystajcie z mojego kodu HMG10 żeby otrzymać 10% rabatu na nieprzecenione produkty.

Born Pretty Store offers a lot of amazing things and is one of my favourite stores with nail art products. If You're interested in ordering something from them be sure to use my HMG10 code to get 10% off on all products that aren't already on sale.

sobota, 20 sierpnia 2016

Colour Alike & B. Loves Plates Neons! Vol. 6

Cześć!
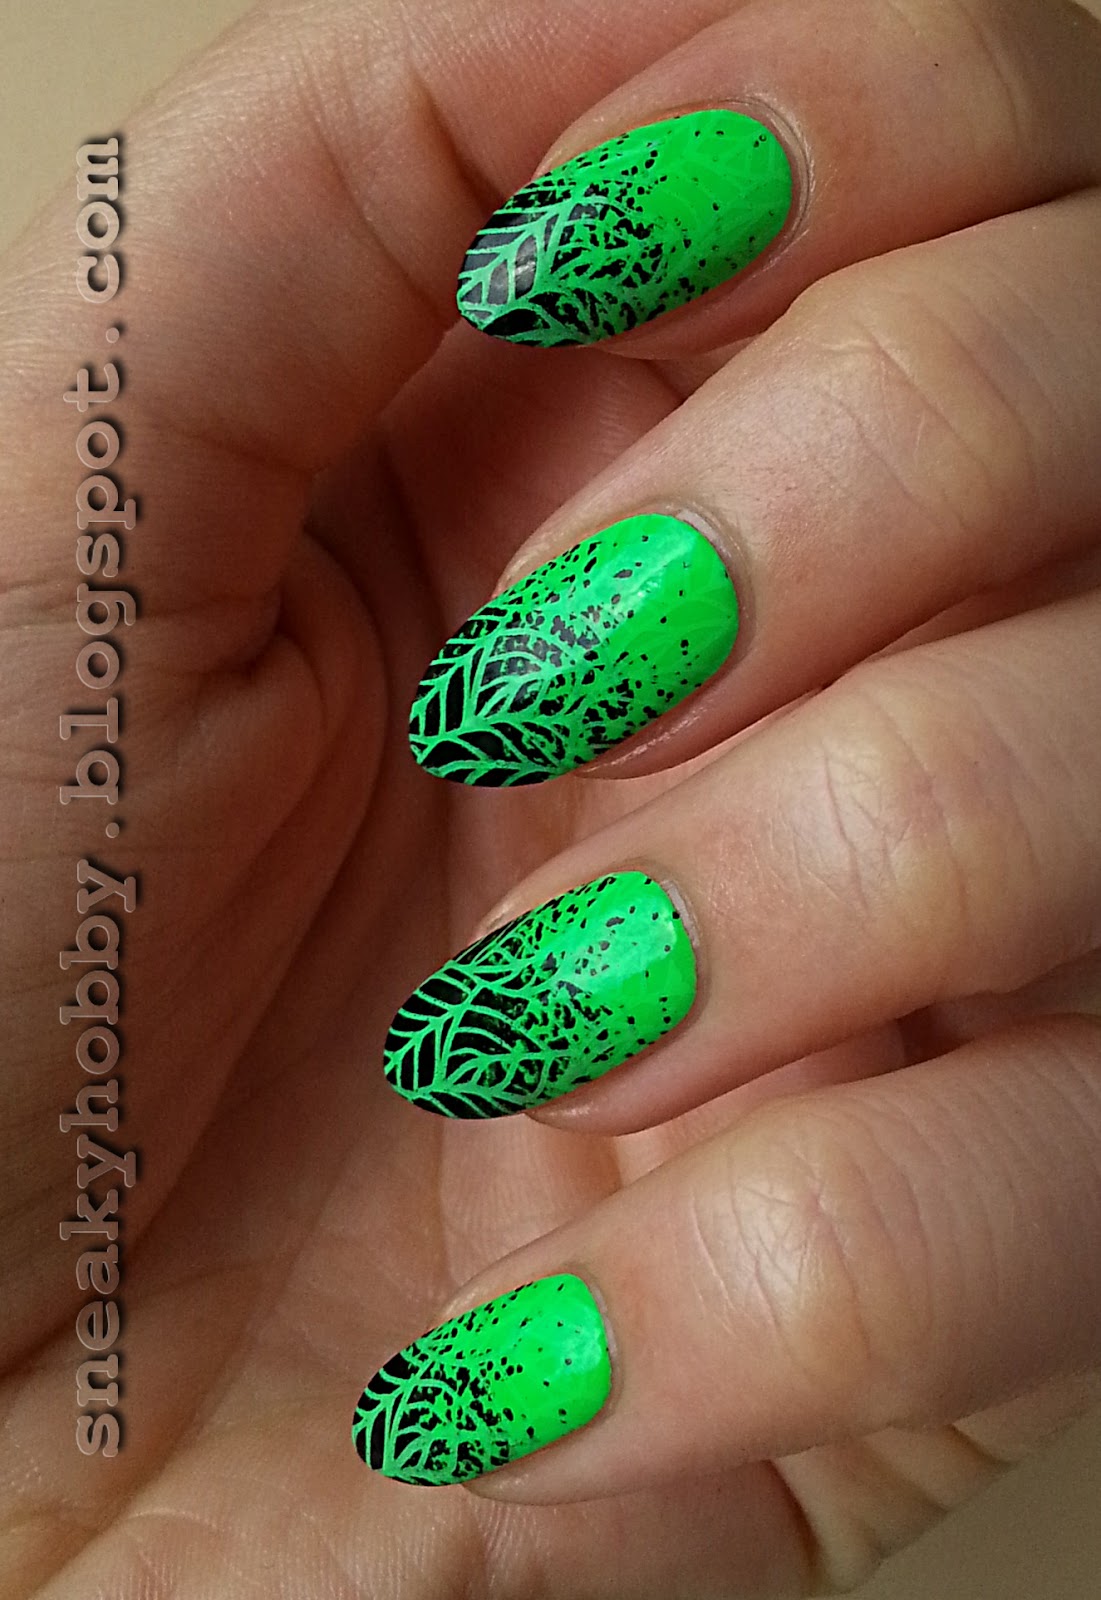
Przyszedł czas na mój ostatni manicure zrobiony przy użyciu lakierów z kolekcji Neon Goes Plastic i Neon Power. Dzisiaj są to dwie zieleni zmiksowane razem w jednym zdobieniu. Ciekawi mnie jak Wam się spodoba taka propozycja :>

Hi!
It's time for my last neon manicure made using polishes from Noen Goes Plastic and Neon Power collections. Today it's two greens mixed together in one nail art. I wonder how will You feel about this proposition :>


Zielony, neonowy, bazowy kolor to Colour Alike Electric Green. Użyłam dwóch warstw i osiągnęłam pełne krycie. Lakier tak jak poprzednie jest ciut gęstszy niż zazwyczaj, ale dla mnie wciąż komfortowy w użyciu. Schnie dość szybko do satynowego wykończenia.

The green, neon base polish is Colour Alike Electric Green. I used two coats and achieved a perfect coverage. The polish just like the previous ones is a bit thicker that usual, but for me still comfortable to use. It dries quite quick and to a satin finish.


To mani jest zasadniczo podwójnym stemplowaniem. Kiedy moja baza była całkowicie sucha zrobiłam wzór, który wygląda jak gradient. Pochodzi on z płytki Bundle Monster BM-XL 19 i odbiłam go Kaleidoscope 01 Black oraz Stemplem B. Loves Plates Jumbo. Absolutnie kocham ten pomysł, ponieważ normalnie jestem beznadziejna w gradientach. Zawsze narobię strasznego bałaganu, mam tendencję do wyczyszczania za dużo w okolicy skórek, jestem zbyt niecierpliwa żeby czekać aż każda warstwa wyschnie i kończę z kawałkami gąbki, włosami czy innymi rzeczami w lakierze. Nigdy nie wygląda do dobrze.. Ten stemplowy wzór uratował mi życie i żałuję, że inne firmy nie maja podobnych. Ten konkretny nie tworzy prostej linii gradientu, jest jakby wypukły (mam nadzieję, że wiecie o co mi chodzi). Chciałabym prosty wzór, można by go użyć pionowo albo skośnie.

This manicure is actually a double stamping. When my base colour was completely dry I did a design that looks like a gradient. It comes from Bundle Monster BM-XL 19 plate and I stamped it with Kaleidoscope 01 Black and B. loves Plates Jumbo Stamper. I absolutely love this idea, because normally I really suck at gradients. I always make a huge mess, I tend to clean too much in my cuticle area, I'm too impatient to wait for each layer to dry and end up with bits of the sponge, hair or other things in my polish. It's never pretty.. This stamping design saved my life and I regret that other brands don't have similar patterns. This particular one doesn't create a straight line of the gradient, it's kind of curved (I hope You know what I mean). I'd love a design that's straight, it could be use vertically or diagonally.


Kiedy mój zielono czarny gradient był gotowy odstemplowałam kolejny wzorek na nim. Użyłam płytki B. Loves Plates B.04 Leaves Of Happiness oraz lakieru do stempli Colour Alike & B. Loves Plates B. a Green Light. Tak jak poprzednio odbijałam Stemplem B. Loves Plates Jumbo. Jak widzicie lakier wygląda świetnie na czerni, jest dobrze napigmentowany i żywy. Ma też ciut inny odcień zieleni niż moja baza, więc kiedy patrzy się z bliska wzór jest widoczny na całym moim paznokciu. Z pewnej odległości listki zdają się zanikać w pobliżu skórek i to jest efekt. który chciałam osiągnąć.

When my green and black gradient was ready I stamped another design on top of it. I used B. Loves Plates B.04 Leaves Of Happiness plate and Colour Alike & B. Loves Plates B. a Green Light stamping polish. Just like before I stamped with B. Loves Plates Jumbo Stamper. As You can see the polish looks amazing over black, it's nicely pigmented and vibrant. It also has a bit different shade of green than my base colour, so when You look very close You can see the design on my whole nail. From a distance the leaves seems to fade near the cuticles, and that's exactly the effect I wanted to accomplish.


Poniżej możecie zobaczyć obie płytki użyte w dzisiejszym mani..

Below You can see both plates I used for today's manicure..

Źródło: https://bundlemonster.com/


Źródło: http://allegro.pl/listing/user/listing.php?us_id=37818237

..i większość produktów.

..and most of the products.


Jeżeli jesteście zainteresowane możecie zobaczyć moje pozostałe, neonowe mani z lakierami z tych dwóch kolekcji tutaj:

If You're interested You can see my other neon manicures with polishes from these two collections here: