sobota, 12 maja 2018

#CREATIVENAILPARTY - Tydzień 2 - Na Niebie

#CREATIVENAILPARTY - Week 2 - In The Sky

Hej!
Mamy tydzien 2 #CREATIVENAILPARTY i tym razem robimy zdobienia w temacie "Na Niebie". To bardzo szeroki temat, daje ogromne pole do interpretacji. Właśnie dlatego postanowiłam wkraść tutaj manicure trochę nietypowy jak na wiosnę..

Hey!
It's #CREATIVENAILPARTY week 2 and this time we're doing the "In the Sky" theme. It's a really big topic, it gives us an enormous space for interpretation. That's why I decide to creep in a manicure a bit unusual for Spring..


Jednak z drugiej strony moje bardzo ciemne i trochę krwawe zdobienie prawie idealnie zgrało się w czasie z #HalfWayToHalloween.. więc może wcale nie jest aż tak nietypowe jak moglibyście pomyśleć :D To powiedziawszy - oto moje ważki!!!

On the other hand though my very dark and a bit bloody nail art has almost perfect timing for #HalfWayToHalloween.. so it's not as unusual as You might think :D That being said - here are my dragonflies!!!


Ten manicure ma swoją historię. Kiedy byłam młoda nie miałam polotu do czytania książek. Czytałam tylko to co musiałam do szkoły i nic poza tym. Jedną z pierwszych książek jaką przeczytałam dla przyjemności była Chemia Śmierci Simon'a Beckett'a. Kiedy zobaczyłam okładkę po prostu się w niej zakochałąm i musiałam ją kupić. Pierwszy egzemplarz był prezentem dla kolegi ze szkoły (kupienie jej dla siebie nie było moją pierwszą myślą, oto jakim "nie czytającym" wtedy byłam), ale książka z jej tytułęm i okładką utknęła mi w głowie i przeczytałam ją niedługo potem. Tak się wciągnęłam w tą serię, że mogła ona być powodem mojego zakochania się w książkach ogólnie. Teraz nie wyobrażam sobie życia bez książek. Widzicie więc dlaczego ta konkretna książkowa seria pojawia się na moim blogu już po raz drugi. Zrobiłam bowiem manicure związany z Chemią Śmierci już wcześniej, TUTAJ jest do niego link. Tym razem padło na okładkę Szeptów Zmarłych, trzecią część serii Chemia Śmierci z dr Hunter'em w roli głównej :)

This manicure has it's story. When I was young I wasn't that into books. I only read what I had to for school and nothing else. One of the first books I read for fun was the Chemistry Of Death by Simon Beckett. When I saw the cover I just fell in love and had to buy it. The first copy was a gift for a friend at school (buying it for myself wasn't my first thought, that's how much of a "non reader" I was back then), but the book with it's title and cover stuck in my head and I read it shortly after. I got so sucked into this series that it might have actually been the reason I fell in love with books in general. Now I can't imagine my life without books. You can see now why this particular book series appears on my blog for the second time. Because I did do a manicure related to the Chemistry Of Death before, HERE is the link to it. This time it's the Whispers Of The Dead cover, the third part of Chemistry Of Death series with the main character of dr Hunter.


Ok.. to nierealne! Nierealne i jednocześnie trochę przerażające :D:D:D Właśnie wygooglowałam mój poprzedni mani związany z Chemią Śmierci żeby wkleić Wam bezpośredni link i nie uwierzycie.. Zrobiłam go jako część zeszłorocznego #HalfWayToHalloweenInstaParty! Całkiem zapomniałam, że był na tą konkretną okazję, na prawdę. Hehehe a teraz wrzucam coś tak podobnego po części jako wkład w #HalfWayToHalloween :) Niewiarygodne!

Ok.. that's unreal! Unreal and a bit creepy at the same time :D:D:D I just googled my previous Chemistry Of Death manicure to give You a direct link and what do You know.. I did it as a part of the #HalfWayToHalloweenInstaParty last year! I totally forgot that it was for that particular event, honestly. Hehehe and now I'm posting something so similar as a semi #HalfWayToHalloween contribution :) Unbelievable!


Wróćmy jednak do mani, wystarczy opowieści jak na jeden post :D Lakiery bazowe jakich użyłam to Kiko 275 Black (dwie warstwy) i Kiko 203 French White For Tips (trzy warstwy). Zdobienie na kciuku i serdecznym zaczęłam od dodania stempli wyglądających trochę jak distressed na brzegach paznokci. To w zasadzie kawałki wzoru z płytki Lina Nail Art Supplies Make Your Mark 01. Odbiłam je kawałek po kawałku tak żeby zostawić na środku paznokci wolną przestrzeń. Użyłam lakieru Kaleidoscope by El Corazon 01 Black i Stempla Born Pretty Store Clear Jelly Silicone Marshmallow.

Let's get back to the manicure though, that's enough story time for one post :D The base polishes I used here are Kiko 275 Black (two coats) and Kiko 203 French White For Tips (three coats). I started the nail art on my thumb and ring finger by adding the kind of distressed looking stamping on the edges of my nails. It's actually parts of a design I found on Lina Nail Art Supplies Make Your Mark 01 plate. I stamped it piece by piece to leave the center of my nail blank. I used Kaleidoscope by El Corazon 01 Black and Born Pretty Store Clear Jelly Silicone Marshmallow Stamper.


Elementem tego mani, który sprawia, że pasuje on do tematu tego tygodnia #CREATIVENAILPARTY są ważki. Znalazłam je na starej płytce z Aliexpress AS-18 i odbiłam na środku paznokci używając tego samego czarnego lakieru do stempli co poprzednio. Na koniec dodałam trochę krwi. Krople też są częścią wzoru z płytki Lina Nail art Supplies Make Your Mark 01. Odsemplowałam je używając lakieru Kaleidoscope by El Corazon 13 True Red.

The element of this manicure that makes it fit the theme of this weeks #CREATIVENAILPARTY are the dragonflies. I found them on an old Aliexpress AS-18 plate and stamped in the middle of my nails using the same black stamping polish as earlier. In the end I added some blood. The drops are also parts of a design from Lina Nail art Supplies Make Your Mark 01 plate. I stamped them using Kaleidoscope by El Corazon 13 True Red.


Jak zwykle zabezpieczyłam stemple top coat'em Kads Smudge Resistant. Kiedy to wyschło pokryłąm wszystkie paznokcie INM Out The Door.

Like always I secured my stamping with Kads Smudge Resistant top coat. When that dried I covered all of my nails with INM Out The Door.


Jak podoba Wam się mój halloweenowaty mani? Kiedy zobaczyłam ten temat i datę projektu #CREATIVENAILPARTY u The Cieniu, poprostu nie mogłąm się powstrzymać przed zrobieniem czegoś niecodziennego :) Jeśli interesuje Was zobaczenie mojego poprzedniego zgłoszenia do projektu to jest TUTAJ.

How do You like my halloweenish manicure? When I saw this theme and date of The Cieniu's #CREATIVENAILPARTY I just couldn't resist doing something out of the ordinary :) If Your interested in seeing my previous entry for the project, HERE it is.


środa, 9 maja 2018

REVIEW: Born Pretty Store Chameleon Nail Polish

Cześć,
mam dzisiaj do przedstawienia recenzję produktu z Born Pretty Store. Jeśli jesteście zainteresowani jak ten Chameleon Nail Polish wygląda na paznokciach oraz jakie są moje przemyślenia na jego temat, czytajcie dalej.

Hi,
today I have a Born Pretty Store product review to share. If You're interested in how this Chameleon Nail Polish looks on the nails and what are my thoughts on it, keep on reading.


Sklep wysłał mi ich Chameleon Nail Polish w kolorze A003 Dream Castle. To bezbarwna baza z flejkami. Kolor jaki posiadam waha się pomiędzy niebieskim a fioletem, czasem można nawet dojrzeć cień różu. Produkt ten możecie znaleźć TUTAJ.

The store send me their Chameleon Nail Polish in the colour A003 Dream Castle. It's a sheer base with flakies. The colour I have varies from blue to purple, sometimes we can even spot a hint of pink. You can find this product HERE.


Do tej pory użyłąm tego lakieru już kilka razy i miałam okazję przetestować więcej niż jedną metodę jego aplikacji. Manicure jaki Wam pokazuję to moje najświeższe podejście i uwierzcie mi, chciałam zrobić mu przyzwoite zdjęcia, ale nie było to możliwe.. Na prawdę nie wiem dlaczego akurat teraz jakość jest nawet gorsza niż zazwyczaj. Zrobiłam dosłownie setki zdjęć w każdym możliwym ustawieniu świateł i nadal nie pokazują one tego co chciałam Wam pokazać. Będziecie musieli uwierzyć mi na słowo.

Produkt najlepiej wygląda na czerni, więc tak zdecydowałąm się go użyć. Na części paznokci mam dwie warstwy Kiko 275 Black, a na paznokciach akcentowych trzy warstwy Kiko 203 French White For Tips. Lakier BPS Chameleon nałożyłam na czarnych paznokciach gąbeczką, dlatego flejki są tak upakowane. Normalnie mamy więcej bezbarwnej bazy i mniejszą ilość flejków. Efekt końcowy jest bardziej rozproszony.

I used this polish a couple of times by now and I had the chance to test more than one method of applying it. The manicure I'm showing You is my most recent attempt and believe me, I tried to take decent photos of it, but it just wasn't possible.. I honestly don't know why the quality is even worse than usual all of a sudden. I took literally hundreds of shots in all possible lighting setups and they still weren't showing what I wanted to show You. You'll just have to take my word for it.

The product looks best over black, so that's how I decided to use it. On part of my nails I have two coats of Kiko 275 Black and on my accent nails three coats of Kiko 203 French White For Tips. I applied the BPS Chameleon Nail Polish on the black nails with a sponge, that's why the flakies are so packed. Normally we get more of the clear base and a lesser amount of flakies. The end result is much more dispersed.


Na paznokciach akcentowych zrobiłam stemple. Użyłam płytki MoYou London Deco 01 i lakieru Kaleidoscope by El Corazon 01 Black. Dodałam też dużą czarną kropkę na środku stemplowego wzorka i nałożyłam w to miejsce flejkowy lakier małym pędzelkiem. Tym sposobem zdobienie wygląda jak jakiś klejnot. Moim ostatnim krokiem było zalanie wszystkiego top coat'em (Kads Smudge Resistant żeby zabezpieczyć stemple i INM Out The Door dla szybkiego wysychania).

On the accent nails I did some stamping. I used MoYou London Deco 01 plate and Kaleidoscope by El Corazon 01 Black. I also added a big black dot in the center of the stamping design and applied the flakie polish in that area with a small brush. This way the nail art looks like a jewel of some kind. My last step was to seal the whole thing with top coat (Kads Smugde Resistant to secure the stamping and INM Out The Door for fats drying).


Napisałam o nakładaniu Born Pretty Store Chameleon Nail Polish w różny sposób nie bez powodu. Użyłam tego lakieru kilka miesięcy temu na czarnej bazie, nakładając tradycyjnie, prosto z butelki i manicure sam w sobie wyglądał dobrze. Nawet zrobiłam kilka zdjęć, ale miałam spore zastrzeżenia do długości i kształtu moich paznokci i nie chciałam Wam ich pokazwyć. Potem była seria złamań paznokci, więc lakier czekał aż do teraz żeby wylądować na moich paznokciach ponownie. Tym razem wpadłam na pomysł bardziej ambitnego zdobienia, ale większość paznokci miałą być taka sama jak wcześniej: czarna baza + BPS Chameleon Nail Polish. Niestety tym razem skończyłam ze straszną ilością bąbelków na wszystkich czarnych paznokciach. Zdarza się, nie? Na tym etapie nie doszłąm nawet do zdobieniowej części, ale chciałąm Wam pokazać ładny manicure, więć zaczęłam robić od nowa zbąblowane paznokcie. Myślałam, że może pomalowałam za grube warstwy czy coś, więc przy następnej próbie użyłam gąbeczki żeby zredukować ilość nakładanej bezbarwnej bazy.. Cóż, ta metoda na pewno pozwala na aplikację większej ilości flejków, ale nie obroniła mnie przed bąblami. Zdecydowałam się mimo wszystko skończyć manicure i zgadnijcie co się stało? Bąble były nawet na tych okrągłych kształtach przypominających klejnoty.. Dosłownie wszędzie tam gdzie użyłam lakieru Chameleon Nail Polish.
Jakby tego było mało spróbowałam nałożyć lakier na wzornikach na innych kolorach i tam też pojawiły się bąble. Może w mniejszej ilości, ale jednak. Nie wiem czy to moja wina, upałów które ostatnio tu mamy czy samego lakieru (czy to możliwe żeby się zepsuł przez te kilka miesięcy?). Wcześniej wszystko było dobrze, więc na prawdę nie wiem. Nie wiem też czy w ogóle widzicie bąble (kto by pomyślał, że kiepska jakość moich zdjęć będzie takim błogosławieństwem :D), ale wierzcie mi - są tam! Ktoś mógłby nawet powiedzieć, że przy głęboko niebieskim kolorze tego mani, bąbelki dają osobliwy klimat oceanu.. Efekt ten jednak był całkowicie niezamierzony.

I wrote about applying the Born Pretty Store Chameleon Nail Polish in various ways for a reason. I used this polish a few months earlier over a black base, applied traditionally, straight from the bottle and the manicure itself looked nice. I even took some photos, but my nail length and shape were so questionable I didn't want to show them to You. After that I had a series of bad nail breaks, so the polish waited for another chance to land on my nails till now. This time I came up with a more ambitious nail art, but most of my nails were supposed to look just like before: black base + BPS Chameleon Nail Polish. Unfortunately this time around I ended up with a massive amount of bubbles on all of my black nails. Shit happens right? I didn't even get to the nail art part at this point, but I wanted to show You a nice looking manicure, so I started redoing the bubbled nails. I thought that perhaps I painted too thick coats or something, so in my next try I used a sponge to reduce the amount of clear base being applied.. Well, this method certainly allowed to get more flakies, but it didn't protect me from the bubbles. I decided to finish the manicure anyway and guess what? I even got bubbles on those round shapes resembling jewels.. Literally everywhere where I applied the Chameleon Nail Polish.
To top it all off I tried applying the polish on swatch sticks over different colours and the bubbles appeared there as well. Perhaps in a lesser amount, but still. I don't know if it's me, the hot weather we've been having lately, or the polish itself (is it possible it went bad after these few months?). It was all good before, so I honestly don't know. I also don't know if You can even see the bubbles (who would have thought that the low quality of my photos would be such a blessing :D), but believe me - they're there. One might even say that with the deep blue colour of this manicure, the bubbles give it a peculiar ocean vibe.. This effect wasn't be any means intended though.


Dajcie znać co myślicie o tym mani. Zauważylibyście bąble gdybym Wam o nich nie powiedziała? Poniżej możecie zobaczyć płytkę jakiej użyłam do zrobienia paznokci akcentowych..

Let me know what do You think about this manicure. Would You spot the bubbles if I didn't tell You about them? Below You can see the plate I used for my accent nails..

Źródło: http://moyou.co.uk/
... wzorniki o których Wam wspomniałam, żebyście mogli zobaczyć jak ten lakier wygląda na innych kolorach..

..the swatch sticks I mentioned about, so You can see how this polish looks over different colours..


..oraz ostatnie spojrzenie na moje zdobienie.

..and one last look of my nail art.


Podczas zakupów na stronie Born Pretty Store pamiętajcie o kodzie rabatowym HMG10 z mojego bloga. Uprawnia on do 10% zniżki na zakupy (tylko nieprzecenione produkty). Przesyłka jest darmowa!

While shopping on the Born Pretty Store site remember about the discount code HMG10 from my blog. It entitles to a 10% discount for your purchase (only products in full price). The shipping is free!


Użyto próbek PR od Born Pretty Store / Born Pretty Store PR Samples used

czwartek, 3 maja 2018

#CREATIVENAILPARTY - Tydzień 1 - Źółty

#CREATIVENAILPARTY - Week 1 - Yellow

Hej!
Słyszałyście, że wyzwanie #CREATIVENAILPARTY prowadzone przez The Cieniu właśnie znów się zaczęło?! Pamiętacie zimową edycję? Jeśli nie to TUTAJ jest link do moich mani. Tym razem tak jak poprzednio mamy cztery tematy, a każdy trwa tydzień. Tematy są jednak mniej sezonowe, więc jest większa dowolność. Myślę nawet, że będzie tu dla mnie okazja na przemycenie Halloween'owego zdobienia :D Na początek "Żółty", poniżej zaś możecie zobaczyć pozostałe tematy, jak również dokładne daty.

Hey!
Did You hear that #CREATIVENAILPARTY challenge hosted by The Cieniu just started again?! Do You remember the Winter edition? If not, HERE is the link to my manicures. This time just like before there's four themes and each one lasts a week. The themes are less seasonal though, so there's much more flexibility. I think there will even be a chance for me to sneak in a Halloween nail art :D We're starting with "Yellow" and below You can see what are the other themes, as well as the exact dates.


Na początek mam trochę blogowych spraw którymi chciałąbym się z Wami podzielić. Już od jakiegoś czasu przeszkadza mi fakt, że moje zdjęcia nie są zbyt estetyczne. Boli mnie wiedza, że nawet jeśli moje zdobienia są satysfakcjonujące to nie mam warunków ani sprzętu żeby Wam je pokazać w bardziej atrakcyjny sposób. Do tej pory fotografowałąm tylko w dzień, w bliskiej odległości od okna i to bardzo ograniczało moje możliwości stworzenia jakiejkolwiek scenki. Próbowałam naprawić ten problem przez kupno pary softbox'ów i profesjonalnego tła, jednak dalej nie zrobiło to aż takiej wielkiej różnicy. Wciąż robię zdjęcia smartfonem i to nie najnowszym. To główny powód dla którego nie jestem w stanie (i prawdopodobnie szybko nie będę) osiągnąć lepszego poziomu ostrości, upragnionego ostatnio tła typu bokeh oraz zamierających dech w piersi ujęć makro moich zdobień. Nie mniej jednak udało mi się przynajmniej odrobinę podnieść poziom ogólnej koncepcji fotografowania manicuru. Światło i ostrość (poprawiona tylko w programie) dalej są do kitu w większości przypadków, a tło to tylko sztuczny bokeh. Wyglądam też przy niektórych ujeciach jakbym uprawiałą jogę, ponieważ większość cześci mojego ciałą jest przed obiektywem telefonu a ja nachylam się do przodu próbując jednak zobaczyć co tak w zasadzie fotografuję, balansując między statywami softbox'ów (wyobraźcie to sobie przez chwilę, to musi być komiczny widok :D). Pomimo tego mam nadzieję, że zmiany są na lepsze i obiecuję postarać się z czasem poprawiać coraz więcej. Kupno porządnego aparatu jest moim priorytetem, tak żebym w przyszłości była bardziej dumna z moich zdjęć. Dajcie znać w komentarzach co myślicie, chętnie przyjmnę wszytskie rady w tym temacie.

First off all I have some blog related things I want to share with You. For some time now I've been bothered with the fact that my photos aren't very esthetic. It pains me to know that even if my nail art is satisfying, I don't have the conditions and equipment to show You it in a more appealing way. Till now I only photographed in daylight, in the vicinity of a window and that really narrowed down my possibilities of building any scene at all. I tried to fix this issue by buying a pair of softbox lights and a professional background, but it still doesn't make that big of a difference. I still take my photos with a smartphone and not a very hi-tech one. That's the main reason I'm not able (and probably won't be in the nearest future) to achieve a better level of focus, the desired lately bokeh background or stunning macro shots of my designs. However I did manage to upgrade the general concept of photographing a manicure at least a little bit. The lighting and focus (sharpened only with a computer program) still sucks most of the time and the background is just artificial bokeh. Also with some poses it almost looks like I'm doing joga, because most of my body parts are in front of the phone camera and I'm leaning forward trying to see what I'm actually photographing, balancing somewhere between the softbox tripods (just imagine that for a moment, it has to be a hilarious view :D). Nevertheless I hope the changes are for the better, I promise to do my best and improve more in time. Buying a decent camera is my priority, so I can be more proud of my pictures in the future. Let me know Your thoughts in the comments, I'll gladly take any advise in the matter.

Wróćmy teraz do manicuru, który tutaj mamy. Najważniejsz jest tutaj oczywiście neonowy żółty, ale sparowałąm go tutaj z kilkoma innymi żarówiastymi kolorami z kolekcji Colour Alike Neon Goes Pastel. Użyłam Yellow Flash (trzy warstwy) jako bazy pod moje stemple, a Hot Red (dwie warstwy) na resztę paznokci. Dołożyłam też warstwę toppera ILNP Alchemist na wszystkie paznokcie żeby dodać im trochę błysku (wyglądało to świetnie na żywo).

Now lets get back to the manicure at hand. The most important factor here is the neon yellow of course, but I pared it with some other bright colours from the Colour Alike Neon Goes Plastic collection. I used Yellow Flash (three coats) as the background for my stamping and Hot Red (two coats) for the rest of the nails. I also added one coat of ILNP Alchemist topper on all of my nails to give the an extra spark (it looks stunning in real life).


Zdobienie jakie możecie tutaj zobaczyć było zrobione przy użyciu techniki reverse stamping. Wzorek pochodzi z płytki B. Loves Plates B.08 Feather Fever, odbiłąm go lakierem Kaleidoscope by El Corazon 01 Black, a piórka pokolorowałam CA Hot Red, Electric Green i Neon Pink używając bardzo małego pędzelka. Na koniec zebzpieczyłam stemple top coat'e, Kads Smudge Resistant oraz pokryłam wszystkie paznokcie INM Out The Door.

The nail art You can see here was made using the reverse stamping technique. The design comes from B. Loves Plates B.08 Feather Fever plate, I stamped it with Kaleidoscope by El Corazon 01 Black and coloured the feathers with CA Hot Red, Electric Green and Neon Pink using a really small nail art brush. In the end I secured the stamping with Kads Smudge Resistant top coat and covered all of my nails with INM Out The Door.


Większość produktów jakich użyłąm przewija się gdzieś na zdjęciach, a poniżej możecie zobaczyć cudowną płytkę Feather Fever.

Most of the products I used are somewhere on the photos and below You can see the wonderful Feather Fever plate.

Źródło: http://blovesplates.com/

Jak Wam się podoba moje pierwsze zgłoszenie do #CREATIVENAILPARTY? Jesteście ciekawe co zrobię następnym razem?

How do You like my first entry for #CREATIVENAILPARTY? Are You curious what I'm going to come up with next?


Możecie śledzić wyzwanie na Instagramie oczywiście pod hashtagiem #CREATIVENAILPARTY oraz na koncie The Cieniu.

You can fallow the challenge on Instagram, of course under the hashtag #CREATIVENAILPARTY and on The Cienu account.


sobota, 21 kwietnia 2018

Perfect Lace

Cześć Wam,
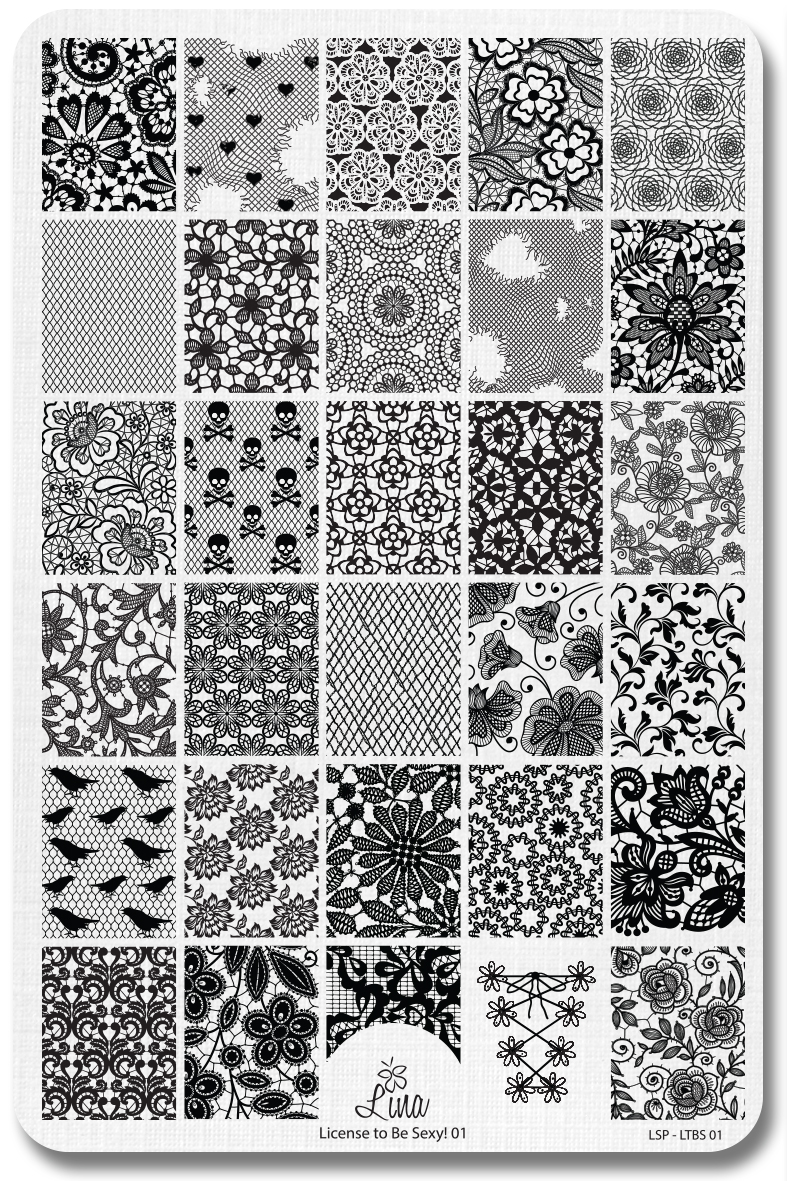
minęło już tyyyyle czasu od kiedy pisałam tu posta. Przepraszam, że tak zaginęłam w akcji ostatnio. Myślę, że ponieważ moje ogólne samopoczucie nie było najlepsze, nie mogłąm znaleźć motywacji do pisania. Wiosna z jej słoneczną pogodą powinna mi pomóc i postawić mnie na nogi. Dzisiaj chcę Wam pokazać manicure jaki zrobiłam z użyciem jednej z najpękniejszych koronkowych płytke jakie kiedykolwiek widziałam - Lina Nail Art Supplies License To Be Sexy 01.

Hi there,
it's been soooo long since I wrote a post here. I'm sorry for being so MIA lately. I think that because my overall frame of mind wasn't the best, so I just couldn't find the motivation to write. Spring with it's sunny weather should help me and get me back in shape. Today I want to show You a manicure I did using one of the most beautiful lace plates I've ever seen - Lina Nail Art Supplies License To Be Sexy 01.


Lakier bazowy jaki mam na paznokciach to Kiko 510 Mauve Grey i nałożyłam dwie średniej grubości warstwy żeby osiągnąć pełne krycie. Jako błyszczący dodatek nałożyłąm także jedną warstwę ILNP Moonstone. Tak jak zapowiadałam w poprzednim poście, jest to kolejny niesamowity lakier z kolekcji ILNP Real Magic Topper. Drobinki w Moonstone są głównie niebieskie, fioletowe i różowe więc świetnie harmonizowały z odcieniem mojej bazy.

The base polish I have on my nails is Kiko 510 Mauve Grey and I applied two medium thick coats to achieve full opacity. As a sparkly addition I also applied one coat of ILNP Moonstone. Just like I announced in my previous post, this is another amazing polish from the ILNP Real Magic Toppers collection. The particles in Moonstone are mostly blue, purple and pink so they consorted with my base shade very well.


Tak jak wspomniałam na początku tego postu, wspaniały, koronkowy wzór jakiego użyłąm pochodzi z płytki Lina Nail Art Supplies License To Be Sexy 01. Do stemplowania użyłąm lakieru Kaleidoscope by El Corazon 01 Black i Stempla Born Pretty Store Clear Jelly Silicone Marshmallow Stamper. Zabezpieczyłam też całe zdobienie top coat'em Kads Smudge Resistant i INM Out The Door.

Like I mentioned in the beginning of this post, the wonderful lace patter I used here comes from Lina Nail Art Supplies License To Be Sexy 01 plate. For the stamping I used Kaleidoscope by El Corazon 01 Black polish and Born Pretty Store Clear Jelly Silicone Marshmallow Stamper. I also secured my whole nail art with Kads Smudge Resistant top coat and INM Out The Door.


Poniżej możecie zobaczyć płytkę o której tak czule pisałam..

Below You can see the plate I've been writing so fondly about..
Źródło: http://linanailartsupplies.com/

..oraz większość pozostałych produktów jakich użyłam.

..and most of the other products I used.


Jak Wam się podoba moje zdobienie? Widzieliście mój poprzedni manicure z użyciem tej wspaniałej koronkowej płytki? Jeśli nie, to jest TUTAJ.

How do You like my nail art? Did You see my previous manicure using this amazing lace plate? If not, HERE it is.

niedziela, 18 marca 2018

Sparkling Ivory Roses

Hej,
dzisiaj przychodzę do Was z prostym, stemplowym mani. Główną atrackcją tutaj jest cudowny topper od ILNP.

Hey,
today I come to You with a simple stamping manicure. The main attraction here is a wonderful topper from ILNP.


Zacznijmy jednak od początku. Większość paznokci pokryłam dwiema warstwami My Secret Dressed In Black. Na paznokciach palca serdecznego i środkowego mam trzy cienkie warstwy lakieru Color Club Poetic Hues oraz trochę ślicznych, stemplowych różyczek. Wzór pochodzi z płytki Lina Nail Art Supplies 4 Seasons - Spring 01, a odbiłąm go używając Kaleidoscope by El Corazon 01 Black.
 
Let's start from the beginning though. I covered most of my nails with two coats of My Secret Dressed In Black. On my ring and middle finger I have three thin coats of Color Club Poetic Hues and some lovely stamping roses. The design comes from Lina Nail Art Supplies 4 Seasons - Spring 01 plate and I stamped it using Kaleidoscope by El Corazon 01 Black.


Stemple zabezpieczyłam top coatem Kads Smudge Resistant i dodałam ostatni skłądnik do tego mani. Pokryłąm wszystkie paznokci ILNP Scarlet, niesamowitym lakierem od z kolekcji ILNP Real Magic Toppers. Ten produkt to w zasadzie drobniutki brokat w bezbarwnej bazie, ale wierzcie mi - potrafi sprawić, że każdy manicure zapiera dech w piersiach. Drobinki w tym konkretnym kolorze są głównie czerwone, różowe, pomarańczone i złote, ale jak widzicie na zdjęciu poniżej przy ostrym kącie możemy nawet zobaczyć zieleń. Ten topper wygląda przepięknie na czerni, ale używałam go także na jaśniejszych kolorach i nie mogłam się nadziwić jak świetny był rezultat. Po zakupieniu tylko tego odcienia i przekonaniu się jak fajnie wygląda praktycznie na wszystkim, zamówiłam niemal całą kolekcję jak tylko miałam okazję. Jestem pewna że bardzo szybko zobaczycie na moim blogu inne odcienie Real Magic Toppers ;)

I secured the stamping with Kads Smudge Resistant top coat and added the final touch to this manicure. I covered all of my nails with ILNP Scarlet, an amazing nail polish from ILNP Real Magic Toppers collection. This product is basically fine glitter in a transparent base, but believe me - it can make any manicure look breathtaking. The particles in this particular shade are mostly red, pink, orange and gold, but as You can see on the photo below at a sharp angle we can even see green. This topper looks gorgeous over black, but I also used it over some lighter colours and couldn't believe how great the result was. After buying just this one shade and seeing how nice it looks over practically anything, I ordered most of the collection as soon as I had the chance. I'm sure You'll be seeing the other Real Magic Toppers on my blog really soon ;)


Poniżej jest płytka jakiej użyłam w dzisiejszym mani..

Below is the plate I used in todays manicure..

Źródło: http://linanailartsupplies.com/

..i większość pozostałych produktów.

..and most of the other products.


sobota, 10 marca 2018

REVIEW: Born Pretty Store Stamping Guide

Cześć Wam,
mam jeszcze kilka produktów do zrecenzowania od Born Pretty Store i dzisiaj chciałabym pokazać Wam ich Stamping Guide (Szablon Do Stempli).

Hi there,
I still have a few items to review from Born Pretty Store and today I'd like to show You their Stamping Guide.


BPS Stamping Guide, który tutaj recenzuję ma symbol G003 i jest płytką ze stali nierdzewnej z wyciętymi dziesięcioma wzorami. Rozmiar płytki to 12cm x 6cm, a każdy wzór ma ok. 2,2cm x 1,7cm. Ten produkt został stworzony żeby wyodrębnić części wzoru z tradycyjnej płytki do stempli. Po prostu nakładamy lakier na wybraną płytkę, zbieramy nadmiar, kładzieny na wierzch szablon i wtedy odbijamy. W ten sposób mam tylko część naszego wzoru na stemplu. Byłam bardzo ciekawa tego produktu i zastanawiałam się czy na prawdę działa. Odpoweidź brzmi tak, faktycznie działa! Zauważyłąm tylko, że w moim przypadku miękki stempel daje najlepsze rezultaty. Poniżej możecie zobaczyć manicure jaki zrobiłam używając jednej z moich płytek do stempli i produktu BPS. Firma zaprojektowała cztery różne szablony i możecie je wszystkie zobaczyć TUTAJ. W tej chwili są w promocji i kosztują 3,99$.

The BPS Stamping Guide, which I'm reviewing here has the symbol G003 and is a stainless steel plate with ten designs carved in it. The plate's size is 12cm x 6cm and each design measures approx. 2,2cm x 1,7cm. This product is designed to extract parts of a design from a traditional stamping plate. We just add nail polish over a chosen stamping plate, scrape the excess, put the guide over it and then stamp. This way we only get part of our design on the stamper. I was really curious about this product and wondered if it actually works. The answer is yes, it does! I just noticed that in my case a soft stamper gave best results. Below You can see a manicure I made using one of my stamping plates and this BPS product. The company designed four different guides and You can see all of them HERE. At this moment they're on sale and cost 3,99$.


Manicure jaki przygotowałam do pokazania Wam dzisiaj to kompozycja błotkowej zieleni i czernic. Jako bazy użyłam China Glaze Trndsetter i nałożyłąm dwie warstwy. Wzorek stemplowy jaki wybrałam pochodzi z płytki Lina Nail Art Supplies Make You Mark 02 i jest podobny do efektu distressed tworzonego przy pomocy techniki suchego pędzla. Dzięki szablonowi Born Pretty Store Stamping Guide zrobiłąm z niego pasiasty wzór distressed :) Inne produkty jakich użyłąm to lakier do stempli Kaleidoscope by El Corazon 01 Black i Stempel B. Loves Plates Jumbo.

The manicure I prepared to show You today is a simple composition of muddy green and black. As a base I used China Glaze Trendsetter and applied two coats. The stamping design I picked comes from Lina Nail Art Supplies Make You Mark 02 plate and is similar to a distressed look created with the dry brush technique. Thanks to the Born Pretty Store Stamping Guide I turned it into a striped distressed design :) The other products I used are Kaleidoscope by El Corazon 01 Black stamping polish and B. Loves Plates Jumbo Stamper.


Na koniec zabezpieczyłam wzorek top coat'e, Kads Smudge Resistant i pokryłąm go INM Out The Door.

Lastly I secured the design with Kads Smudge Resistant Top Coat and covered it with INM Out The Door.


Poniżej możecie zobaczyć płytkę jakiej użyłam.

Below You can see the plate I used..

Źródło: http://linanailartsupplies.com/
..oraz większość produktów.

..and most of the products.


Podczas zakupów na stronie Born Pretty Store pamiętajcie o kodzie rabatowym HMG10 z mojego bloga. Uprawnia on do 10% zniżki na zakupy (tylko nieprzecenione produkty). Przesyłka jest darmowa!

While shopping on the Born Pretty Store site remember about the discount code HMG10 from my blog. It entitles to a 10% discount for your purchase (only products in full price). The shipping is free!

niedziela, 25 lutego 2018

REVIEW: Born Pretty Store Floral BPX-L017 Stamping Plate

Cześć Wam,
czas na recenzję! Dzisiaj chcę Wam pokazać świetną, kwiatową płytkę od Born Pretty Store oraz dwa zdobienia jakie stworzyłam używając jej.

Hey there,
it's time for a review! Today I want to show You a great, floral plate from Born Pretty Store and two nail arts I did using it.


Jak widzicie płytka BPS Floral BPX-L017, którą recenzuję ma głównie całopaznokciowe wzory. Każdy z tych wzorków mierzy około 1,5x2,0cm. Fajnym dodatkiem są mniejsze wzory na środku. Jeśli jesteście zainteresowane kupnem płytki, to możecie ją znaleźć TUTAJ. Obecnie jest nawet na wyprzedaży za 2,39$.

As You can see the plate BPS Floral BPX-L017, that I'm reviewing has mostly full nail designs. Each of these designs measures about. A nice addition are the smaller designs in the middle. If You're interested in buying this plate, You can find it HERE. Right now it's even on sale for 2,39$.


Pierwszy manicure jaki zrobiłam przy pomocy tej płytki był bardzo letnią kompozycją. Jako bazę nałożyłam dwie warstwy Ruby Wing Saloon Sweetheart. To lakier reagujący na promienie UV, więc zmienia kolor w bezpośrednim słońcu. Poniżej możecie zobaczyć obie wersje, osobiście uważam, że zdobienie wygląda ładnie na obu kolorach :)

The first manicure I did with this plate was a very summery composition. As a base I applied two coats of Ruby Wing Saloon Sweetheart. It's a UV responsive polish, so it changes colour in direct sunlight. Below You can see both versions, personally I think the nail art looks nice on both colours :)


Wzór na moich paznokciach odbity był lakierem Kaleidoscope by El Corazon 09 Yellow Neon i Stemplem Born Pretty Store Clear Jelly Silicone Marshmallow. Zdobienie zabezpieczyłąm Kads Smudge Resistant Top Coat i INM Out The Door.

The design on my nails was stamped with Kaleidoscope by El Corazon 09 Yellow Neon and Born Pretty Store Clear Jelly Silicone Marshmallow Stamper. I secured the nail art with Kads Smudge Resistant Top Coat and INM Out The Door.


Poniżej możecie zobaczyć produkty jakich użyłam.

Below You can see the products I used.


Drugie zdobienie jakie zrobiłam używając płytki Born Pretty Store Floral BPX-L017 było inspirowane mani Elizy Ok-W. W zasadzie to wybrałam tą płytkę do współpracy po zobaczeniu jej zdobienia, więc koniecznie tam zajrzyjcie. Mój manicure jest trochę inny, ale myślę, że odtworzę też dokałdnie pomysł Elizy w przyszłości.

The second nail art I did using Born Pretty Store Floral BPX-L017 plate was inspired by Eliza Ok-W's manicure. I actually chose this plate for my collaboration after seeing her nail art, so be sure to check it out. My manicure is a bit different, but I think I'll be recreating Eliza's exact idea in the future as well.


Lakiery bazowe jakie mam na paznokciach to My Secret Dressed in Black i Color Club Poetic Hues, oba nałożone w dwóch warstwach. Różyczkowy wzór odbity był lakierem Kaleidoscope by El Corazon 01 Black i Stemplem Uber Chic Beauty XL Sticky. Kiedy zabezpieczyłam zdobienie Kads Smudge Resistant Top Coat, zaczęłam wypełniać wzorek przezroczystymi tintami.

The base polishes I have on my nails are My Secret Dressed In Black and Color Club Poetic Hues, both applied in two coats. The rose design was stamped with Kaleidoscope by El Corazon 01 Black and Uber Chic Beauty XL Sticky Stamper. When I secured the nail art with Kads Smudge Resistant Top Coat, I started filling up the design with sheer tints.


Żeby pokolorować wór użyłam czerwonego, chińskiego tinta (więcej o nim TUTAJ) i zielonego P2 Gloss Goes Neon Ferris Wheel. Kiedy całość wyschła nałożyłam Golden Rose Matte Top Coat.

To colour the design I used a red Chinese tint (more about it HERE) and green P2 Gloss Goes Neon Ferris Wheel. When the whole thing dried I applied Golden Rose Matte Top Coat.


Poniżej możecie zobaczyć większość produktów jakich użyłam do stworzenia tego mani.

Below You can see most of the products I used to create this manicure.


Jak podoba wam się ta płytka? Jeśli planujecie zamówienie na stronie Born Pretty Store to pamiętajcie o moim kodzie zniżkowym HMG10. Daje on 10% rabatu an wszystkie produkty, które nie są już przecenione.

How do You like this plate? If You're planning an order on Born Pretty Store site, remember about my HMG10 discount code. It gives You 10% off any products that aren't already on sale.