piątek, 12 lutego 2016

Gothic Valentine's Day Manicure

Cześć :)
Co powiecie na kolejny Walentynkowy Manicure? Tym razem trochę bardziej gotycki i tajemniczy. Cóż, o ile róż w ogóle można nazwać gotyckim ;)

Hallo :)
What would You say for another Valentine's Day Manicure? This time a bit more Gothic and mysterious. Well, if You can even call pinks Gothic ;)


Poza delikatnymi, słodkimi, ślicznymi i romantycznymi Walentynkowymi Mani chciałam zrobić też coś ciemniejszego i bardziej klimatycznego. Generalnie - coś bardziej "mojego".

Aside from the delicate, sweet, cute and romantic Valentine's Day manicures I wanted to do something darker and more climatic. Generally - something more "me".


Zaczęłam to mani przez pomalowanie paznokci średnim odcieniem różu. Użyłam Essie Bachelorette Bash i nałożyłam dwie warstwy. Lakier nie był w pelni kryjący po tych dwóch warstwach, ale wiedziałam, że będę robić gradient więc nie musiał być. Muszę Was ostrzec, że ten lakier strasznie zabarwił mi paznokcie. Nie użyłam żadnej bazy i to moja wina, ale myślę, że zabarwiłby nawet z bazą pod spodem.

I started this manicure by painting my nails in a medium shade of pink. I used Essie Bachelorette Bash and applied two coats. This polish wasn't fully opaque after these two coats, but I knew I was doing a gradient so it didn't have to be. I need to warn You that this polish extremely stained my nails. I didn't use any base coat and that's on me, but I think it would stain even with a base underneath.


Gradient jaki tutaj widzicie został zrobiony przy użyciu dwóch lakierów Dewi: L39 (ciemny fiolet) i L01 (czarny). Nałożyłam je gąbeczką do makijażu. Fakt, że te lakiery nie mają ekstremalnego krycia pozwolił im ładnie się zlać w gradiencie.

The gradient You can see here was made using two Dewi polishes: L39 (dark purple) and L01 (black). I applied them with a make-up sponge. The fact that these polishes don't have extreme coverage helped them to blend nicely in the gradient.


Do tego mani chciałam użyć wzór, który nadałby gotyckiego charakteru, więc sięgnęłam po dwie płytki MoYou London Gothic. Napis "love" na kciuku pochodzi z płytki MoYou London Gothic 06 a napis na reszcie paznokci z MoYou London Gothic 04. Odbiłam te wzory lakierem Sally Hansen Insta Dri Presto Pink i stemplem B. Loves Plates Crystal Clear.

For this manicure I wanted to use a design that would give it a Gothic character, so I reached for two of my MoYou London Gothic plates. The "love" sign on my thumb comes from MoYou London Gothic 06 plate and the inscription on the rest of my nails from MoYou London Gothic 04. I stamped these design with Sally Hansen Insta Dri Presto Pink and the B. Loves Plates Crystal Clear Stamper.


Płytki jakich użyłam możecie zobaczyć TUTAJ i TUTAJ. Pozostałe produkty są poniżej.

You can see the plates I used HERE and HERE. The rest of the products is below.


czwartek, 11 lutego 2016

Sweet Valentine's Day Manicure

Hej!

Walentynki coraz bliżej, więc zacznę Was atakować serduszkami jak reszta internetu. Mam nadzieję, że nie jest Wam jeszcze niedobrze od całego tego cukru i miłości ;)

Hey!

Valentine's Day is closer and closer, so I'll start attacking You with hearts like the rest of the internet. Hope You're not sick from all the sugar and love yet ;)


Kolor bazowy tutaj to Kiko 507 Blush. To idealny, nudziakowy, lekko brzoskwiniowy kolor. Nałożyłam dwie warstwy i tyle wystarczyło do pełnego krycia.

The base colour here is Kiko 507 Blush. It's a perfect, nude, slightly peachy colour. I applied two coats and that was enough to get full coverage.


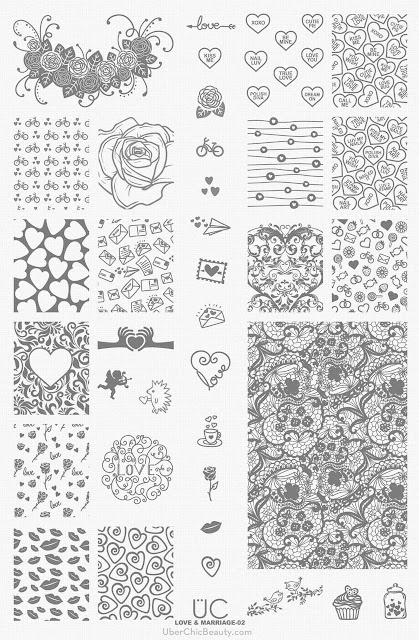
Wzór jaki odbilam pochodzi z płytki Uber Chic Love And Marriage-02. Jak tylko zobaczyłam tą płytkę i ten konkretny wzór od razu wiedzialam, że zrobię takie mani. To oczywisty wybór, ale strasznie mi się podoba!

The design I stamped here comes from Uber Chic Love And Marriage-02 plate. As soon as I saw this plate and this particular design I knew that I would do a manicure like this. It's an obvious choice, but I just love it!


Odbijałam wzór My Secret Dressed In Black i pokolorowałam go kilkoma przeźroczystymi tint'ami własnej roboty. Użyłam małej sondy żeby kolory były dokładnie tam gdzie chciałam.
I stamped the design with My Secret Dressed In Black and coloured it with a bunch of DIY sheer tints. I used a small dotting tool to get the colours precisely where I wanted them.


Poniżej możecie zobaczyć tą niesamowitą płytkę od Uber Chic..

Below You can see this amazing Uber Chic plate..

Źródło: http://uberchicbeauty.com/
.. i produkty jakich użyłam żaby stworzyć ten manicure.

.. and the products I used to create this manicure.


środa, 10 lutego 2016

Delicate Valentine's Day Manicure

Cześć :)
Wiecie jak bardzo lubie tematyczne mani, prawda? Halloween'owe mani są moimi ulubionymi, ale bożonarodzeniowe, wielkanocne, na Dzień Św, Patryka - kocham je wszystkie. Ostatnio internet jest pełny różu, serc i calusów ponieważ nadchodzą Walentynki. W pewnym momencie od calej tej słodyczy bolą mnie zęby, ale zawsze staram się zrobić choć kilka mani równiez na to święto.

Hi :)
You know how much I like themed manicures, right? Halloween manicures are my favourite, but Christmas, Easter, St. Patrick's Day - I love them all. Nowadays the internet is full of pinks, hearts and kisses because Valentine's Day is coming. At some point all that sugar makes my teeth ache, but I always try to make at least a few manicures for this holiday as well.


W tym roku zdecydowałam się zacząć serię Walentynkowych Mani czymś delikatnym i nie zbyt przytłaczającym. Wybrałam jasny odcień różu jako mój kolor bazowy. Widzicie tutaj trzy warstwy lakieru Colour Alike Maniurka.

This year I decided to start a series of Valentine's Day Manicures by something delicate and not too overwhelming. I choose a pale shade of pink for my base colour. What You see here are three coats of Colour Alike Maniurka.


Jedynym akcentem na moich paznokciach jest mały napis 'love' na palcu serdecznym. Wzorek odbiłam używając płytki Uber Chic Love And Marriage-02 oraz lakieru Sally Hansed Insta Dri Presto Pink.  To był też dzień w którym moja wielka kolekcja stempli była przydatna. Nie wiem dlaczego ale nie mogłam podnieść tego wzoru żadnym z moich przeźroczystych, marshmallow, silikonowych czy klejących stempli. Jedyny który się spisał to mój stary podwójny Konad. Normalnie nigdy nie mam problemów z płytkami Uber Chic. Może dzisiaj byl zły dzień, a może wzór jest tak specyficzny, pomyślałam jednak, że warto o tym wspomnieć (kiedy będziecie kupować 10ty stemple, pomyślcie o tym jak o dobrej inwestycji :D Może Wam się na prawdę przydać któregoś dnia ;)).

The only accent on my nails is a small 'love' sign on my ring finger. I stamped this design using Uber Chic Love And Marriage-02 plate and Sally Hansen Insta Dri Presto Pink. This was also a day when my enormous collection of stampers came in handy. I don't know why, but I couldn't pick up this design with any of my clear, marshmallow, silicone or sticky stampers. The only one that did well was my old Konad Double stamper. Normally I never have any issues with the Uber Chic plates. Maybe today was just a bad day or the design is so specific, but I thought it was worth mentioning (when you buy a 10th stamper, just think of it as a good investment :D You might really need it one day ;)).


Poniżej jest płytka jakiej użyłam do stworzenia tego mani..

Below is the plate I used to create this manicure..

Żródło: http://uberchicbeauty.com/
.. i produkty.

.. and the products.


wtorek, 9 lutego 2016

Projekt Tęcza II: Tydzień 5 - Granatowy

Project Rainbow II: Week 5 - Dark Blue

Cześć Wam!

Pamiętacie moje Jesienne Drzewka? To mani było dość łatwe do zrobienia i na prawdę podobało mi się jak wyszło. Zdecydowałam się zrobić coś podobnego na Projekt Tęcza II u Aggi eN na stronce Kociołek Romaitości. Tym razem jest to jednak zimowa wersja ;) Mam nadzieję, że spodoba Wam się tak samo jak poprzednia.

Hey there!

Do You remember my Autumn Trees? That manicure was quite easy to do and I really liked how it came out. I decided to do something similar for Aggi eN's Project Rainbow II on the site Kociołek Rozmaitości. This time it's a winter version though ;) I hope You'll like it just as much as the previous one.


Do zrobienia tego mani jako bazy użyłam Bell Glam Wear 701. Na pierwszy rzut oka  ten lakier wydaje się biały, ale tak na prawdę ma znaczącą kroplę niebieskiego albo szarego.. albo czegoś :D To bardzo unikalny kolor i nie mam podobnych w swojej kolekcji. Nałożyłam go w trzech cienkich warstwach.

To do this manicure as a base I chose Bell Glam Wear 701. This polish appears at first almost white, but it actually has a significant hint of blue or grey.. or something :D It's a very unique colour and I have no similar ones in my collection. I applied it in three thin coats.


Drzewka są odbite z płytki Qgirl-002 bardzo ciemnym granatowym kolorem - Essie Afret School Boy Blazer. Odbiłam ten wzór stemplem Creative Shop.

The trees are stamped from Qgirl-002 plate with a very dark blue colour - Essie Afret School Boy Blazer. I stamped this design with the Creative Shop stamper.


Kiedy moje drzewa był gotowe zaczęłam dodawać duże ilości kropek sondą. Zrobiłam je różnej wielkości i w różnych kolorach, ale wszystkie w chłodnych niebieskawych odcieniach. Są tu też białe kropki, ale na zdjęciach prawie całkiem zniknęły. Na żywo były dużo bardziej widoczne jako, że kolor bazowy nie jest tak na prawdę biały.

When my trees were ready I started adding lots of dots with a dotting tool. I made them in different sizes and in different colours, but all in cool blue-ish shades. There are also white dots here, but on the photos they almost entirely disappeared. In real life they were much more visible, as the base colour isn't really that white.


Poniżej możecie zobaczyć produkty jakich użyłam. Pominęłam lakiery użyte do kropek, bo było ich na prawdę sporo ;)

Below You can see the products I used. I skipped the polishes I used for the dots, because there was an awful lot of them ;)


Wszystkie mani podesłane na Projekt są publikowane w każdy poniedziałek na stronie Kociołek Rozmaitości.

All the manicures submitted for the Project are published every Monday on Kociołek Rozmaitości.

Projekt Tęcza II

sobota, 6 lutego 2016

Projekt Tęcza II: Tydzień 4 - Złoty

 Project Rainbow II: Week 4 - Gold

Cześć :)
Kolorem przewodnim w tym tygodniu Prokejtu Tęcza II jest Złoty. Zdecydowałam się na bardzo blady odcień złota. Na moich zdjęciach może on się nawet wydawać srebrny, ale w realu jest zdecydowanie złoty.

Hallo :)
This week's theme colour in Project Rainbow II is Gold. I decided to go with a very pale shade of gold. On my photos it might even appear silver, but in real life it was definitely gold.


Złoty lakier jakiego użyłam to Catrice The GlamoureX Factor. Powiedziałabym, że jest to foil, nie typowy metalik. Pociągnięcie pędzelka nie były mocno widoczne. Nałożyłąm dwie warstwy żeby uzyskać dobre krycie.

The gold nail polish I used is Catrice The GlamoureX Factor. I would say that it's a foil, not a typical metallic. The brush strokes weren't strongly visible. I applied two coats to get good opacity.


Kiedy baza była całkowicie sucha, przykleiłam na paznokcie trójkątne naklejki do zdobień, nałożyłam jedną warstwę czerni i zdjęłam naklejki. Robiąłm to po jednym paznokciu, żeby czerń nie wyschła za bardzo zanim odkleję naklejkę. Czerń jakiej użyłam to My Secret Dressed In Black.

When the base colour was completely dry, I stuck some triangle nail vinyls on my nails, applied one coat of black and took the vinyls of. I  did one nail at a time, so the black wouldn't dry too much before I peel of the vinyl. The black I used is My Secret Dressed In Black.


Ostatnim krokiem było nałożenie dwóch warstw top coat'u. Jednej Golden Rose Gel Look i jednej INM Out The Door.

The last step was applying two layers of top coat. One of Golden Rose Gel Look and one of INM Out The Door.


Mam nadzieję, że spodoba Wam się ta propozycja do projektu.

I hope You'll like this proposition for the project.


Poniżej możecie zobaczyć lakiery jakich użyłam.

Below You can see the polishes I used here.


Pozostałe zgłoszone mani będą opublikowane w poniedziałek na stronie Kociołek Romaitości.
The rest of the submitted manicures will be posted Monday on Kociołek Rozmaitości.


piątek, 5 lutego 2016

B. a Wenus

Hej!
Dzisiaj chcialabym pokazać Wam najwspanialszy lakier do stempli jaki kiedykolwiek widziałam. Tak, tak.. Wiecie już co to jest, prawda?

Hey!
Today I'd like to show You the most amazing stamping polish I've ever seen. Yes, yes.. You know what it is, don't You?


Lakier do stempli o którym piszę to Colour Alike B. a Wenus z kolekcji Galaxy Color Travel. Była to limitowana edycja złożona z trzech multichromów dedykowanych specjalnie do stempli: B. a Supernova, B. a Mars and B. a Wenus

The stamping polish I'm writing about is Colour Alike B. a Wenus from the Galaxy Color Travel collection. This was a limited edition composed of three multichromes dedicated especially for stamping: B. a Supernova, B. a Mars and B. a Wenus.


Każdy z tych lakierów wygląda niesamowicie na czarnej bazie, jest super kryjący, napigmentowany i świetnie się odbija. Każdy z nich zmienia też kolor w zależności od oświetlenia. Myślę, że udało mi się zlapać ten unikalny, multichromowy efekt całkiem dobrze. B. a Wenus jest różowy, złoty a nawet pomarańczowawy na brzegach wzoru. Wygląda na prawdę rewelacyjnie.

Each of these nail polishes looks amazing on a black base, is super opaque, pigmented and stamps great. Each of them also changes colours depending on lighting. I think I managed to catch this unique, multichrome effect quite well. B. a Wenus is pink, gold and even orangey on the edges of the design. It truly looks stunning.


Efekt ten nie był tani.. Lakiery z tej kolekcji były po 25zł za 8ml buteleczkę. Uwierzcie, że musiałam przemyśleć ten zakup kilkakrotnie. W końcu nie mogłam się oprzeć tym trzem dzieciątkom, ale był to dylemat. Nawet dla mnie :D

This effect didn't come cheap.. Polishes in this collection were 25zł per 8ml bottle. Believe me I had to think this purchase through various times. In the end I couldn't resist these three babies, but it was a struggle. Even for me :D


Krótko o reszcie mojego dzisiajszego mani: Nałożyłam dwie warstwy Essie Bahama Mama jako bazę. Wzór jaki odbiłam Colour Alike B. a Wenus pochodzi z płytki B. Loves Plates B.01 Geometry Is Perfect.

Shortly about the rest of my today's manicure: I applied two coats of Essie Bahama Mama as a base. The design I stamped with Colour Alike B. a Wenus comes from B. Loves Plates B.01 Geometry Is Perfect plate.


Poniżej możecie zobaczyć płytkę B. Loves Plates jakiej użyłam..

Below You can see the B. Loves Plates image plate I used..

Żródło: http://allegro.pl/show_user.php?uid=37818237

.. i dwa lakiery do paznokci.

.. and the two nail polishes.


wtorek, 2 lutego 2016

Miętowy Sweterek

Mint Sweater

Cześć,
pogoda na zewnątrz nie przypomina zimy, ale kalendarz nie kłamie. Ostatnio zdałam sobie sprawę, że nie zrobiłam w tym sezonie żadnego sweterkowego zdobienia, więc dopóki jeszcze mamy zime - oto mój pierwszy miętowy sweterek ;)

Hi,
the weather outside doesn't really resemble winter, but the calender doesn't lie. Lately I realized that I didn't do any sweater nail art's this season, so until we still have winter - here's my first mint sweater ;)


Piękny miętowy lakier jakiego tym razem użylam to Kiko Mint Milk. Potrzebowałam dwóch średnich warstw do całkowitego krycia, a aplikacja była bardzo łatwa. Wypróbowałam kilka lakierów Kiko i dalej mam w mojej kolekcji pare do przetestowania, ale jak na razie jestem pod wrażeniem ich jakości.
The beautiful mint polish I used this time is Kiko Mint Milk. I needed two medium coats to get full opacity and the application was super easy. I tried a few Kiko polishes and still have some more in my collection yet to try, but for now I'm really impressed with they're quality.


Sweterkowy wzór jaki wybrałam pochodzi z płytki B. Loves Plates B.05 Let It Snow. Odbiłam go za pomocą lakieru do stempli B. Loves Plates B. A Snow White i Stempla Uber Chic Sticky.

The sweater design I picked comes from B. Loves Plates B.05 Let It Snow plate. I stamped it using B. Loves Plates B. a Snow White stamping polish and Uber Chic Sticky Stamper.


Poniżej możecie zobaczyć płytkę B. Loves Plates..

Below You can see the B. Loves Plates image plate..

Żródło: http://allegro.pl/show_user.php?uid=37818237

.. i lakiery jakich użyłam.

.. and the polishes I used.