wtorek, 31 marca 2015

Różowy Kaleidoskop?

Pink Kaleidoscope?

Cześć,
Tym razem zdecydowałam się użyć kilku moich nowych zakupów. Jak już pewnie wiecie jestem trochę uzależniona od płytek do stempli MoYou London. Tutaj jedna z nowych w użyciu.

Hi,
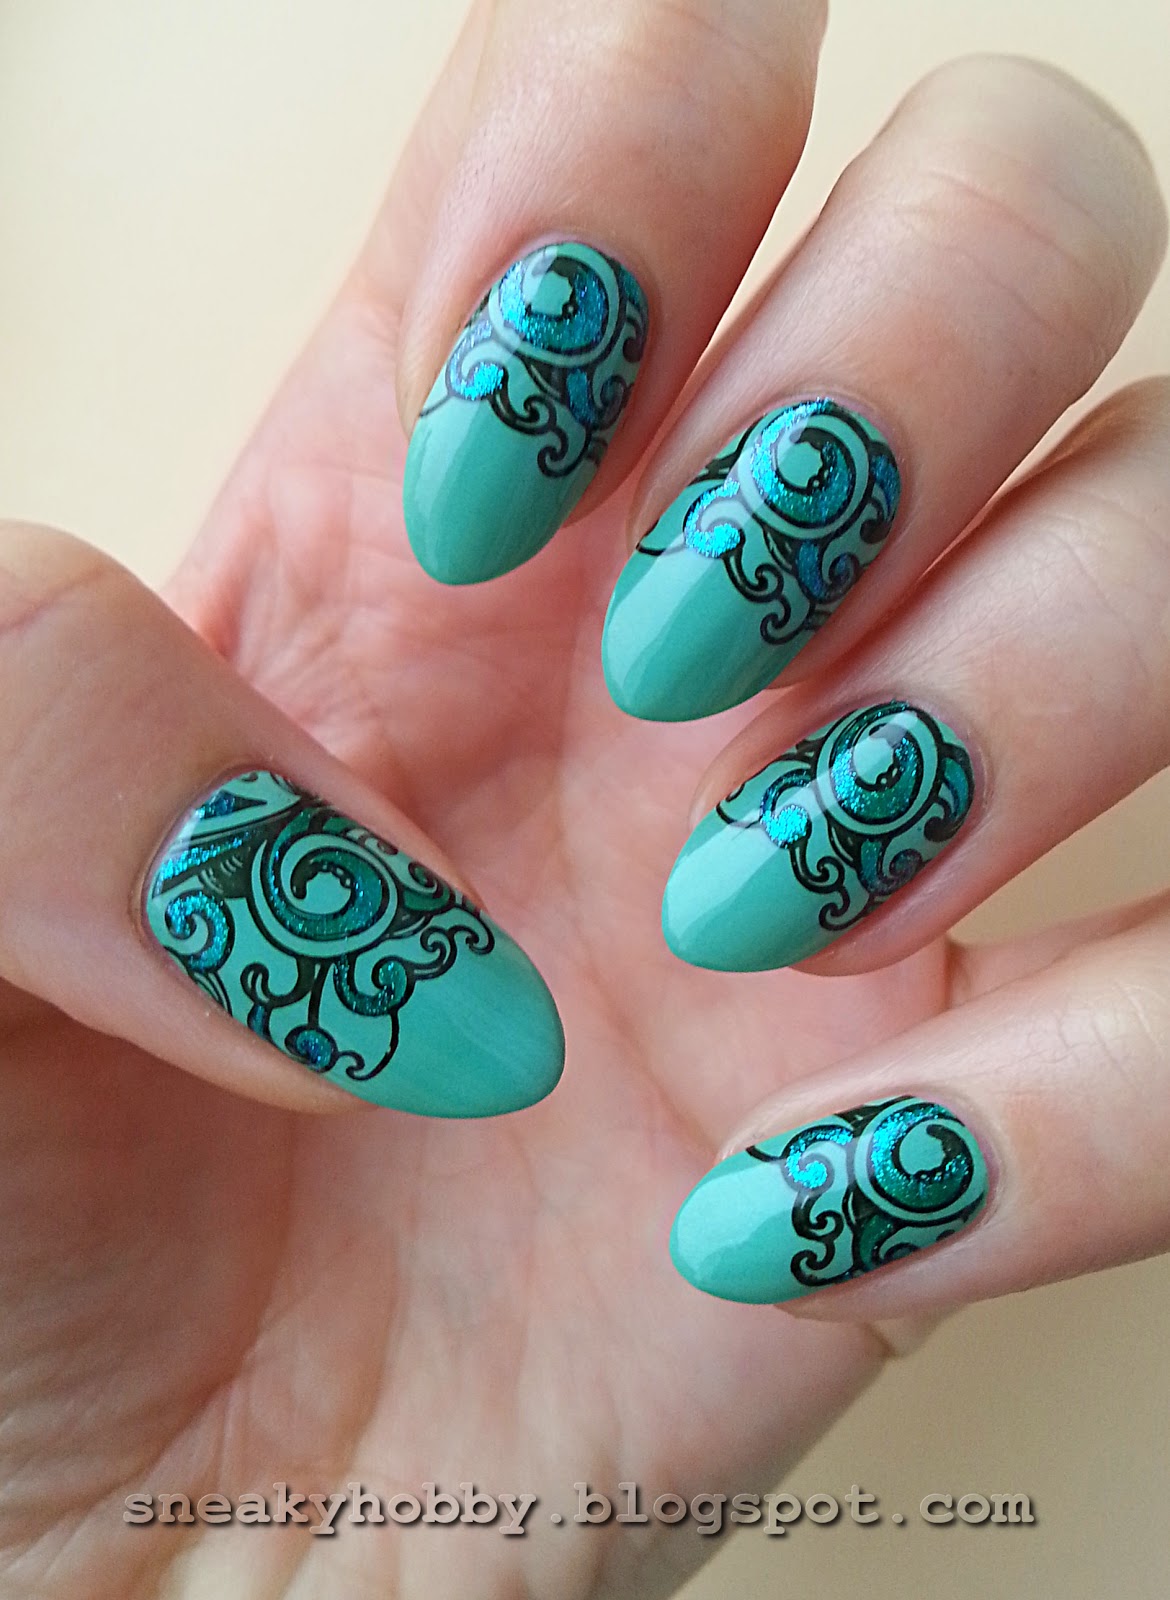
This time I decided to use some of my newest purchases. As You probably know by now I'm a bit addicted to MoYou London Image plates. Here's one of the new ones in use.


Kolor bazowy też jest całkiem nowy. Kupiłam Color Club Warhol z Euro Fashion i była to jedna z moich najlepszych decyzji. To niesamowity lakier! Mam nadzieje, że możecie zobaczyć neon w nim, w realu prawie świeci!. I wystarczyły tylko dwie warstwy. DWIE! Jak na neon to na prawdę fajnie, kocham go!

The base colour is also brand new. I got Color Club Warhol from Euro Fashion and it was one of my best decisions. It's an amazing polish! I hope You can see the neon in it, in real life it almost glows! And only two coats were enough. TWO! For a neon it's really nice, I love it!


Płytka jakiej użyłam tutaj to MoYou London Kaleidoscope 06. Do tej pory nie mogłam odbijać horyzontalnych wzorków prosto. Używałam twardszych stempli (marshmellow'e są tutaj na prawdę trudno dostępne) i zawsze rolowałam wzór z jednej strony paznokcia na drugą. Na prawdę trudno go w ten sposób ustawić prosto. Teraz moje zmartwienia się skończyły, Stempel Creative Shop skrócił moje cierpienie!

The image plate I used here is MoYou London Klaeidoscope 06. Until now I couldn't stamp horizontal designs straight. I used firm stampers (the marshmallow ones are really hard to get here) and I always rolled the design from one side of the nail to the other. It's really difficult to place it straight this way. Now my worries are over, the Creative Shop Stamper put me out of my misery!


Nie łatwo było dostać Stempel CS, w końcu kupiłam go ze sklepu Hypnotic Polish. Myślę, że napiszę jego recenzję w osobnym poście, ale moje pierwsze wrażenia są świetne. Działał od razu, prosto z pudełka. Jest super miękki i (co było dla mnie najważniejsze) mogę łatwo wcisnąć w stempel paznokieć. Tego właśnie szukałam, to najlepszy sposób żeby umieścić wzór tam gdzie chcę. Mogę teraz odbijać horyzontalne wzorki idealnie!

It wasn't easy to get the CS Stamper, in the end I bought it from Hypnotic Polish. I think I'll write a review of it in a separate post, but I can say that my first impressions are great. It worked right away, straight from the box. It's super soft and (what was most important for me) I can easily press my nail into the stamper. That's what I was looking for, it's the best way to get the design in the exact place I want to. I can stamp all the horizontal designs perfectly now!


Czarny lakier jakiego użyłam do stempli to My Secret 121. Na wierzchu, jak zwykle nałożyłam Golden Rose Gel Look i INM Out The Door.

The black polish I used for the stamping here was My Secret 121. On top, as always I applied Golden Rose Gel Look and INM Out The Door.


Poniżej możecie zobaczyć użyte produkty.

Below You can see the used products.


sobota, 28 marca 2015

Inspired by...

Cześć Wszystkim!
Ostatnio widziałam mani, które zaparło mi dech w piersi. Było taaaaakie ładne i należy do Ewlyn z Polish My Nail. Od razu wiedziałam, że któregoś dnia zrobię takie na swoich paznokciach, a na razie mam coś inspirowanego nim ;)

Hi Everyone!
Lately I saw a manicure that took my breath away. It was sooooo beautiful and it belongs to Ewlyn from Polish My Nail. Right away I knew I was going to do it on my nails someday, but for now I have something inspired by it ;)


Wiem, wiem :) Moje mani jest całkiem inne niż Ewlyn. Kolory są jaśneijsze, wzorek nie jest taki sam.. Ale wpadłam na nie po obejrzeniu jej manicuru i dla mnie są pewne podobieństwa.

I know, I know :) My manicure is totally different than Ewlyn's. The colors are lighter, the design isn't the same.. But I came up with it after seeing her manicure and for me there are some similarities.


Kolor bazowy jakiego użyłam to Kaleidoscope t-22. To lakier termalny i zależnie od temperatury moich paznokci zmienia się z jasnego różowawego koloru w o wiele bardziej chłodny, trochę szarawy fiolet. Możecie zobaczyć "ciepły" kolor na zdjęciu z butelką lakieru powyżej, a "chłodny" kolor poniżej. Stał się nawet chłodniejszy i ciemniejszy w bardzo niskiej temperaturze (zima w Polsce). To mój nowy nabytek, kupiłam go razem z paroma innymi rzeczami na stronie Hypnotic Polish.

The base colour I used is Kaleidoscope t-22. It's a thermal nail polish and depending on my nails temperature it shifts from a light pinkish colour to a way cooler toned, a bit greyish violet. You can see the "warm" colour on the photo with the bottle of polish above and the "cold" colour below. It got even cooler and darker in a lower temperature (winter in Poland). This is my new purchase, I got it with some other things on the Hypnotic Polish site.


Następną nową rzeczą w mojej kolekcji są lakiery do stempli Mundo de Unas. To mani jest moją pierwszą próbą i użyłam MdU Purple. Jak widzicie rezultat jest całkiem niezły. Rzeczy jakie czytałam o tych lakierach potwierdziły się tutaj. Są super napigmentowane, bardzo żywe nawet na czerni i całkowicie inne od wszystkich. Konsystencja jest inna, inaczej schną i inaczej się odbijają. Sama technika jest ważna.. Słyszałam też, że top coaty których moja koleżanka używała na stemple, rozmazują wzorki MdU. W moim wypadku musiałam być bardziej ostrożna, ale udało mi się użyć Golden Rose Gel Look jak zawsze. To moje pierwsze wrażenia, pewnie napiszę coś więcej o nich z upływem czasu.

The next new thing in my collection are Mundo de Unas stamping polishes. This manicure was my first try and I used MdU Purple. As You can see the result is quite nice. The things I read about these polishes affirmed here. They are super pigmented, really vibrant even on black and totally different than any other. The formula is different, they dry different and they stamp different. The technique alone is important.. I also heard that top coats that a friend of mine always used on stamping, smudged MdU designs. In my case I had to be more careful, but I still managed to use Golden Rose Gel Look as always. This are my first impressions, I'll probably write some more about them in time.


Płytka jakiej użyłam do stempli to Bundle Monster BM-XL 13. Bundle Monster na prawdę mi dogodziło tworząc płytki XL. Zakochałam się w niektórych ich wzorach, ale były za małe na moje paznokcie. Teraz nie muszę się martwić, wzorki całopaznokciowe mają! Płytkę możecie znaleźć TUTAJ.

The plate I used for stamping is Bundle Monster BM-XL 13. Bundle Monster really made my day creating XL plates. I loved some of their designs, but they were mostly too small for my nails. Now I don't have to worry, the full nail designs are ! You can find the plate HERE.


Rzeczą która upodabnia moje mani do mani Ewlyn to kropki dodane do stempli. Są o wiele jaśniejsze niż reszta mani, więc się wyróżniają. Do ich zrobienia użyłam sondy i lakieru China Glaze Bottoms Up. Nie wpadłabym na ten pomysł gdyby nie Ewlyn, więc dzięki wielkie! Wygląda to na prawdę świetnie i od tej pory będę robić mani takie jak ten bardzo często :)

The thing that makes my manicure similar to Ewlyn's are the dots added to my stamping. They're much brighter than the rest of the manicure, so they stand out. To make them I used a dotting tool and China Glaze Bottoms Up nail polish. I wouldn't have come up with the idea if it wasn't for Ewelyn, so thanks a lot! It looks really great and I think I'll be doing manicures like this one very often from now on :)


Dzisiaj zrobiłam też pasujący makijaż.

Today I did a matching make-up too.


wtorek, 24 marca 2015

Mustache Manicure

Tym razem mam dla Was wąsate mani :) Oryginalnie zrobiłam to mani na potrzeby odznaczenia Nailpolis, ale na prawdę spodobał mi się motyw. Mani jest humorystyczne i w jakiś sposób jednocześnie eleganckie. Myślę, że moje odczucie elegancji jest spowodowane kolorami, ale mimo wszystko ;)

This time I have a mustache manicure for You :) I originally did this one for the Nailpolis badge, but I really enjoyed the theme. The manicure is humoristic and somehow elegant at the same time. I think the elegant feeling I got is because of the colours, but still ;)


Dwa kolory jakich użyłam to moje nowo zakupione lakiery Essie. Ciemniejszy to Essie Fierce, No Fear i jest on bardziej brązowy w realu. Może nie czekoladowy, ale mniej szarawy niż na moich zdjęciach. To bardzo przyjemny lakier, nakładał się gładko i potrzebowałam dwóch warstw do krycia.

The two colours I used are me newly bought Essie polishes. The dark one is Essie Fierce, No Fear and it's more brown in real life. Maybe not chocolate, but less greyish than in my photos. It's a very pleasant polish, it applied smoothly and I needed two coats for coverage.


Jaśniejszy kolor to Essie Urban Jungle, tego potrzebowałam trzech warstw. Był nieźle napigmentowany, ale zdołałam sobie zrobić kilka przeźroczystych placków.

The lighter colour is Essie Urban Jungle, with this one I needed three coats. It was nicely pigmented, but I managed to get some sheer spots.


Wąsy to naklejki i zasadniczo kupiłam je przez przypadek. Chciałam naklejki wodne, ale wzięłam zwykłe zamiast nich. Kupiłam je w Born Pretty Store. Żeby kompozycja była bardziej spójna dodałam kropki na ciemniejszych paznokciach lakierami My Secret 121 i Essie Urban Jungle.

The mustashes are nail stickers and I actually bought them by mistake. I wanted water decals, but I got these instead. I got them in Born Pretty Store. To make the composition more consistent I added dots on the darker nails with My Secret 121 and Essie Urban Jungle.


Poniżej są lakiery i naklejki jakich użyłam.

Below are the nail polishes and the stickers I used.


sobota, 21 marca 2015

All In Black

Cześć.
miałam trochę wątpliwości przed opublikowaniem tego mani. To moja pierwsza próba tego typu zdobienia i zasadniczo nie wiem czy mi pasuje. Ale cóż, to coś co zostawię Wam do oceny :) Proszę powiedzcie co myślicie, ja potrafię być subiektywna w stosunku do mojej własnej pracy.

Hey,
I had some doubts before posting this manicure. It was my first try of this kind of nail art and I don't really know if it suits me. But well, that's something I leave You to grade :) Please tell me what You think, I can be very subjective towards my own work.


Zaczęłam od zrobienia czarnego french'a. Użyłam samoprzylepnych pasków żeby każda końcówka paznokcia była taka sama. Paski mają bardzo fajny kształt, dostosowany do migdałkowych paznokci. Możecie je znaleźć TUTAJ. Czarny lakier, który tu widzicie to My Secret 121.

I started by making a black french manicure. I used stick-on stripes to make the tips even on each nail. The stripes have a very nice shape adjusted to the almond nails. You can find them HERE. The black polish You see here is My Secret 121.


Kiedy końcówki całkowicie wyschły zaczęłam odbijać kwiatowy wzór. Szukałam wzorku, który imitowałby kwiatowe, koronkowe rajstopy. Myślę, że ten się sprawdził. Pochodzi z płytki MoYou London Tourist 07 i odbiłam go również lakierem My Secret 121.

When the tips were totally dry I started stamping the floral pattern. I searched for a design that would imitate floral, lace tights. I think this one did the trick. It comes from MoYou London Tourist 07 plate and I stamped it with My Secret 121 as well. 

W tym momencie musiałam pokryć paznokcie topem Golden Rose Gel Look żeby nie rozmazać wzoru malując moim domowym, czarnym tint'em. Patrząc teraz na mani myślę, że mogłam po prostu odstemplować wzór na końcu, po nałożeniu tint'a. Myślę, że sprawdziłoby się to tak samo dobrze.

At this point I had to cover my nails with Golden Rose Gel Look top coat in order not to smudge the design when I paint the nails with my home made black tint. Looking at the manicure now I think I could have just stamped the design in the end, after I put the tint. I think it would work just as good.


Główny trik w tym typie mani to przezroczysty tint sprawiający, że mani wygląda tak interesująco. Swój zrobiłam z zapachowego top coatu Essence o nazwie Fruity. Dodałam tylko kilka kropli czarnego lakieru do paznokci. W moim przypadku był to O.P.I. Black Onyx. Dodałam też dwie kulki mieszające żeby łatwiej połączyć całość. Na moich paznokciach możecie zobaczyć trzy warstwy tint'a.

The main trick of this type of manicure is the sheer tint that makes the manicure look so interesting. I made mine from a Essence scented top coat called Fruity. I just gave it a few drops of a black nail polish. In my case it was O.P.I. Black Onyx. I also added two mixing balls to combine the two easier. And voila! On my nails You can see three coats of the tint.


Poniżej możecie zobaczyć czego użyłam.

Below You can see what I used.


czwartek, 19 marca 2015

REVIEW: Born Pretty Store Image Plates

Dzisiaj przybywam do Was z małą recenzją. Jakiś czas temu Born Pretty Store zaczęło sprzedawać własne płytki do stemplowania. Dostałam kilka do recenzji, więc oto ona!

Today I come to You with a little review. Some time ago Born Pretty Store started to sell their own stamping image plates. I received a few for review, so here it goes!


Trzy pierwsze płytki jakie chciałabym Wam pokazać to BP-15, BP-28 i BP-36. Wszystkie płytki Born Pretty są pokryte niebieską, plastikową folią, która powinna zostać zerwana przed stemplowaniem. Oto jak to wygląda:

The first three plates I wan to show You are BP-15, BP-28 and BP-36. All Born Pretty plates are covered with a blue, plastic seal, which should be peeled off before stamping. Here's how it looks like:


Druga strona wszystkich płytek ma biały, papierowy tył ze stroną internetową sklepu. Każda osobną płytka kosztuje 2,99$, ale często są w cenie promocyjnej. Można je też kupić w zestawach.

The other side of all plates has a white, paper backing with the store's internet site. Each separate plate costs 2,99$, but their often in promotional price. You can also buy them in sets.

Pierwsza płytka to BP-15 i nazywa się Marilyn Monroe Pattern. Możecie ją znaleźć TUTAJ. Ta płytka ma trzy małe wzorki (ok. 1cm x 1cm), trzy całopaznokciowe (2,0cm x 1,5cm i 1,6cm x 1,3cm) i jeden trochę większy (ok. 4,0cm x 2,0cm). Poniżej możecie zobaczyć każdy wzór na kartce papieru. Do stemplowania użyłam czarnego lakieru My Secret 121 i stempla MoYou.

The first plate is BP-15 and it's named Marilyn Monroe Pattern. You can find it HERE. This plate has three little images (ca. 1cm x 1cm), three whole nail images (2,0cm x 1,5cm and 1,6cm x 1,3cm) and one that's a bit larger (ca. 4,0cm x 2,0cm). Below You can see each design on a piece of paper. For the stamping I used My Secret 121 black polish and MoYou stamper.


Wszystkie wzory odbiły się na prawdę ładnie. Tylko ten z ptakiem nie jest całkiem szczegółowy, ale i tak wygląda moim zdaniem dobrze. Myślę, że może wymagać miększego stempla albo innego lakieru. Jest wiele możliwości.

ll the designs stamped really nice. Only the one with the bird is not quite detailed, but still looks good in my opinion. I think it might need a softer stamper or a different nail polish. There are many possibilities.

Następna płytka to BP-28 i nazywa się Mixed Abstarct Pattern. Możecie ją znaleźć TUTAJ. Ta płytka podzielona jest na cztery części, każda część to wycinek koła o promieniu 2,5cm i zawiera jeden wzór. Już pisałam trochę o tej płytce TUTAJ. Poniżej możecie zobaczyć wzorki na papierze.

The next plate is BP-28 and it's named Mixed Abstarct Pattern. You can find it HERE. This plate is divided in four parts, each part is a sector of a circle that has a 2,5cm radius and contains one design. I already wrote a few words about this plate HERE. Below You can see the designs shown on paper.


Użyłam tego samego stempla i lakieru jak poprzednio.Rezultat jest satysfakcjonujący. Na prawdę podoba mi się kwiatowy wzór z tej płytki, jest taaaaki ładny.

I used the same stamper and nail polish as before. The result is satisfying. I'm really loving the floral design from this plate, it's soooo pretty.

Ostatnia płytka na dziś to BP-36, płytka France. Jak tylko ją zobaczyłam wiedziałam, że muszę ja mieć. Możecie ją znaleźć TUTAJ. Ta płytka ma jeden całopaznokciowy wzór (1,9cm x 1,5cm) i osiem mniejszych wzorków (ok. 1-1,5cm x 1cm). Możecie zobaczyć każdy na dole, odbite w taki sam sposób jak pozostałe wyżej.

The last plate for today is BP-36, the France plate. As soon as I saw this one I knew I had to get it! You can find it HERE. This plate has one full nail design (1,9cm x 1,5cm) and eight smaller designs (ca. 1-1,5cm x 1cm). You can see each one below, stamped the same way as the others above.


Ta płytka również mnie nie zawiodła. Napisy maja kilka pustych plamek, ale sa one prawie niezauważalne.

This plate also didn't disappoint me. The inscriptions have a few blind spots, but their almost unnoticeable.

Chciałabym pokazać Wam kilka mani jakie zrobiłam z użyciem tych płytek.

I'd like to show You a few manicures I made using these three image plates.

All In One
Morskie Fale


Valentine's Day Manicure
Paris, Paris..


Pamiętajcie, że w czasie zakupów w sklepie Born Pretty Store możecie dostać 10% rabat z kodem HMG10 z mojego bloga. Przesyłka jest darmowa!
 
Remember that while shopping in Born Pretty Store You can get a 10% discount with the code HMG10 from my blog. The shipping is free!

niedziela, 15 marca 2015

Energetyczne Połączenie!

Energetic Compound!

Cześć,
dzisiejsze mani jest super optymistyczne i energrtyczne. Jestem ostatnio strasznie zmęczona i przydałoby mi się trochę dodatkowej siły.

Hi,
today's manicure is super optimistic and energetic. I'm really tired lately and I could use some extra power.


Bazą jaką tutaj użyłam jest Kiko 336 Electric Blue. To jedno z moich nowych dzieci, ostatnio kupiłam kilka lakierów Kiko na próbę. Ten na prawdę mnie zaskoczył. Na początku jak zobaczyłam butelkę to pomyślałam, że to tylko niebieski.. Na paznokciach zrobił się z niego electric blue, a aplikacja była taaaaaaka fajna. Formuła była gładka i przyjemna. Byłam na prawdę z niej zadowolona. Użyłam dwóch warstw w tym mani.

The base coat I used here is Kiko 336 Electric Blue. It's one of my new babies, I got a few Kiko polishes lately to try them out. This one really surprised me. At first when I saw the bottle I thought that it's just a blue.. On the nails it became electric and the application was sooooo good. The formula was smooth and pleasant. I was really happy with it. I used two coats in this manicure.


Żeby to mani było czymś więcej użyłam neonowego brokatu od Claire's - Digi Pop. To połączenie było niesamowite. Nosiłam je z wielką przyjemnością. Glitter był trochę kłopotliwy w nakładaniu jednolicie na paznokcie, ale było to wykonalne. Kiedy miałam miejsca bez brokatu po prostu używałam sondy żeby umieścić poszczególne cząstki glitteru precyzyjnie gdzie chciałam.

To make this manicure something more I used a neon glitter from Claire's - Digi Pop. This combo was amazing. I wore it with great pleasure. The glitter was a bit tricky to get it evenly on my nails, but it's manageable. When I had no glitter spots I just used a dotting tool to place individual particles of glitter precisely where I wanted.


Całość była pokryta jedną warstwą bezbarwnego lakieru i jedną INM Out The Door. Te dwie sprawiły, że powierzchnia była idealnie gładka.

The whole thing was covered with one layer of clear nail polish and one of INM Out The Door. These two made the surface perfectly smooth.


Mam nadzieję, że spodoba Wam się tak jak mi. Poniżej możecie zobaczyć dwa lakiery jakich użyłam.

Hope You like it as much as I did. Below you can see the two nail polishes I used.


sobota, 7 marca 2015

Vintage Letter

Cześć Wszystkim,
dzisiaj mam mani, które miałam w głowie od bardzo długiego czasu. Widziałam kiedyś coś takiego w internecie i od tego momentu miałam ochotę wypróbować.

Hi Everyone,
today I have a manicure I had in my head for a very long time. I saw something like this on the internet once and wanted to try it ever since.


Głównym kolorem jakiego użyłam jest Orly Glow. Nałożyłam dwie warstwy i to było akurat wystarczająco żeby pokryć moje paznokcie. Myślę, że mogę mieć zamiennik tego koloru gdzieś w mojej kolekcji Essie, ale nie jestem pewna. Muszę kiedyś zrobić porównanie.

The main colour I used here it Orly Glow. I applied two coats and it was just enough to cover my nails. I think I could have a dupe of this colour somewhere in my Essie collection, but I'm not sure. I'll have to make a comparison someday.


Następną rzeczą jaką zrobiłam był całopaznokciowy, stemplowy wzorek. Użyłam płytki MoYou London PRO XL 07 i lakieru China Glaze Street Chic. Jak widzicie ChG odbiła się całkiem dobrze.

The next thing I did was the full nail stamping. I used MoYou London PRO XL 07 image plate and China Glaze Street Chic. As You can see ChG stamped pretty well.


Róże na wierzchu zrobione były dwoma kolorami. Najpierw namalowałam okrągłe plamy lakierem Sally Hansen Insta Dri Presto Pink, a potem odstemplowałam czerwone róże. Użyłam do tego lakieru Sally Hansen Insta Dri Rapid Red, a wzorek pochodzi z płytki MoYou London Mother Nature 11.

The roses on top were made with two colours. First I painted round marks with Sally Hansen Insta Dri Presto Pink and then I stamped the red roses. I used Sally Hansen Insta Dri Rapid Red for that, and the design comes from MoYou London Mother Nature 11 image plate.


Całość pokryłam Golden Rose Gel Look żaby nie rozmazać wzorków i INM Out The Door dla szybszego schnięcia.

The whole thing is covered with Golden Rose Gel Look so I wouldn't smudge the designs and INM Out The Door for faster drying.


Mam nadzieję, że Wam się spodoba!

Hope You like it!


Poniżej możecie zobaczyć lakiery jakich użyłam.

Below You can see the polishes I used.